Scanning Documents and Storing the Scanned Data in the Machine
You can store the scanned documents in the machine, and then check the documents and send them.

You can specify a password for each stored file. We recommend that you protect stored files from unauthorized access by specifying passwords.
Scan file stored in the machine may be lost if some kind of failure occurs. We advise against using the internal storage to store important files. The supplier shall not be responsible for any damage that may result from the loss of files.
When [Auto Delete File in Document Server] is enabled, documents stored on the machine will be automatically deleted after the set number of days or time has passed.
Settings for Administrator
Press [Scanner] on the Home screen.

Press
 , and then select [Store File].
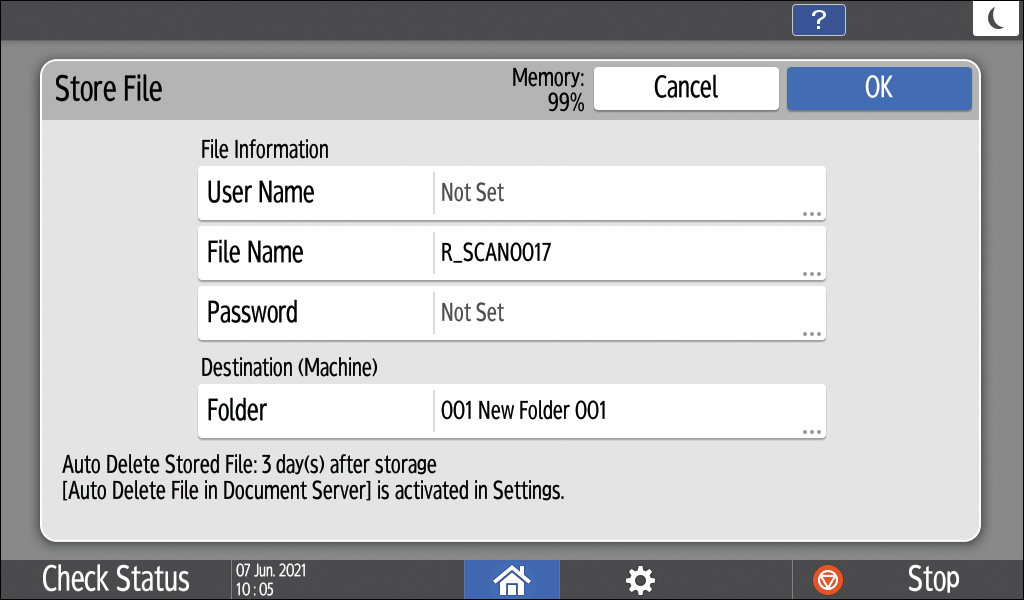
Set the information of the document storage destination.

User Name: Specify the user name displayed as the owner of the document. Select a user from the address book or enter the name. Documents can be stored even if a user name is not set.
File Name: Specify the name of the scanned document. If you do not specify the file name, a name such as "R_SCAN0001" or "R_SCAN0002" is assigned automatically.
Password: Specify the password required for printing the document. You can specify a number of 4 to 8 digits as the password. Documents can be stored even if a password is not set.
Folder: Specify the folder in which to save documents. You can also create a new folder.
After completing the settings, press [OK].
Place the original on the scanner.
Placing an Original to ScanSpecify the scan settings according to the purpose of the scanned data.
Scanning an Original with Suitable Quality and Density
Specifying the File Type or File Name When Scanning a DocumentSet the destination to which to send documents at the same time as they are stored.
Scanning Documents and Sending the Scanned Data by E-mail
Scanning Documents and Sending the Scanned Data to a Folder
Press [Start].
Press [Reset] after storing all the originals.

[Access Privileges] appears instead of [User Name] in the following cases. In this case, access privileges for documents can be set for each user and group.
When basic authentication, Windows authentication, or LDAP authentication is enabled
When authentication management of the scanner is enabled in [Application Authentication Management]
Logged in as a user, file administrator, or an administrator who has custom privileges equal to those of the file administrator
You can check stored documents on the preview screen, and delete or edit them, such as by changing their password.
Press [Scanner] on the Home screen.

Press [Send Settings] on the scanner screen.
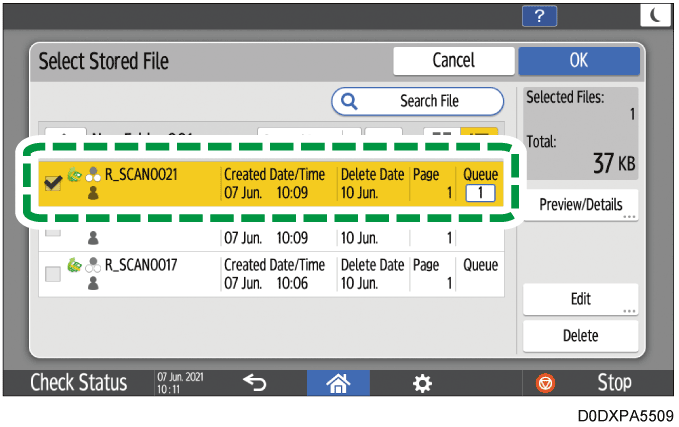
Press [Select Stored File].

If you cannot press [Select Stored File], press [Reset].Press [Open] for the folder where the document that you want to confirm or send is saved.

To create a new folder, press [Folder Create].Operate/send stored documents.

To send stored documents
Select the document you want to send, and then press [OK].
Set a destination and send the document, and then press [Start].
Scanning Documents and Sending the Scanned Data by E-mail
Scanning Documents and Sending the Scanned Data to a Folder
To check stored documents on the screen
Select the document you want to check, and then press [Preview/Details].
After confirming the document, press [Exit].
To edit stored documents
Select the document you want to edit, and then press [Edit].
You can change the user name or set a password.After editing the document, press [Exit].
To delete stored documents
Select the document you want to delete, and then press [Delete].
Press [Delete] on the confirmation screen.