Basic Procedure for Copying Documents
Set the original on the original table to make a copy.
Get the output basket ready in advance. For details, see the following section:
You can specify output locations for originals. If the rear original stackers are installed, originals are ejected onto the original stackers. If the rear original stackers are not installed, the originals are ejected onto the original output guides. You can use stacker support to eject the originals to the front side. For details about specifying output locations for originals, see the following section:
Output Locations for Originals
Basic Original Orientation
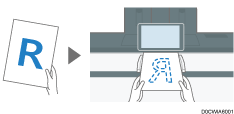
Place the original face down in a readable orientation.
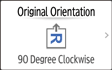
If the Originals Cannot Be Set in the Readable Orientation
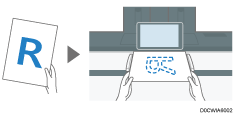
If the originals cannot be set in the readable orientation, rotate the original clockwise 90 degrees and place it face down, and then specify [Original Orientation].

If the previous setting is still active, press [Reset] before copying.
 Press [Copy] on the Home screen.
 Select the color mode on the Copy screen.

 Press [
 ] or [
 ] in [Quantity] to specify the number of copies.
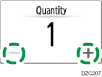
You can enter this using the keyboard after pressing [Quantity] or a number.
 Press the paper input location select key, and then select the paper input location and paper size to use as necessary.
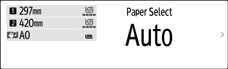
When you select [Auto Paper Select], the paper suitable for the original is selected automatically. When the orientations of the original and paper in the paper input location do not match, the machine rotates the copied image 90 degrees automatically.
If the size of the original is not detected properly or when you make a copy on paper of a special size, specify the paper input location in which the paper to use is loaded.
When making full size copies in A4 or B4 JIS size paper using the Rotate Copy function, place originals in the
 orientation and load paper in the
  orientation.
When you specify the length to cut the paper loaded in the paper input location, see the following section:
 Press [Original Orientation], and then specify the original orientation.
If the key is not displayed, select it from [Original Setting].
When you place the original in a readable orientation, this setting is not necessary if [Readable Direction] is displayed on the key.
 Specify the Original Orientation.
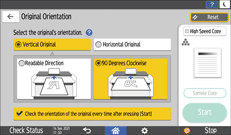
Depending on the settings, the screen shown above is displayed when you place an original or press [Start]. If you do not want this screen to appear when you place originals or press [Start], clear the [Check the orientation of the original every time after pressing [Start]] check box.
 Place the original.
Placing Originals on the Original Table
The original is fed into the machine automatically, and copying starts. If the original is not fed automatically, press [Start].
Do not pull or push an original forcibly while scanning it.
You cannot place the original in the
orientation when copying onto A0 (E), B1 JIS, 30 × 21, or 30 × 42 size paper. Instead, place the original in the orientation and specify the original orientation in [Original Orientation].When copying multi-page originals or the back sides of the originals, place the original again. Press [Finish Scn] after scanning all of the originals if necessary according to copy settings.

The factory–default configuration is for copying to starts by just placing the original. You can change the setting so that copying starts after you press [Start].
Originals scanned when no paper is loaded or when an error has occurred will be copied automatically when the machine is ready to execute copying.
To stop the original feeding in, press the [Scanner Stop] key.
When the machine is printing on paper that requires a long time for the ink to dry, such as translucent (vellum) paper, wait until each job has finished printing before loading the next original. If you load the next original while the machine is printing, the original might touch the printout and be stained with ink.
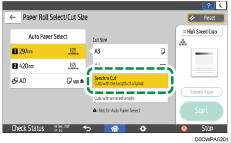
Specifying the Length of Copy Paper Cut
Specify the length to cut the paper loaded in the paper input location. The paper loaded in the paper input location is cut and delivered after copying.
There are three types of applications that paper cut methods as described below.
Synchro Cut
Preset Cut
Variable Cut
When you use the paper that loaded into the paper bypass location, you cannot use this function.
Synchro Cut
Cuts the paper at the same length as the original. If the copy is enlarged or reduced, the machine calculates the appropriate length for the magnification ratio and cuts the paper.
Press [Copy] on the Home screen.
Press the paper input select key, and then select Paper Input Location 1 or 2.
Press [Synchro Cut].
Place the original.
Basic Procedure for Copying Documents
The original is fed into the machine automatically, and copying starts. If the original is not fed automatically, press [Start].
You cannot specify Synchro Cut together with Stamp function.
You can copy with a margin when Synchro Cut is specified.
Depending on the original length and paper type, copy paper length may be different from the original.
Preset Cut
Cuts the paper at a preset size, regardless of the size of the original. You can use this to copy different sized originals to the same size.
Press [Copy] on the Home screen.
Press the paper input select key, and then select Paper Input Location 1 or 2.
Select a preset cut size.
Place the original.
Basic Procedure for Copying Documents
The original is fed into the machine automatically, and copying starts. If the original is not fed automatically, press [Start].
The preset cut size differs depending on the paper roll width. It is cut in the following sizes.
 (mainly Europe and Asia)
Paper roll width
Preset
Preset
841 mm
A0
A1
594 mm
A1
A2
420 mm
A2
A3
297 mm
A3
A4
728 mm
B1 JIS
B2 JIS
515 mm
B2 JIS
B3 JIS
364 mm
B3 JIS
B4 JIS
914 mm
36 × 48
24 × 36
880 mm
1,189 mm
594 mm
800 mm
1,189 mm
594 mm
707 mm
1,000 mm
500 mm
680 mm
841 mm
420 mm
660 mm
841 mm
420 mm
625 mm
880 mm
440 mm
620 mm
880 mm
440 mm
490 mm
594 mm
297 mm
440 mm
594 mm
297 mm
 (mainly North America)
Engineering
Paper roll width
Preset
Preset
34 inch
34 × 44
22 × 34
22 inch
22 × 34
17 × 22
17 inch
17 × 22
11 × 17
11 inch
11 × 17
81/2 × 11
Architecture
Paper roll width
Preset
Preset
36 inch
36 × 48
24 × 36
30 inch
30 × 42
21 × 30
24 inch
24 × 36
18 × 24
18 inch
18 × 24
12 × 18
12 inch
12 × 18
9 × 12
Others
Paper roll width
Preset
Preset
15 inch
15 × 20
-
14 inch
-
81/2 × 14
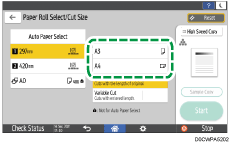
Variable Cut
Cuts the paper to the size entered.
Press [Copy] on the Home screen.
Press the paper input select key, and then select Paper Input Location 1 or 2.
Press [Variable Cut].
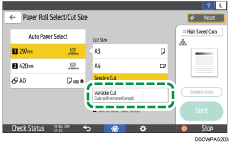
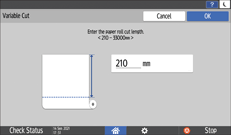
Enter the length to cut the roll paper, and the press [OK].
Place the original.
Basic Procedure for Copying Documents
The original is fed into the machine automatically, and copying starts. If the original is not fed automatically, press [Start].
The minimum cut length is 210 mm (8.3 inches), and the maximum length is 33,000 mm (1299.2 inches) for plain paper of 841 mm (34 or 36 inches) or more in width. For other paper, the maximum length is 3,600 mm (141.8 inches). If the length you specify exceeds the maximum, the paper will be fed in at a slant, resulting in poor copy quality and wrinkled paper.
When copying originals that are larger than A0 (E), make sure that there is enough ink to finish the job. If the ink runs out while copying, and new ink is added, copying starts from the beginning, not from where it stopped.
When copying originals that are larger than A0 (E) onto two or more sheets of paper, it takes time until the next copy starts.
Scanning the Original at a Certain Width
The machine scans using a predetermined width, regardless of the actual width of the original (Wide Scan).
You can copy a custom size original without specifying its horizontal and vertical sizes.
Position of printout when [Wide Scan] is not selected. | Position of printout when [Wide Scan] is selected. | |
|---|---|---|
When an original is smaller than the paper:  | The image is printed on the top left area of the paper.  | The image is printed on the top center area of the paper.  |
When an original is larger than the paper:  | The top left area of the original is printed.  | The top center area of the original is printed.  |
When you use the paper that loaded into the paper bypass location, you cannot use this function.
Press [Copy] on the Home screen.
Press [Wide Scan] on the Copy screen.

Place the original.
Basic Procedure for Copying Documents
The original is fed into the machine automatically, and copying starts. If the original is not fed automatically, press [Start].
If you select [Wide Scan], the scan width is determined by the sum of the selected paper size and a specified reduce/enlarge ratio. The maximum width of Wide Scan is 914 mm (36.0 inches).
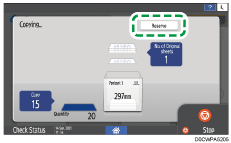
Reserving a Copy Job While Executing Another Copy Job
When [Reserve] is displayed on the execution screen of the current copy job, you can scan the original of another copy job to execute after the current job is completed (Job Preset).
You can make reservations for up to eight jobs each in the Copier and Document Server functions.
Press [Reserve] on the execution screen of a copy job.
Specify Combine, Sort, and other copy settings if necessary.
Combining and Copying a Multi-page Original onto a Single Sheet of Paper
Place the original.
Basic Procedure for Copying Documents
The original is fed into the machine automatically, and copying starts. If the original is not fed automatically, press [Start].
Press [Finish Scn] after scanning all of the originals.
After the current copy job is completed, the reserved copy job starts automatically.
If the original is large, you may not be able to make a reservation.
To cancel the last reserved job or confirm the content of the current job, press [Job Confirmation].
You can confirm and cancel reserved contents on the [Check Status] screen. For details, see the following section:
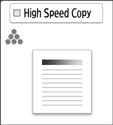
High Speed Copying
The vertical resolution is reduced and the print speed increased.
Press [Copy] on the Home screen.
Press [High Speed Copy] on the Copy screen.
Place the original.
Basic Procedure for Copying Documents
The original is fed into the machine automatically, and copying starts. If the original is not fed automatically, press [Start].
If you use this function with the Rotate Sort function, the printed images of odd-numbered pages may be different from those of even-numbered pages.