Placing Originals on the Original Table

Place one original at a time on the original table.
When inserting an original, push it lightly against the rollers. Pushing it with force may cause an original jam.
Once an original start to feed in, do not push or pull it. This may damage the original.
If the original's front or rear edge is badly curled, smooth it out with both hands before scanning. If the original is inserted as is, it may be damaged.
When the machine is printing on paper that requires a long time for the ink to dry, such as translucent (vellum) paper, wait until each job has finished printing before loading the next original. If you load the next original while the machine is printing, the original might touch the printout and be stained with ink.
Be sure not to place anything other than originals on the original table.
Load the original only after the machine is ready.

Place originals after any correction fluid or ink has completely dried. Not taking this precaution will result in a dirtied exposure glass and blemished copies.
 Press [Check Status], and then confirm that the copier or scanner function is ready to use.
 On the Home screen, press [Copy] or [Scanner].
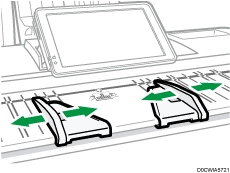
 Adjust the original guides to the original size.
Adjust the original guides so they are the same distance from the center of the original table.
Make sure that the original guides are flush against the original. Do not push the original guide side fences with force.
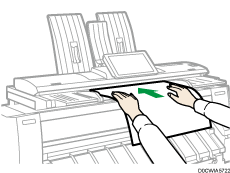
 Using both hands, carefully insert the original between the original guides, scan side down.
Push the original so that it makes light contact with the feed rollers.
Support the original with your hands until it feeds in.
After inserting an original, do not try to handle it.
When loading long or thick originals, use both hands to support the original as it feeds until half of it is scanned so feeding is not interrupted.
When placing rolled originals, use the output basket. For details, see Placing Rolled Originals.
You can change the original feed delay setting if originals are repeatedly feeding in slanted, or if you need to adjust the delay for the type of originals you are using.
Stopping Originals from Feeding in
If the originals are feeding in slanted, or jamming, etc., press the [Scanner Stop] key to stop them feeding in.
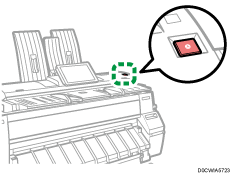
When you press the [Scanner Stop] key, the machine stops feeding the original immediately, which can cause it to jam. When this happens, see below.
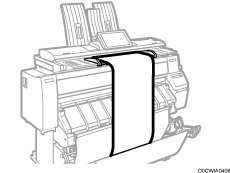
Placing Rolled Originals
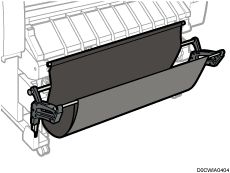
When placing rolled originals, you can use the output basket.
Check that the output basket is in basic mode.
Adjust the original guides to the original size.
Place the trailing edge of the rolled original on the output basket.
Pull the leading edge of the original up to the original table with the side to be scanned facing down.
 Using both hands, carefully insert the original between the original guides.
When loading long originals, use both hands to support the original as it feeds until half of it is scanned so feeding is not interrupted.
Do not apply excessive force to the output basket.
For details about how to use the output basket, see Setting the Output Basket.