Binding Copied Pages
You can use various bookbinding functions to finish the copied paper like a booklet.
Combine the functions according to the finishing style and the number of pages.

You need to attach the optional unit to the machine according to the function.
Type of Binding
Booklet
Copy four 1-sided originals or two 2-sided originals onto a single sheet of paper and fold it in half. Fold the paper in half sheet by sheet and stack the folded paper as shown below. The paper is bound in page order.
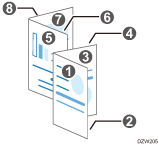
Finish the booklet by binding the stacked paper with paste or a binding strip. This function is recommended when no booklet finisher is installed or when you are binding a large number of pages.
Magazine
Copy several 1-sided originals or 2-sided originals onto a single sheet of paper. Stack all of the papers and fold them in half as shown below. The paper is bound in page order.
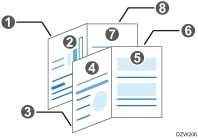
Staple the center of the paper to finish Magazine. This function is recommended when a booklet finisher is installed.
Booklet and Combine/Magazine and Combine
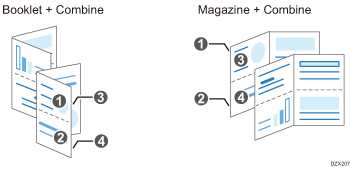
When you use the booklet or magazine function together with the combine function, you can copy multiple sheets of an original onto a single sheet of paper.
Functions Useful for Binding
Margin
Copy an original with a margin added on one edge of the paper.
Use this function together with stapling or binding to bind the output sheets in a booklet that is easy to read.

Half Fold (Center Folding)
Fold the copied paper in half to finish it like a leaflet.
When combined with the binding or center stapling function, you can bind the output sheets to form a booklet with facing pages.
To fold the copied paper in half, the Booklet Finisher or the Internal Multi-Folding unit is required.
For details about the size and weight of paper and the number of sheets that you can fold in half, see the following section:
You cannot fold the following paper in half:
Letterhead*1
Prepunched*2
Transparency
Tab Stock
Translucent Paper
Label Paper
Envelope
Textured Paper*1
Metallic/Pearl Paper*1
Clear File Folder
Synthetic Paper*1
Carbonless Paper
*1 Only for Multi-Folding Unit FD5020
*2 Only for Booklet Finisher SR5100/Booklet Finisher SR5120
Booklet Copy
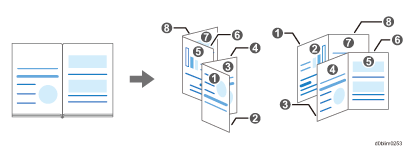
Copy a bound book in the format of Booklet or Magazine.
Copying to Make a Booklet or Magazine
 Press [Copy] on the Home screen.
If the icon is not displayed on the Home screen, add the icon from the Application list screen.
Adding a Frequently Used Application or Widget to the Home Screen
 Press [Book] on the Copy screen.

If the key is not displayed, select it from [2 Sided/Combine].
 Select the type of original and binding, and then proceed to the next screen.
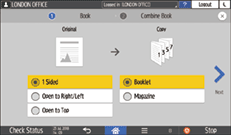
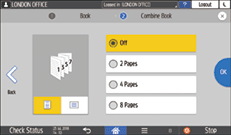
 Select the paper orientation, specify how many pages to combine on a single page, and then press [OK].
 Press [Paper Select] on the Copy screen to select the copy paper.

The copy ratio is automatically set in the range of 25 to 400% according to the size of the original and paper.
When you select Auto Paper Select, the paper is selected according to the original size and the combined number of pages.
 Specifying Half Fold (Center Folding) or Staple.
You cannot fold or staple the paper only by specifying binding. Specify Half Fold (Center Folding) or Staple according to the installed finisher.
To specify Half Fold (Center Folding), see the following sections:
When you select [Magazine], specify [Center] under Staple, and you can staple the paper at the center.
 Place the original.
 Press [Start].
When specifying Magazine or Staple and placing the originals on the exposure glass, press [Finish Scn] after scanning all of the originals.

You can specify the page opening direction of booklets and magazines in [Orientation: Booklet, Magazine] under [2 Sided / Combine].
Compensating for Creep Caused by Paper Thickness When Copying
When folding stacked paper, the thickness of the paper causes creep (progressive image loss) between the most inner and most outer pages. When [Magazine] is selected, you can specify the creep value (Creep Adjustment). For example, when folding 15 sheets, the creep value will be 2 mm (0.1 inches).
 Press [Copy] on the Home screen.
If the icon is not displayed on the Home screen, add the icon from the Application list screen.
Adding a Frequently Used Application or Widget to the Home Screen
 Press [Book] on the Copy screen.

If the key is not displayed, select it from [2 Sided/Combine].
 Select the type of original and press [Magazine], and then proceed to the next screen.
 Specify how many pages to combine on a single page, and then press [Creep Adjustment].
 Specify the creep adjustment value and press [OK] twice.
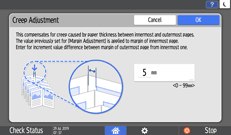
You can specify the creep adjustment value between 0 to 99 mm (0.0 to 3.9 inches) in 1 mm (0.1 inches) steps.
 Place the original.
 Press [Start].
Copying with a Binding Margin
 Press [Copy] on the Home screen.
If the icon is not displayed on the Home screen, add the icon from the Application list screen.
Adding a Frequently Used Application or Widget to the Home Screen
 Press [Margin Adjustment] on the Copy screen.

If the key is not found, select it from [Edit/Color].
 Specify the width of binding margins on the front and back sides, and then press [OK].
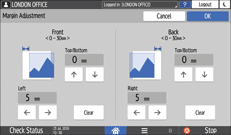
 Specify stapling and binding to finish like a booklet.
 Place the original.
 Press [Start].
When specifying Magazine or Staple and placing the originals on the exposure glass, press [Finish Scn] after scanning all of the originals.

You can change the default value of the margin of the front and back sides by specifying the margin under [Edit / Stamp].
Moving the Scanning Position When Copying
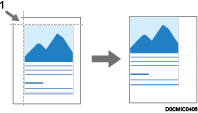
Point from which the machine begins scanning
 Press [Copy] on the Home screen.
If the icon is not displayed on the Home screen, add the icon from the Application list screen.
Adding a Frequently Used Application or Widget to the Home Screen
 Press [Scan Position] on the Copy screen.

If the key is not displayed, select it from [Edit/Color].
 Specify the scanning position for the front side and back side of the original, and then press [OK].
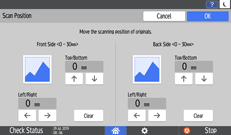
You can move the scanning position up to 30 mm (1.2 inches) in 1 mm (0.1 inches) increments upward, downward, to left and to right.
The scanning position for the back side of the original is valid only when you are copying two-sided originals.
 Place the original.
 Press [Start].

Press [
 ] and [
 ] to specify the top or bottom position. Press [
 ] and [
 ] to specify the left or right position.
If you are copying one-sided originals with duplex printing enabled, odd pages will be printed using the scanning position specified for the front sides of originals, and even pages will be printed using the scanning position specified for the back sides of originals.
Folding the Copied Paper in Half
 Press [Copy] on the Home screen.
If the icon is not displayed on the Home screen, add the icon from the Application list screen.
Adding a Frequently Used Application or Widget to the Home Screen
 Press [Center Folding] on the Copy screen.

If the key is not displayed, select it from [Finishing].
For details about folding the copied paper in half with the Multi-Folding unit by pressing [Fold], see the section below:
 Select the Print Side, and then press [OK].
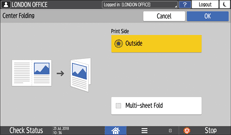
When Booklet Finisher SR5100/Booklet Finisher SR5120 is attached to the machine, you can specify whether to use the Multi-sheet Fold function. When you specify the Multi-sheet Fold function, the Mixed Sizes function cannot be used.
When you specify [Center Folding] and [Book], the original is copied on both sides of the paper according to the settings for Booklet regardless of the setting of printing side for Center Folding.
 Specify stapling and binding to finish like a booklet.
 Place the original.
 Press [Start].
When specifying Magazine or Staple and placing the originals on the exposure glass, press [Finish Scn] after scanning all of the originals.
The machine outputs the copied sheets automatically for every maximum number of folding.
Copying and Binding in Booklet Copy
Select the opening type of the original and binding type at finishing, and configure the cover sheet.
 Press [Copy] on the Home screen.
 Press [Booklet Copy] on the Copy screen.

If the key is not found, select it from [2 Sided/Combine].
 Select the Orientation and Binding Type, and proceed to the next screen.
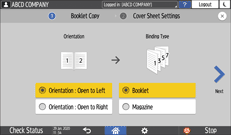
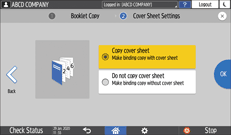
 Specify whether to copy the cover sheet, and then press [OK].
 Press [Booklet CopyTo Next].
 Follow the on-screen instructions to scan the cover sheet and inside pages of the source book on the exposure glass.
 After scanning all of the originals, press [Finish Scn].

You can specify the page opening direction of booklets and magazines in [Orientation: Booklet, Magazine] under [2 Sided / Combine].
