Printing Date, Stamp, and Page Number When Copying
You can print a preset message or image as a stamp to identify the documents to manage or distribute.
You can specify the combination of any stamp functions.
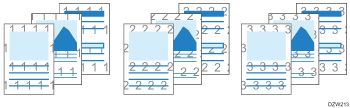
Background Numbering
Patterned numbers are stamped on the entire paper face (Background Numbering). When the Sort function is used together, different numbers are stamped for each set.
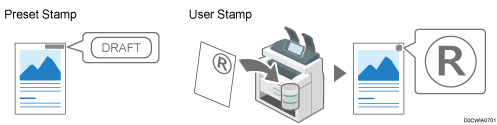
Preset Stamp
You can print registered stamps, such as "For Internal Use Only" or "DRAFT".
Also, you can register and stamp logos or created images (User Stamp).
Stamping Date, Page Number, and Text


When you use the paper that loaded into the paper bypass location, you cannot use the Stamp function.
You can specify the Stamp function when the original size is A0 (E) or smaller.
Setting the Stamp Function
 Press [Copy] on the Home screen.
 Press [Stamp] on the Copy screen.

If the key is not found, select it from [Edit].
 Select the Stamp Function and specify the settings such as Stamp type.
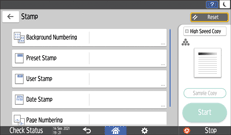
Background Numbering: Enter the start number.
Preset Stamp: Select a stamp type.
User Stamp: Select a user stamp. Register user stamps in advance. For details about the user stamps, see Registering User Stamps.
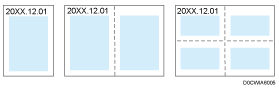
Date Stamp: Specify the date format such as MM/DD/YYYY or DD/MM/YYYY.
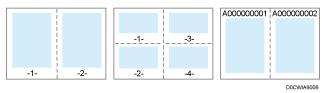
Page Numbering: Specify the page number format such as P1/P2 or -1-/-2-.
You can specify the stamp start page and stamp end page. You can also specify the page number to stamp, which enables you to replace the specified page afterwards.
Stamp Text: Enter the text to register as a stamp. By entering a number in [Start Numbering], you can append a nine-digit serial number to the specified text.
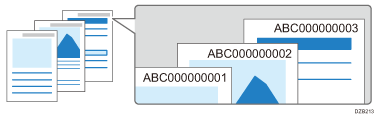
To stamp a serial number, set [Change Job Serial No. for First Job] to [On] in advance.
The serial number is not reset when the machine is turned off. To stamp the number only for the current set, enter "1" in [Start Numbering].
You cannot print the serial number when using the Job Preset function.
 Press [Original Orientation], and then specify the original orientation.

If the key is not displayed, select it from [Original Setting].
 Place the original.
Basic Procedure for Copying Documents
The original is fed into the machine automatically, and copying starts. If the original is not fed automatically, press [Start].
You can change settings, such as stamp size and color, in the setting page for each stamp function under [Stamp] in [Copier / Document Server Settings].
When using the Combine function together with the Stamp Function, the results may differ depending on the Stamp Function.
Date Stamp: Stamped on each printed page
Page Numbering, Stamp Text: Stamped per original
To stamp Page Number on every copied sheet in the same way as Date Stamp, set [Page Numbering in Combine] to [Per Copy].
When Sort and Page Numbering are combined, stamp position may change for each printed page depending on the orientation of the original or the paper.
Registering User Stamps
You can scan an original and register it as a stamp.
You can register an image with a size up to 7 cm (2.76 inch) × 7 cm (2.76 inch) (5,000 mm2, 7.75 inch2) as a stamp. Enter the Scan Size within a range of 10–432 mm (0.4–17.0 inches) in height and 10–297 mm (0.4–11.7 inches) in width.
You can register up to 40 user stamps.
An original in full-color text is scanned as a single-color image.
Press [Settings] on the Home screen.
Press [Copier / Document Server Settings].
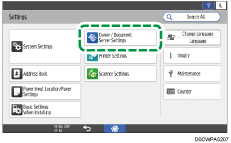
Press [Edit / Stamp]![]() [Stamp]
[Stamp]![]() [User Stamp]
[User Stamp]![]() [Program / Delete User Stamp].
[Program / Delete User Stamp].

Select the program number to which you want to register a stamp, and then press [Program / Change].
Press [Stamp Name / Image], and then specify the stamp name and size.
 Place the original of the stamp, and then press [Start Scanning].
 Press [Exit].
 Specify the settings, such as which pages to stamp and the stamp position, on the [Program User Stamp] screen.
 Press [OK].
 After completing the procedure, press [Home] (
 ).
).
To delete a registered user stamp, select the program number of the stamp that you want to delete in Step 4, and then press [Delete] twice.
If the stamp is red or bright red, it may not be scanned clearly. To store a user stamp clearly, use a black ink stamp, or make a copy and use that as the original.