Changing the Fax Reception Behavior Based on the Time or Day of the Week
You can change the output behavior of the machine when receiving documents based on the time or day of the week, or the type of the received document (Output Mode Switch Timer).
For example, you can configure the machine to store the received documents instead of printing them over the weekend when nobody is in the office.

The setting of [Output Mode Switch Timer] is valid also when printing various reports automatically in the fax function.
Overview of Output Mode Switch Timer (Settings Screen Type: Standard)
Specify the output mode and the time to switch to the mode in [Output Mode Switch Timer] under [Reception File Settings].
Output mode types
You can configure the same output mode settings in [Output Mode Switch Timer] as the functions that can be specified in the setting items for configuring the output mode on the [Reception File Settings] screen.
Output types | Description | |
|---|---|---|
[Output Mode Switch Timer] setting | [Reception File Settings] setting | |
Store | Store | Stores the received documents in the hard disk drive. Press [Fax Reception] |
Forwarding | Forwarding | Forwards the received document to the specified destination. Transferring a Received Fax Document to E-mail Address or Folder Transferring Received Fax Documents to Another Fax Destination |
Prints the received documents automatically. | ||
Standby to Print | Prohibit Auto Print | Stores the received documents in the memory. You can specify the setting per receiving line or for each type of the sender. Any user can print the received documents by pressing [Print Standby to Print Files] under [Reception File Settings]. |
ID Required Print | Memory Lock Reception | Stores the received documents in the memory. Only those users who know the Print ID or Memory Lock ID can print documents from [Fax Reception] on the fax screen. |

In [Register Special Sender], you can specify the action the machine performs when receiving faxes per sender.
Specifying the Action to Perform When Receiving a Fax from Different Senders
Setting Examples for [Output Mode Switch Timer]
Specifying the same output behavior every week (Weekly Settings)
You can configure up to five combinations of output method and time and date to switch the output mode per day of the week.
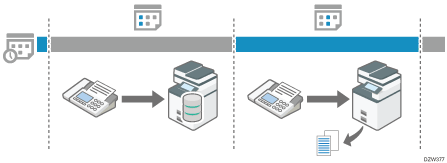
Specifying the output method to select at the specified time and date (Specific Period Settings)
You can specify up to three combinations of time and date to switch to the specified output method.

Specifying the period to allow printing documents by entering the Print ID (ID Required Print)
You can specify the period in which the machine stores the documents received and allows printing of documents only when the print ID is entered. The documents not printed during the period specified in ID Required Print remain stored.

Configuring Output Mode Switch Timer (Settings Screen Type: Standard)
Specify a timer, the reception document to apply the timer, and output behavior during the specified period in [Output Mode Switch Timer] under [Reception File Settings] in [Fax Settings].
 Press [Settings] on the Home screen.
 Press [Fax Settings] on the Settings screen.
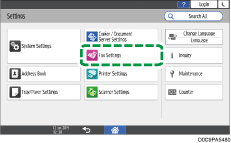
 Press [Reception Settings]
 [Reception File Settings]
 [Output Mode Switch Timer] to display the screen for configuring Output Mode Switch Timer.
 Specify the target of the timer.
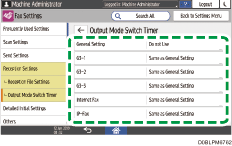
General Setting
Set the timer for all documents that are output in the fax function including the received documents and various reports.
G3-1 (G3-2, G3-3), Internet Fax, IP-Fax
Set the timers, output method for a specific period, and Print ID individually for documents to be received to the G3-1 line (G3-2 and G3-3 as well when using the G3 extension lines), Internet Fax, and IP-Fax. If you do not want to specify the date and time for each timer individually, select [Same as General Setting].
 Press [Use], and then specify the time to switch the output method and the action to perform for each time period.
To configure the machine to behave in the same way every week
Press "1st" of the day of the week to switch the output mode.
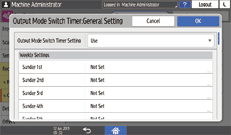
Specify the time to switch the mode and the output mode to be enabled from the specified time, and then press [OK].
When specifying ID Required Print, Forwarding or Store as the Output Mode, see below for the additional settings to configure.
Output Mode
Additional settings
ID Required Print
On the [Output Mode Switch Timer] screen, press [Print ID Setting] and specify the Print ID. For details about the procedure, see Step 6.
Forwarding
To forward documents received in the specified period to a destination different from the destination specified in [Forwarding] under [Reception File Settings], press [Receiver] and specify the destination.
Store
To send a notification by e-mail to a destination different from the destination specified in [Store] under [Reception File Settings] during the specified period, press [Store Notification]: [Notify]
 [Notify Destination] and specify an e-mail address to which to send the notification.
Confirm the settings configured in "1st".
Press "1st" of the day of the week to switch to another output mode, specify the time to switch the mode and the output mode to be enabled from the specified time, and then press [OK].
Confirm the settings configured in "1st" of the day you have selected in 4., and then press [OK].
Press [OK].
To configure the machine to switch the output mode during the specified time period and date
Press [Specific Period Settings].
Press [1st], [2nd] or [3rd] in [Specific Period Settings], specify the [Start Date]/[Start Time]/[End Date]/[End Time] and the output mode to be enabled during this period, and then press [OK].
When specifying ID Required Print, Forwarding or Store as the output mode, see below for the additional settings to configure.
Output Mode
Additional settings
ID Required Print
On the [Output Mode Switch Timer] screen, press [On] in [Print ID Setting] and specify the Print ID. For details about the procedure, see Step 6.
Forwarding
To forward documents received in the specified period to a destination different from the destination specified in [Forwarding] under [Reception File Settings], press [Receiver] and specify the destination.
Store
To send a notification by e-mail to a destination different from the destination specified in [Store] under [Reception File Settings] during the specified period, press [Store Notification]: [Notify]
 [Notify Destination] and specify an e-mail address to which to send the notification.
Confirm the settings configured in "1st" on the [Specific Period Settings] screen, and then press [OK].
When [ID Required Print] is selected in [Output Settings], proceed to Step 6. When any other setting is specified, proceed to Step 7.
 Specify the Print ID.
Press [On] in [Print ID Setting] on the [Output Mode Switch Timer] screen.
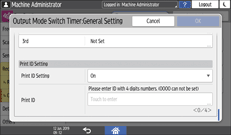
Enter the Print ID, and then press [Done].
 Press [OK].
 After completing the procedure, press [Home] (
 ).
).
Output Behavior to Be Performed on Documents Received During the Period Specified for Output Mode Switch Timer (Settings Screen Type: Standard)
See below for the mode to be selected when the output mode for all received documents (overall machine setting) differs from the output mode specified in Output Mode Switch Timer.
When receiving a fax, IP-Fax or Internet Fax
Output modes that involve printing are performed according to the settings specified in Output Mode Switch Timer.
Output modes that involve Delivery, Forwarding, Memory Lock Reception, or Store are performed according to the settings for all received documents. However, the applied output mode varies as shown below depending on how the settings are combined.
Overall machine setting
Output Mode Switch Timer setting
Selected output mode
Distributing to the distribution destination of Personal Box, distributing e-mails received by SMTP + Print
Standby to Print, Forwarding or Store
Distributing to the distribution destination of Personal Box, distributing e-mails received by SMTP + Standby to Print
Distributing to the distribution destination of Personal Box, distributing e-mails received by SMTP + Print
ID Required Print
Distributing to the distribution destination of Personal Box, distributing e-mails received by SMTP + by entering the Print ID specified in [Output Mode Switch Timer]
Store + Print
Standby to Print, Forwarding or Store
Store + Standby to Print
Store + Print
ID Required Print
Store + printing by entering the Print ID specified in [Output Mode Switch Timer]
Forwarding + Print
Standby to Print, Forwarding or Store
Forwarding (Overall machine setting) + Standby to Print
Forwarding + Print
ID Required Print
Forwarding (Overall machine setting) + printing by entering the Print ID specified in [Output Mode Switch Timer]
Forwarding + Store + Print
Standby to Print, Forwarding or Store
Forwarding (Overall machine setting) + Store + Standby to Print
Forwarding + Store + Print
ID Required Print
Forwarding (Overall machine setting) + Store + printing by entering the Print ID specified in [Output Mode Switch Timer]
When receiving an e-mail with an attachment/specifying automatic printing of reports
[Output Mode] under [Output Mode Switch Timer] | Applied output mode |
|---|---|
Standby to Print, Forwarding, Store | Standby to Print |
ID Required Print | Print by ID Required Print in [Output Mode Switch Timer] |

Reports with Auto Print specified are printed only when [Output Mode] is set to [Print] in [Output Mode Switch Timer]. If you want to restrict printing of received documents but not Auto Print of Reports, specify [Not Set] in [Output Mode] and specify an item other than [Print] in [Output Mode] for each line.
The reports to be printed manually, various lists, and LAN-Fax documents received from a computer are printed regardless of the setting in [Output Mode Switch Timer].
Overview of Output Mode Switch Timer (Settings Screen Type: Classic)
Specify the output mode and the time to switch to the mode in [Output Mode Switch Timer] under [Reception File Settings].
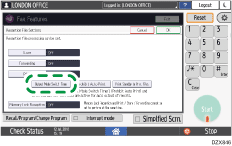
Output mode types
You can configure the same output mode settings in [Output Mode Switch Timer] as the functions that can be specified in the setting items for configuring the output mode on the "Reception File Settings" screen.
Output types | Description | |
|---|---|---|
[Output Mode Switch Timer] setting | [Reception File Settings] setting | |
Store | Store | Stores the received documents in the hard disk drive. Press [Fax Reception] |
Forwarding | Forwarding | Forwards the received document to the specified destination. Transferring a Received Fax Document to E-mail Address or Folder Transferring Received Fax Documents to Another Fax Destination |
Prints the received documents automatically. | ||
Standby to Print | Prohibit Auto Print | Stores the received documents in the memory. You can specify the setting per receiving line or for each type of the sender. Any user can print the received documents by pressing [Print Standby to Print Files] under [Reception File Settings]. |
ID Required Print | Memory Lock Reception | Stores the received documents in the memory. Only those users who know the Print ID or Memory Lock ID can print documents from [Fax Reception] on the fax screen. |

In [Program Special Sender], you can specify the action the machine performs when receiving faxes per sender.
Specifying the Action to Perform When Receiving a Fax from Different Senders
Setting Examples for [Output Mode Switch Timer]
Specifying the same output behavior every week (Weekly Settings)
You can configure up to five combinations of output method and time and date to switch the output mode per day of the week.

Specifying the output method to select at the specified time and date (Specific Period Settings)
You can specify up to three combinations of time and date to switch to the specified output method.

Specifying the period to allow printing documents by entering the Print ID (ID Required Print)
You can specify the period in which the machine stores the documents received and allows printing of documents only when the print ID is entered. The documents not printed during the period specified in ID Required Print remain stored.

Configuring Output Mode Switch Timer (Settings Screen Type: Classic)
Specify a timer, the reception document to apply the timer, and output behavior during the specified period in [Output Mode Switch Timer] under [Reception File Settings] in [Fax Settings].
 Press [Settings] on the Home screen.
 Press [Machine Features Settings] on the Settings screen.
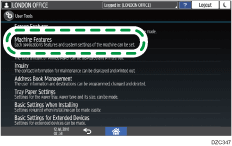
 Press [Fax Settings]
 [Reception Settings] tab
  [Reception File Settings]
 [Output Mode Switch Timer] to display the screen for configuring Output Mode Switch Timer.

 Specify the target of the timer.
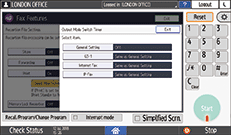
General Setting
Set the timer for all documents that are output in the fax function including the received documents and various reports.
G3-1 (G3-2, G3-3), Internet Fax, IP-Fax
Set the timers individually for documents to be received to the G3-1 line (also when using the G3, G3-2, and G3-3 extension lines), Internet Fax, and IP-Fax. If you do not want to specify the date and time for each timer individually, select [Same as General Setting].
 Press [On]
 [Timer: Detailed Settings], and then specify the time to switch the output method and the action to perform for each time period.
To configure the machine to behave in the same way every week
Press [Weekly Settings].
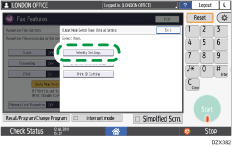
Press the day of the week to switch the output mode.
On the Weekly Settings screen of the specified day, press [Change] under "1st", specify the time to switch the mode and the output mode to be enabled from the specified time, and then press [OK].
When specifying ID Required Print, Forwarding or Store as the Output Mode, see below for the additional settings to configure.
Output Mode
Additional settings
ID Required Print
On the [Output Mode Switch Timer: Detailed Settings] screen, press [Print ID Setting] and specify the Print ID. For details about the procedure, see Step 6.
Forwarding
To forward documents received in the specified period to a destination different from the destination specified in [Forwarding] under [Reception File Settings], press [Receiver] and specify the destination.
Store
To send a notification by e-mail to a destination different from the destination specified in [Store] under [Reception File Settings] during the specified period, press [Store]
 [Notify Destination] and specify an e-mail address to which to send the notification.
Confirm the settings configured in "1st" on the Weekly Settings screen, and then press [Exit].
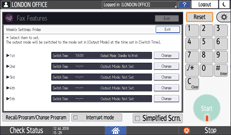
Press the day of the week to switch to another output mode.
On the Weekly Settings screen of the specified day, press [Change] under "1st", specify the time to switch the mode and the output mode to be enabled from the specified time, and then press [Exit].
Confirm the settings configured in "1st" on the Weekly Settings screen, and then press [Exit].
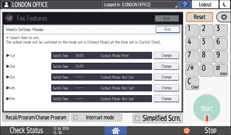
Press [OK].
To configure the machine to switch the output mode during the specified time period and date
Press [Specific Period Settings].
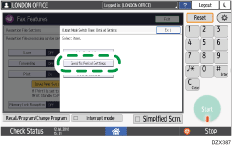
Press [Change] in [1st], [2nd] or [3rd], specify the [Start Date/Time]/[End Date/Time] and the output mode to be enabled during this period, and then press [Exit].
When specifying ID Required Print, Forwarding or Store as the output mode, see below for the additional settings to configure.
Output Mode
Additional settings
ID Required Print
On the [Output Mode Switch Timer: Detailed Settings] screen, press [Print ID Setting] and specify the Print ID. For details about the procedure, see Step 6.
Forwarding
To forward documents received in the specified period to a destination different from the destination specified in [Forwarding] under [Reception File Settings], press [Receiver] and specify the destination.
Store
To send a notification by e-mail to a destination different from the destination specified in [Store] under [Reception File Settings] during the specified period, press [Store]
 [Notify Destination] and specify an e-mail address to which to send the notification.
Confirm the settings configured in "1st" on the [Specific Period Settings] screen, and then press [Exit].
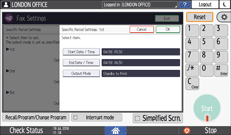
When [ID Required Print] is selected in [Output Settings], proceed to Step 6. When any other setting is specified, proceed to Step 7.
 Specify the Print ID.
Press [Print ID Setting] on the [Output Mode Switch Timer: Detailed Settings] screen.
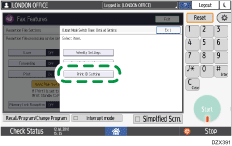
General Settings
Specify the ID to print all documents that are output in the fax function including the received documents and various reports.
G3-1 (G3-2, G3-3), Internet Fax
Specify the Print ID to use individually for documents to be received to the G3-1 line (also when using the expanded G3 lines, G3-2 line and G3-3 line) and Internet Fax. If you do not want to specify the date and time for each timer individually, select [Same as General Setting].
Enter the Print ID, and then press [Exit].
 Press [OK]
 [Exit].
 After completing the procedure, press [Home] (
 ).
).
Output Behavior to Be Performed on Documents Received During the Period Specified for Output Mode Switch Timer (Settings Screen Type: Classic)
See below for the mode to be selected when the output mode for all received documents (overall machine setting) differs from the output mode specified in Output Mode Switch Timer.
When receiving a fax, IP-Fax or Internet Fax
Output modes that involve printing are performed according to the settings specified in Output Mode Switch Timer.
Output modes that involve Delivery, Forwarding, Memory Lock Reception, or Store are performed according to the settings for all received documents. However, the applied output mode varies as shown below depending on how the settings are combined.
Overall machine setting
Output Mode Switch Timer setting
Selected output mode
Distributing to the distribution destination of Personal Box, distributing e-mails received by SMTP + Print
Standby to Print, Forwarding or Store
Distributing to the distribution destination of Personal Box, distributing e-mails received by SMTP + Standby to Print
Distributing to the distribution destination of Personal Box, distributing e-mails received by SMTP + Print
ID Required Print
Distributing to the distribution destination of Personal Box, distributing e-mails received by SMTP + by entering the Print ID specified in [Output Mode Switch Timer]
Store + Print
Standby to Print, Forwarding or Store
Store + Standby to Print
Store + Print
ID Required Print
Store + printing by entering the Print ID specified in [Output Mode Switch Timer]
Forwarding + Print
Standby to Print, Forwarding or Store
Forwarding (Overall machine setting) + Standby to Print
Forwarding + Print
ID Required Print
Forwarding (Overall machine setting) + printing by entering the Print ID specified in [Output Mode Switch Timer]
Forwarding + Store + Print
Standby to Print, Forwarding or Store
Forwarding (Overall machine setting) + Store + Standby to Print
Forwarding + Store + Print
ID Required Print
Forwarding (Overall machine setting) + Store + printing by entering the Print ID specified in [Output Mode Switch Timer]
When receiving an e-mail with an attachment/specifying automatic printing of reports
[Output Mode] under [Output Mode Switch Timer] | Applied output mode |
|---|---|
Standby to Print, Forwarding, Store | Standby to Print |
ID Required Print | Print by ID Required Print in [Output Mode Switch Timer] |

Reports with Auto Print specified are printed only when [Output Mode] is set to [Print] in [Output Mode Switch Timer]. If you want to restrict printing of received documents but not Auto Print of Reports, specify [Not Set] in [Output Mode] and specify an item other than [Print] in [Output Mode] for each line.
The reports to be printed manually, various lists, and LAN-Fax documents received from a computer are printed regardless of the setting in [Output Mode Switch Timer].
Confirming the Output Mode that is Applied Automatically
You can confirm the setting currently specified as the output mode for received documents such as Print, Standby to Print, Forwarding, and Store for each line.
 Press [Fax] on the Home screen.
 Press [Fax Reception] on the fax screen.
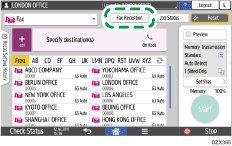
 Press [Check Reception File Settings] and confirm the current settings.
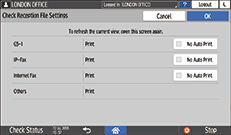
When [No Auto Print] is specified, the machine stores the received documents as Standby to Print files. You can print the stored document per receiving line from the following setting items.
Settings screen type: Standard
[Fax Settings]
 [Reception Settings]
 [Reception File Setting]
 [Print Standby to Print Files]
Settings screen type: Classic
[Fax Settings]
 [Reception Settings] tab
  [Reception File Setting]
 [Print]
 [Print Standby to Print Files]
 Press [OK] after confirming the settings.
