Transferring a Received Fax Document to E-mail Address or Folder
In addition to printing received faxes from the machine, you can also transfer them to an e-mail address or a shared folder on your computer (Forwarding). This feature is convenient when you want to check the content of received faxes via e-mail while you are out of your office or to manage received faxes in the folder on your computer.
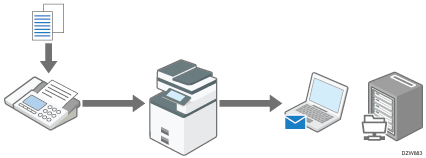
You cannot transfer a fax with Memory Lock Reception that requires entering the Memory Lock ID to print.

To transfer a received fax to more than one destination, specify the destination group.
You can also specify a different destination for each sender.
Specifying the Action to Perform When Receiving a Fax from Different Senders
Transferring Received Faxes to an E-mail Address (Settings Screen Type: Standard)
Register an e-mail address to deliver the received faxes in the address book, and specify the address as the forwarding destination in [Forwarding] under [Fax Settings].
 Press [Address Book] on the Home screen.
 Press [Register] on the address book screen.
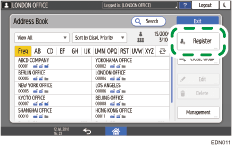
 Enter the information of the destination in the input boxes displayed on the [Name] tab, and select a title to classify the destination.
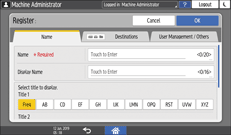
 Select the [Destinations] tab, and press [Email Address].
 Enter the e-mail address to deliver the fax into the Email Address input box.
 Select [Yes] in [Send via SMTP Server].
 Press [OK].
 After completing the procedure, press [Home] (
 ).
).
Registering the forwarding destination is completed. Proceed to enable forwarding, and specify the forwarding destination.
 Press [Settings] on the Home screen.
 Press [Fax Settings] on the Settings screen.
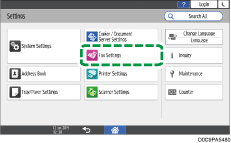
 Press [Reception Settings]
 [Reception File Settings]
 [Action on Receiving File] to display the configuration screen.
 Press [On] in [Forwarding].
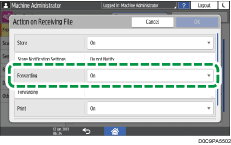
 Press [Forwarding].
 Press [Receiver].
 Select [Email Address], select the forwarding destination, and then press [OK].
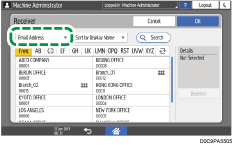
 Press [OK].
 If you are not printing the forwarding fax on the machine, select [Off] in [Print].
 Press [OK].
 After completing the procedure, press [Home] (
 ).
).
Forwarding Received Faxes to a Folder (Settings Screen Type: Standard)
Create a shared folder on your computer, register the path to it in the address book of the machine, and then enable Forwarding.
Creating a shared folder to store forwarded faxes
Create a shared folder on your computer, and specify the access permissions of the folder to prohibit other users from viewing the content.
 In Windows Explorer, create a folder to share.
A folder named "shared_doc" is created as an example.
 Right-click the created folder, and then click [Properties].
 On the [Sharing] tab, click [Advanced Sharing].
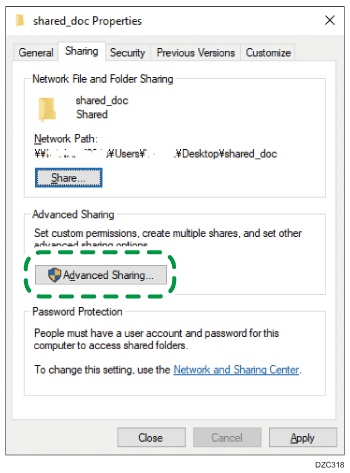
 Select the [Share this folder] check box, and then click [Permissions].
After completing the procedure, remove Everyone (unspecified user), and then add a user allowed access the folder.
 Select [Everyone] under [Group or user names], and then click [Remove].
 Click [Add]
  [Advanced]
  [Object Types].
 Select [Users], and then click [OK].
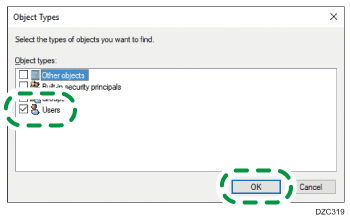
 Click [Locations], select the name of the domain or work group the user belongs to, and then click [OK].
 Click [Find Now].
 From the Search Results, select the login user name of the computer to be added, and then click [OK].
 Click [OK].
 Select the added user, and then select the [Allow] check box under [Permissions].
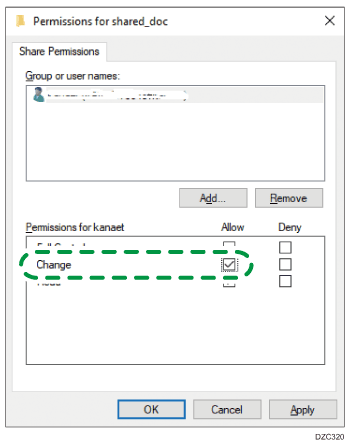
The access permissions on the folder has been successfully configured. Click [OK] to close all windows, and continue operating on the machine.
Registering the path to the shared folder in the address book
Register the "shared_doc" folder created as the forwarding destination, and check that you can access the folder.
 Press [Address Book] on the Home screen.
 Press [Register] on the address book screen.

 Enter the information of the destination in the input boxes displayed on the [Name] tab, and select the title to classify the destination.

 Select the [Destinations] tab, and press [Folder].
 Select [SMB (Send to Shared Folder on PC)] in "Protocol".
 Specify the network path to the forwarding destination folder in "Path".
Entering the path name manually
If the computer name is "User1PC", and the shared folder name is "shared_doc", enter as follows:
\\User1PC\shared_doc
Selecting a folder from the list
Enter the IP address of the computer on which to search for a shared folder, and press [Browse Network] to select the forwarding destination folder.
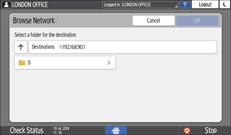
 Under "Folder Authentication Info", select [Specify Other Authentication Information] and then enter the name and password of the user on the computer where the forwarding destination folder is located.
 Press [Connection Test].
When no connection is established, check the message that appears.
When a Message Is Displayed While Using the Fax Function
The folder is registered after a connection test successfully completed. Proceed to specify the registered folder as the forwarding destination in [Forwarding] under [Fax Settings].
 Press [OK].
 Press [Settings] on the Home screen.
 Press [Fax Settings] on the Settings screen.

 Press [Reception Settings]
 [Reception File Settings]
 [Action on Receiving File] to display the configuration screen.
 Press [On] in [Forwarding].

 Press [Forwarding].
 Press [Receiver].
 Select [Folder], select the forwarding destination, and then press [OK].
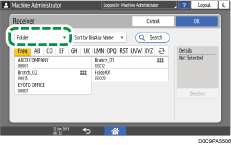
 Press [OK].
 If you are not printing the forwarding fax on the machine, select [Off] in [Print].
 Press [OK].
 Press [
 ] to return to [Reception Settings] screen, and then press [Folder Transfer Settings]
 [File Name Setting in Folder Transfer].
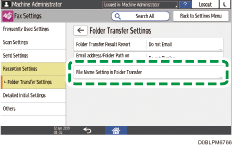
Add Sender Information to File Name
Select [Yes] to include the sender's name and fax number in the name of the forwarded file.
Limit File Name Character Type
Select [Yes] to limit the character type that can be used in the file name to prevent garbled characters appearing in the file name or data being lost.
 Press [OK].
 After completing the procedure, press [Home] (
 ).
).
Transferring Received Faxes to an E-mail Address (Settings Screen Type: Classic)
Register an e-mail address to deliver the received faxes in the address book, and specify the address as the forwarding destination in [Forwarding] under [Fax Settings].
 Press [Address Book] on the Home screen.
 Press [Register] on the address book screen.

The items displayed on the screen vary depending on the version of RICOH Always Current Technology that is implemented on the machine.
 Enter the information of the destination in the input boxes displayed on the [Name] tab, and select a title to classify the destination.
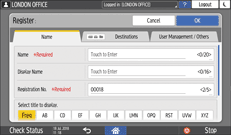
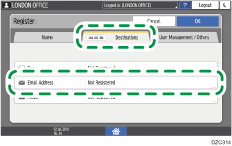
 Select the [Destinations] tab, and press [Email Address].
 Enter the e-mail address to deliver the fax into the Email Address input box.
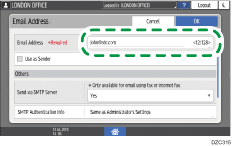
 Select [Yes] in [Send via SMTP Server].
 After completing the procedure, press [Home] (
 ).
).
Registering the forwarding destination is completed. Proceed to enable forwarding, and specify the forwarding destination.
 Press [Settings] on the Home screen.
 Press [Machine Features Settings] on the Settings screen.
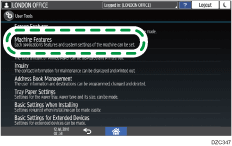
 Press [Fax Settings]
 [Reception Settings] tab
  [Reception File Settings] to display the configuration screen, and then press [Forwarding].
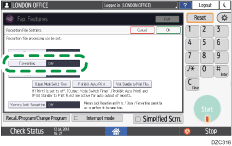
 Press [On], and then display the [Email] tab.
 Select the forwarding destination.
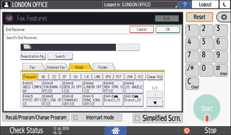
 Press [Exit].
 If you are not printing the forwarding fax on the machine, press [OK] to return to the Reception File Settings screen, and then select [Off] in [Print].
 Press [Exit].
 After completing the procedure, press [Home] (
 ).
).
Forwarding Received Faxes to a Folder (Settings Screen Type: Classic)
Create a shared folder on your computer, register the path to it in the address book of the machine, and then enable Forwarding.
Creating a shared folder to store forwarded faxes
Create a shared folder on your computer, and specify the access permissions of the folder to prohibit other users from viewing the content.
 In Windows Explorer, create a folder to share.
A folder named "shared_doc" is created as an example.
 Right-click the created folder, and then click [Properties].
 On the [Sharing] tab, click [Advanced Sharing].

 Select the [Share this folder] check box, and then click [Permissions].
After completing the procedure, remove Everyone (unspecified user), and then add a user allowed access the folder.
 Select [Everyone] under [Group or user names], and then click [Remove].
 Click [Add]
  [Advanced]
  [Object Types].
 Select [Users], and then click [OK].

 Click [Locations], select the name of the domain or work group the user belongs to, and then click [OK].
 Click [Find Now].
 From the Search Results, select the login user name of the computer to be added, and then click [OK].
 Click [OK].
 Select the added user, and then select the [Allow] check box under [Permissions].

The access permissions on the folder has been successfully configured. Click [OK] to close all windows, and continue operating on the machine.
Registering the path to the shared folder in the address book
Register the "shared_doc" folder created as the forwarding destination, and check that you can access the folder.
 Press [Address Book] on the Home screen.
 Press [Register] on the address book screen.

The items displayed on the screen vary depending on the version of RICOH Always Current Technology that is implemented on the machine.
 Enter the information of the destination in the input boxes displayed on the [Name] tab, and select the title to classify the destination.

 Select the [Destinations] tab, and press [Folder].
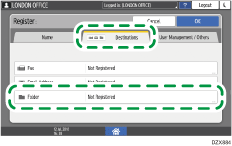
 Select [SMB (Send to Shared Folder on PC)] in "Protocol.
 Specify the network path to the forwarding destination folder in "Path".
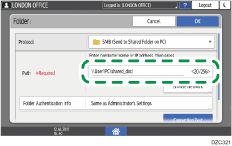
Entering the path name manually
If the computer name is "User1PC", and the shared folder name is "shared_doc", enter as follows:
\\User1PC\shared_doc
Selecting a folder from the list
Enter the IP address of the computer on which to search for a shared folder, and press [Browse Network] to select the forwarding destination folder.

 Under "Folder Authentication Info", select [Specify Other Authentication Information] and then enter the name and password of the user on the computer where the forwarding destination folder is located.
 Press [Connection Test].
When no connection is established, check the message that appears.
When a Message Is Displayed While Using the Fax Function
The folder is registered after a connection test successfully completed . Proceed to specify the registered folder as the forwarding destination in [Forwarding] under [Fax Settings].
 Press [Settings] on the Home screen.
 Press [Machine Features Settings] on the Settings screen.

 Press [Fax Settings]
 [Reception Settings] tab
  [Reception File Settings] to display the configuration screen, and then press [Forwarding].

 Press [On], and then display the [Folder] tab.
 Select the forwarding destination.
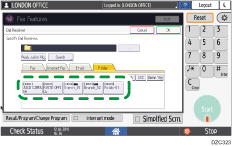
 Press [OK].
 If you are not printing the forwarding fax on the machine, press [OK] to return to the Reception File Settings screen, and then select [Off] in [Print].
 Press [OK].
 To include the sender's name and fax number in the name of the forwarded file, configure the parameters under [Initial Settings] tab
  [Parameter Setting].
Select bit number [4] under switch number [37], and change current value to "1".
Changing the Parameter Settings
To prevent garbled characters appearing in the file name or data being lost, select bit number [5] under switch number [37], and change current value to "1".
 Press [Exit].
 After completing the procedure, press [Home] (
 ).
).
