When Copies Are Not as Expected

When confirming or changing the settings in [Settings], press [Home] (
 ) after closing [Settings].
When the Machine Does Not Operate as Expected
Condition | Cause | Solution and reference |
|---|---|---|
Number of copies cannot be specified. | A number that exceeds [Maximum Copy Quantity] is specified. |
|
A copy is made on paper of a size that is different from the original, or the copied image is trimmed because the orientation of the original and the copied image do not match when [Auto Paper Select] is specified. | The original was placed in the incorrect position on the exposure glass. | Place the original correctly. |
The sensor did not operate correctly when the original was placed in the ADF. | Check that the sensor is not dirty, or blocked by an object. | |
A malfunction occurred temporarily on the machine. | Turn off the power of the machine, wait for 10 seconds or more after confirming that the main power indicator is turned off, and then turn on the power. | |
The output pages are separated at an incorrect position when sorted. | The memory became full while the sort job was being processed, and the job was output divided. | To stop copying when the memory becomes full, specify [Off] in [Settings] |
Paper is jammed when printing. | Paper other than recommended paper is used. | Use recommended paper. |
The paper is not placed correctly on the machine. | See the items to check when paper jam occurs frequently, and check that paper is loaded correctly. | |
When printing using the bypass tray, the paper size and type are not correctly specified in the printer driver. | Check that the paper size and type are correctly specified. |
When the Output Paper Is Not Ejected as Expected
Condition | Cause | Solution and reference |
|---|---|---|
Paper becomes wrinkled. | Paper is too thin. | Use recommended paper. |
The paper contains too much moisture. | Use paper that has been stored in a dry environment. | |
The paper is not placed correctly on the machine. | See the items to check when paper jam occurs frequently, and check that paper is loaded correctly. | |
Edge of the paper may become bent. | Paper other than recommended paper is used. | Use recommended paper. |
The paper contains too much moisture. | Use paper that has been stored in a dry environment. | |
The paper is not placed correctly on the machine. | See the items to check when paper jam occurs frequently, and check that paper is loaded correctly. | |
The ejected sheets are not aligned. | The paper is not placed correctly on the machine. | See the items to check when paper jam occurs frequently, and check that paper is loaded correctly. |
The paper contains too much moisture. | Use paper that has been stored in a dry environment. | |
More than one sheet of paper is ejected at one time (multi-sheet feeding). | The sheets of paper are in close contact with each other. | Fan the sheets thoroughly before loading them in the paper tray. |
The paper size is not detected correctly in the interposer tray. | The side fences may have moved after the bottom plate was raised. | After loading the paper, the tray automatically moves. Before it does, adjust the side fences and end fence. Adjust the side fences as required. |
"Paper jam (J432)" occurs in the interposer tray. | The paper guides of the twin interposer may not be closed correctly. | Close the paper guides correctly. For details about how to close the paper guides, view the video displayed on the machine's control panel. 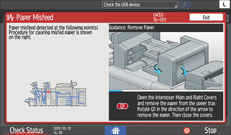 |
When Duplex Printing or Editing of the Pages Is Not Performed as Expected
Along with the individual solution, check the original size and how the original is placed on the machine.
Placing an Original on the Exposure Glass
Placing an Original in the Auto Document Feeder (ADF)
Condition | Cause | Solution and reference |
|---|---|---|
The copied image is not printed on the output sheets as expected. | The original is placed in the wrong orientation. | Specify the setting in [Original Setting] |
The copied pages are printed in the orientation of Open to Top when [Open to Right/Left] is specified, or printed in the orientation of Open to Right/Left when [Open to Top] is specified. | The orientation in which the original is placed is incorrect. | Check Original Orientation and Original Setting in [2 Sided/Combine] |
Images are trimmed or margins are added unexpectedly in [Combine]. | [Copy Ratio] and paper size are combined incorrectly for the original size. | Specify [Copy Ratio] |
The copied image is cropped in [Erase Center / Border]. | The specified width is too large. | Specify a narrower width to erase in [Edit / Color] |
The copied image is cropped when [Margin Adjustment] is specified. | The specified width is too large, or the margin on the edge opposite from the binding edge is too small. | Specify a narrower width in [Edit / Color] |
The image is cropped in [Copy Ratio]. | The image was copied rotated by 90 degrees for the specified original size and paper size. | Specify [Copy Ratio] |
The output sheets folded in the [Booklet] or [Magazine] setting do not come out in the form of a book. | The combination of the original and opening orientation is incorrect. | Specify the opening orientation in [Settings] |
The paper or tray that you want to use cannot be selected in Duplex printing. | The specified paper is too thick or too thin. | Check the paper that is supported in Duplex printing, and load the paper in the tray. |
The Paper Type that is not supported in Duplex printing is specified on the paper tray to use or the paper is not specified as the target of Duplex printing in [Tray/Paper Settings]. | Check "Paper Type" and "Apply Duplex" in [Tray/Paper Settings] | |
The pages are not copied in the expected order in Duplex or Combine printing. | The original is placed in the incorrect orientation. |
|
The backside of the paper is not printed in Duplex printing. | The paper size is specified incorrectly. | Check that the loaded paper size and the setting in [Tray/Paper Settings] match. |
When the Finished Paper Is Not as Expected
Condition | Cause | Solution and reference |
|---|---|---|
The output paper is not stapled together. | A staple is jammed. | Remove the jammed staple. |
The staple cartridge is not correctly set. | Set the cartridge again. | |
The output paper is curled. | Correct the curl before loading the paper in the tray. When the paper supports duplex printing, fan the paper thoroughly and turn over the paper. | |
The output paper is not stapled in the specified position. | The original is set in an orientation that does not match the specified staple position. | Specify the original orientation again. |
Paper is not delivered to the output tray when stapling the output paper. | The paper not yet stapled remains inside the machine when copying is canceled while Staple printing is in progress. | Press [Reset] and remove the paper remaining inside the staple unit. |
Output paper to the stacker tray does not align properly. |
|
|
Output paper to the stacker tray does not align properly. | When the paper weight is 280.0 g/m2 or more, and the paper size is A3, SRA3 or larger, the output paper to the stacker tray might fail to align properly. | Select [П Curl Correction Level: Small] or [П Curl Correction Level: Large] under [Correct Output Paper Curl] in "Adjustment Settings for Operators". |
Wrinkling occurs when Gate Fold, Letter Fold-in, or Letter Fold-out is applied. | Wrinkling can occur if Gate Fold, Letter Fold-in, or Letter Fold-out is applied to B4 JIS (Japanese Industrial Standard) | When applying Gate Fold, Letter Fold-in, or Letter Fold-out to paper larger than A4, we recommend you enable image reduction and use paper no larger than A4 |
When you print Z-folded paper, the machine indicates that the output tray is full even though the amount of output paper on the tray is less than the stack capacity. | The Z-fold support tray is not set. | Set the Z-fold support tray for finisher or multi-folding unit. |
The multi-folding unit outputs sheets with creased edges when Gate Fold is applied. | The paper is curled. |
|
The position of the fold is incorrect when Letter Fold-in is applied to a B5 JIS sheet. | Multi-sheet Fold has been specified when only one sheet is being printed. |
|
 , A3
, A3When Using the Connect Copy Function
Condition | Cause | Solution and reference |
|---|---|---|
“Cannot connect to the sub-machine. Check the status of the sub-machine.” | The The hard disk of the sub-machine is malfunctioning. | Press [Exit] on the main machine and follow the instructions on the display. |
“Cannot print from the sub-machine. Check the status of the sub-machine.” | A paper or staple jam has occurred on the sub-machine, or toner or other supplies need to be replaced. | Follow the instructions displayed. Precautions When Removing Jammed Paper If the sub-machine's display indicates that a cover is open, follow the instructions displayed. |
“Cannot print from the sub-machine. Check the status of the sub-machine.” | The sub-machine's User Tools menu is open. | Press [User Tools] to close the User Tools menu. |
“Cannot print from the sub-machine. Sub-machine will be disconnected.” | The sub-machine has stopped due to power failure or communication error. | Continue copying using the main machine. |
“Fold is available only when Sort mode is selected in Connect Copy.” | Sort has not been selected with fold. | Select the Sort function. |
“No stamp data in the sub-machine.” | Stamp data on the sub-machine has been deleted. | Reprogram the stamp on the sub-machine. |
“Sub-machine does not have the same paper setting(s).” | Paper type or tray settings on the two machines do not match. | Make the same settings on both machines. |
“Sub-machine is in Interrupt mode.” | The sub-machine is in Interrupt mode. | Press [Interrupt] on the sub-machine to cancel Interrupt mode. |
“Sub-machine paper settings must be the same to use this tray.” | Paper tray settings on the two machines do not match. | Make the same settings on both machines. |
“The Cover Sheet setting(s) of the sub-machine is different from the main machine.” | Cover Sheet settings on the two machines do not match. | Make the same settings on both machines. |
“The Designation Sheet n setting(s) of sub-machine is different from main machine.” ("n" in the message represents a changeable number.) | Designation Sheet settings on the two machines do not match. | Make the same settings on both machines. |
“The Slip Sheet setting(s) of the sub-machine is different from the main machine.” | Slip Sheet settings on the two machines do not match. | Make the same settings on both machines. |
 icon is lit.
Connect Copy
Condition | Cause | Solution and reference |
|---|---|---|
You cannot staple, punch, or fold. | The main and sub-machines do not have the same option installed. | Press [Connect Copy] to cancel Connect Copy. |
You get different copy results from the main and submachines. | The Copy Quality setting differs on the two machines. | On the control panel, select [Edit / Color]. Select [Color] in [Edit / Color], and then make the same setting on both machines. |
If You Cannot Use Connect Copy
Condition | Cause | Solution and reference |
|---|---|---|
[Connect Copy] is not displayed. | The sub-machine's power is off. | Turn on the sub-machine's power. |
[Connect Copy] is not displayed. | Functions that cannot be used with Connect Copy are selected on the main machine (such as storing or copying the first page of a document in the Document Server). | Cancel the functions selected on the main machine. |
[Connect Copy] is not displayed. | The main machine is in Interrupt mode. | Press [Interrupt] on the main-machine to cancel Interrupt mode. |
[Connect Copy] is not displayed. | The [Connect Copy Key Display] setting is off. | Select [On] for the [Connect Copy Key Display] setting. |
[Connect Copy] is not displayed. | The cable connecting the two machines is damaged. | Contact your service representative. |
[Connect Copy] is not displayed. | The | Follow the instructions displayed. |
[Connect Copy] appears faded. | Functions that cannot be used with Connect Copy have been set. | Press [Reset] to clear the settings. |
If Connect Copy Is Canceled
Condition | Cause | Solution and reference |
|---|---|---|
The machine cancels [Connect Copy]. | The main machine's power is off, or [Energy Saver] was pressed. | Turn on the main machine's power, or press [Energy Saver], and then press [Connect Copy]. |
The machine cancels [Connect Copy]. | The sub-machine's power is off. | A message instructing you to check the sub-machine appears on the display of the main machine. Press [Cancel] to clear Connect Copy. Turn on the sub-machine's power, press [Connect Copy], and then make your settings again. |
The machine cancels [Connect Copy]. | The Weekly Timer setting is coming into effect on the main machine. | Press the main machine's [Energy Saver], and then press [Connect Copy]. |
An error message indicates the main machine has broken down. | The | Copying is not possible. Follow the instructions displayed. |
If You Cannot Exit from Connect Copy
Condition | Cause | Solution and reference |
|---|---|---|
There is no response when you press [Connect Copy]. | Scanning is in progress. | Press [Stop] on the main machine, and then press [Stop]. |
There is no response when you press [Connect Copy]. | Copying is in progress. | Press [Stop] on the main machine, and then press [Stop]. |
There is no response when you press [Connect Copy]. | A paper misfeed has occurred on either the main machine or sub-machine. |
|
There is no response when you press [Connect Copy]. | [Stop] has been pressed on the main machine. | To cancel Connect Copy, press [Stop] on the main machine, follow the on-screen instructions to stop copying, and then press [Connect Copy] to cancel. |
There is no response when you press [Connect Copy]. | Toner or other supplies need to be replaced on either the main machine or sub-machine. |
|