Loading Paper into the Paper Tray
The method of loading paper varies for each tray type.

- When replacing paper or removing jammed paper, make sure not to trap or injure your fingers.
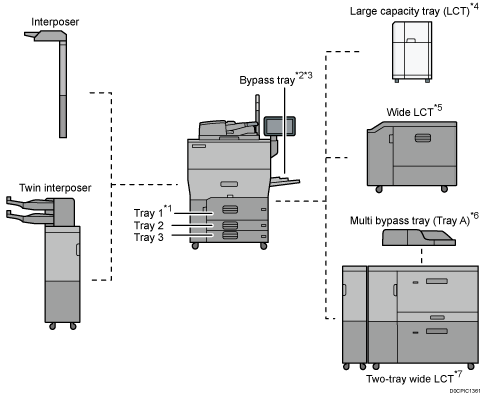
*1 The A3/11 × 17 tray unit can be attached.
*2 The banner paper guide tray can be attached.
*3 This is unavailable if the two-tray wide LCT is attached.
*4 The extension unit of LCT can be attached.
*5 The banner sheet guide tray can be attached.
*6 The banner sheet tray of multi bypass tray (Tray A) can be attached.
*7 The banner sheet tray of two-tray wide LCT can be attached.
Before loading paper into a tray, check the paper size and type that can be loaded in the tray, and confirm the paper size that is automatically detected.
When loading paper of a size that is not automatically detected, specify the paper size in [Tray Paper Settings].
Specifying the Paper Size That Is Not Automatically Detected
Check the paper setting before printing. If the paper differs from the paper setting, a mismatch error will occur when you print.
Straighten curled or warped paper before loading.
When loading paper on a tray which has a few sheets of paper, multiple sheets of paper may be fed at once from the tray. Take out all sheets, fan the sheets, and then load them again.
You may hear the sound of rubbing paper. This is not a malfunction.
Do not stack paper over the limit mark.
Fanning the Paper

If you load coated paper, label paper, transparencies, or thick paper of 150.1–360.0 g/m2 (55.1 lb. Cover–198.0 lb. Index), it is important that you fan the sheets thoroughly. Misfeeds may occur if paper is not fanned thoroughly. If the machine feeds several sheets of paper together or it does not feed paper, fan paper and load it again.
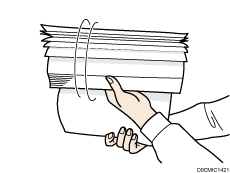
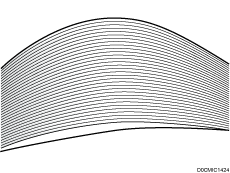
 Loosen the stack by riffling the sheets.
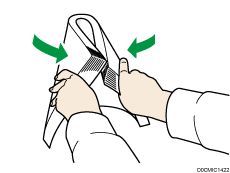
 Holding its shorter ends, flex the stack back and forth to create space between the sheets. Repeat this several times.
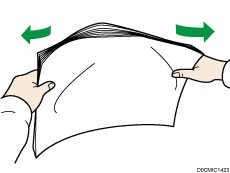
 Make sure there is space between the sheets.
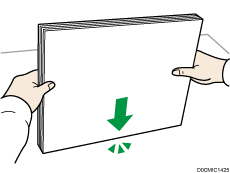
 Hold the stack of paper in both hands and tap the long and short edges of the paper against a flat surface to align them.
Loading Paper into Tray 1
 (mainly Europe and Asia)
Tray 1 can hold A4![]() paper only. If you want to print on 81/2 × 11
paper only. If you want to print on 81/2 × 11![]() from Tray 1, contact your service representative.
from Tray 1, contact your service representative.
 (mainly North America)
Tray 1 can hold 81/2 × 11![]() paper only. If you want to print on A4
paper only. If you want to print on A4![]() from Tray 1, contact your service representative.
from Tray 1, contact your service representative.

When paper loaded in the right side of Tray 1 runs out, paper on the left is automatically shifted to the right. Do not pull out Tray 1 while the tray is moving paper; wait until sounds stop coming from the tray.
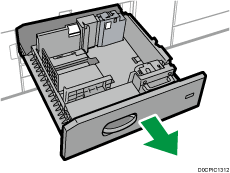
 Carefully pull out the paper tray until it stops.
 Square the paper and load it print side down.
When you load paper into the right side of the tray, load the paper so its right edge is flush against the right side of the tray.
When you load paper into the left side of the tray, load the paper so its left edge is flush against the left side of the tray.
When loading paper in the left side of the tray, load at least 30 sheets.
Whole tray pulled out
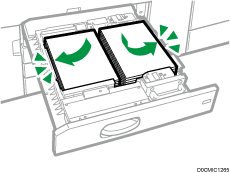
Left half of the tray pulled out
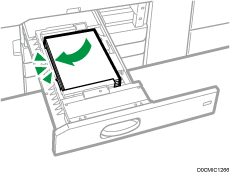
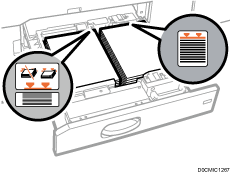
Do not stack paper over the limit mark.
 Carefully push the paper tray fully in.
 Specify the paper settings.

You can load paper even if Tray 1 is in use. It is okay to pull out the left half of the tray while Tray 1 is in use.
Loading Paper into the A3/11 × 17 Tray Unit
 (mainly Europe and Asia)
If you attach the A3/11 × 17 tray unit to Tray 1, it will hold A3![]() paper only. If you want to print on A4
paper only. If you want to print on A4![]()
![]() , B4 JIS
, B4 JIS![]() , 11 × 17
, 11 × 17![]() , 81/2 × 14
, 81/2 × 14![]() , or 81/2 × 11
, or 81/2 × 11![]()
![]() , contact your service representative.
, contact your service representative.
 (mainly North America)
A3/11 × 17 tray unit can hold 11 × 17![]() paper only. If you want to print on A3
paper only. If you want to print on A3![]() , A4
, A4![]()
![]() , B4 JIS
, B4 JIS![]() , 81/2 × 14
, 81/2 × 14![]() , or 81/2 × 11
, or 81/2 × 11![]()
![]() , contact your service representative.
, contact your service representative.

Check that the paper edges are aligned at the right side.
 Check that paper in the paper tray is not being used, and then pull the tray carefully out until it stops.
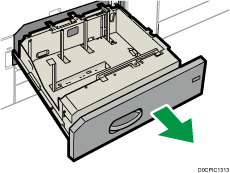
 Square the paper and load it print side down.
Do not stack paper over the limit mark.
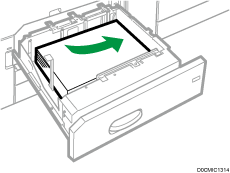
 Carefully push the paper tray fully in.
 Specify the paper settings.
Loading Paper into Trays 2 and 3
Each paper tray is loaded in the same way. In the following example procedure, paper is loaded into Tray 2.
To use coarted paper, the optional feed roller unit is required.

Check that the paper edges are aligned at the right side.
If a paper tray is pushed vigorously when putting it back into place, the position of the tray's side fences may slip out of place.
When loading a low number of sheets, be sure not to squeeze the side fences in too tightly. If the side fences are squeezed too tightly against the paper, the edges may crease, the paper may misfeed, or if it weighs between 52.3–65.9 g/m2 (14.0–17.9 lb. Bond), it may wrinkle.
Do not stack paper over the limit mark. If you load paper over the limit mark, the printed images may become slanted or a paper jam may occur.

 Check that paper in the paper tray is not being used, and then pull the tray carefully out until it stops.
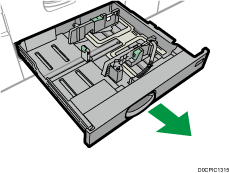
 Remove paper if loaded.
 Release the lock on the side fence.
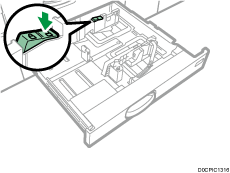
 Loosen the screws holding the side fences in position.
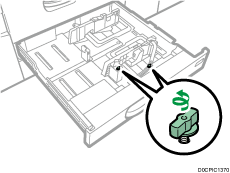
 While pressing down the release lever of the side fence, slide the side fences outward.
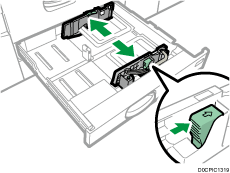
 While pinching the release lever of the end fence, slide the end fence outward.
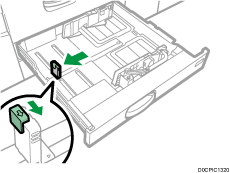
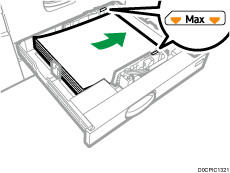
 Square the paper and load it print side down.
Do not stack paper over the limit mark.
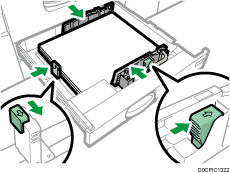
 Align the end and side fences gently against the paper you loaded.
Make sure that there is no space between the paper and the side fences or end fence.
When loading thin paper, keep the gap between the paper and each side fence within 0.5 mm. If the gap is too wide, creases may occur.
 Turn the screws slowly to fasten it in place.
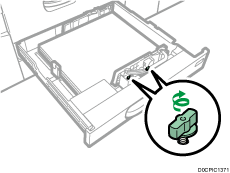
 Re-lock the side fences.
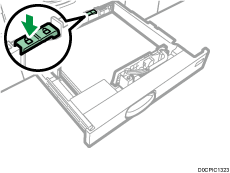
 Carefully push the paper tray fully in.
 Specify the paper settings.

You can load envelopes in Trays 2 and 3. When loading envelopes, place them in the correct orientation.
Loading Tab Stock into Trays 2 and 3
When loading tab stock, always use the optional tab sheet holder.
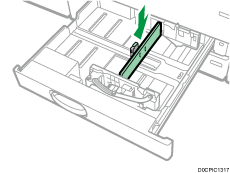
Load tab stock so that the side with the tab faces the tab sheet holder.
Pressing the release lever, adjust the end fence position so that the tab sheet holder fits against the tab stock.
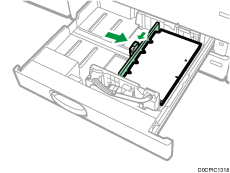
Specify the paper settings before you start printing.
Loading Paper into the Bypass Tray
Use the bypass tray to use transparencies, adhesive labels, translucent paper, and paper that cannot be loaded in the paper trays.
The maximum number of sheets you can load at the same time depends on paper type.
Recommended Paper Sizes and Types

Do not stack paper over the limit mark. If you load paper over the limit mark, the print image may be slanted or the paper may be jammed.
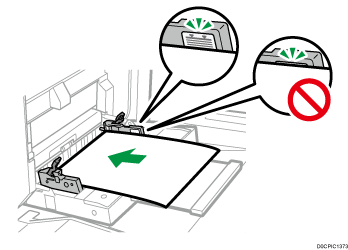
 Open the bypass tray.
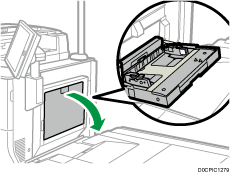
 Pull the extender out when loading paper whose size is larger than A4
![]() or 81/2 × 11
or 81/2 × 11![]() .
.
 Release the locks on both of the paper guides.
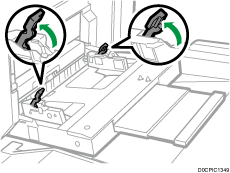
 Insert the paper print side up as far as it will go into the machine.
Fan sheets before loading so that multiple sheets of paper do not stick to each other and are not fed at once.
When loading envelopes or letterhead paper, confirm the orientation, face and back, or location of flaps.
 Put your fingers on the dimples on the front and rear paper guides and align the paper guides to the paper size.
If the guides are not flush against the paper, images might be skewed or paper misfeeds might occur.
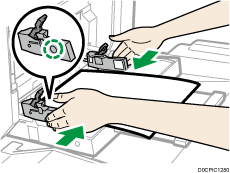
 While holding the paper guides with your hands, lock both of the paper guides again.
Make sure that the total of the gaps between the paper and the front and rear paper guides does not exceed 0.75 mm (0.03 inches).
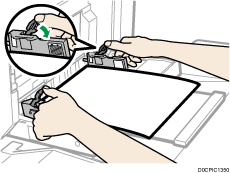
 Specify the paper settings.

To load paper on the bypass tray, it is better to orient it in the direction of
 .
.Certain types of paper might not be detected properly when placed on the bypass tray. If this happens, remove the paper and place it on the bypass tray again.
You do not need to pull the extender out if the banner sheet guide tray is installed.
To load paper whose horizontal length is longer than 487.7 mm (19.20 inches), the multi bypass banner sheet tray or banner sheet guide tray is needed.
Loading Tab Stock into the Bypass Tray
When loading tab stock, load tab stock so the tabs face to the right.
Specify the paper settings before you start printing.
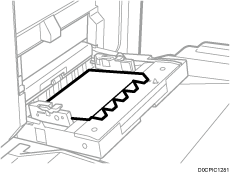
Loading Paper into the Multi Bypass Banner Sheet Tray
The multi bypass banner sheet tray can be attached to the bypass tray. This allows you to load paper having a horizontal dimension of 487.8 mm (19.21 inches) or greater in the bypass tray.
 Pull out the multi bypass banner sheet tray.
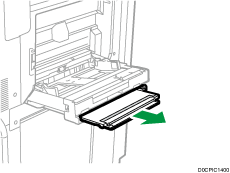
 After pulling out the multi bypass banner sheet tray, lift it until it clicks.
Raise the multi bypass banner sheet tray until it is at an angle of about 60 degrees with the floor.
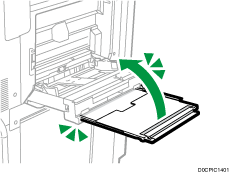
 Open the extender.
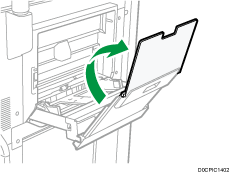
 Release the locks on both of the paper guides.
Move the paper guides in the same way as when loading paper in the bypass tray.
 Insert the paper print side up as far as it will go into the machine.
 Put your fingers on the dimples on the front and rear paper guides and align the paper guides to the paper size.
If the guides are not flush against the paper, images might be skewed or paper misfeeds might occur.
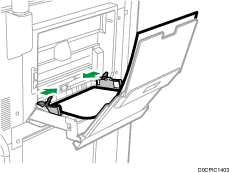
 While holding the paper guides with your hands, lock both of the paper guides again.
Make sure that the total of the gaps between the paper and the front and rear paper guides does not exceed 0.75 mm (0.03 inches).
 Specify the paper settings.
Closing the Multi Bypass Banner Sheet Tray
 Lightly pull up the extender, and then fold it into the machine.
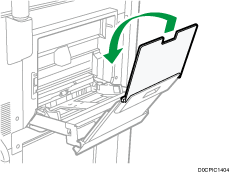
 Raise the multi bypass banner sheet tray towards the machine until it clicks, and then tilt it to the opposite side.
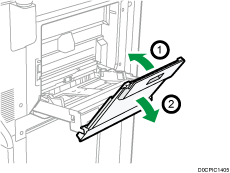
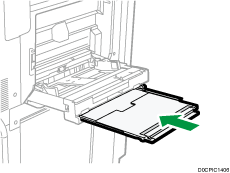
 Push the multi bypass banner sheet tray into its original position.
Loading Paper into the Banner Sheet Guide Tray
The banner sheet guide tray can be attached to the wide LCT. This allows you to load paper having a horizontal dimension of 487.8 mm (19.21 inches) or greater in the bypass tray.

- When you open the bypass tray when a banner sheet guide tray is installed, do not put your hands on the front side and the back side of the place indicated by the label of the banner sheet guide tray. Otherwise, your fingers might be caught, resulting in injury.
 Open the bypass tray.
Be careful not to get your hand caught between the bypass tray and banner sheet guide tray.
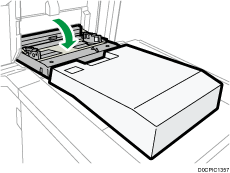
 Release the locks on both of the paper guides.
Move the paper guides in the same way as when loading paper in the bypass tray.
 Insert the paper print side up as far as it will go into the machine.
To load paper on the banner sheet guide tray, load it over the joint line of the bypass tray and the banner sheet guide tray.
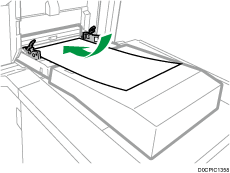
 Put your fingers on the dimples on the front and rear paper guides and align the paper guides to the paper size.
If the guides are not flush against the paper, images might be skewed or paper misfeeds might occur.
 While holding the paper guides with your hands, lock both of the paper guides again.
Make sure that the total of the gaps between the paper and the front and rear paper guides does not exceed 0.75 mm (0.03 inches).
 Specify the paper settings.
Loading Paper into the Multi Bypass Tray (Tray A)

The maximum number of sheets you can load at the same time depends on paper type. Do not stack paper over the limit mark. If you load paper over the limit mark, the printed images may become slanted or a paper jam may occur. For details about the maximum number of sheets you can load for each paper type, see the following:
Check the paper edges are aligned at the left side.
When loading a low number of sheets, be sure not to squeeze the side fences in too tightly. If the side fences are squeezed too tightly against the paper, the edges may crease, the paper may misfeed, or if it weighs between 52.3–63.0 g/m2 (14.0–16.9 lb. Bond), it may wrinkle.
 Set the side fences to the paper size, and then square the paper and load it print side up.
Do not stack paper over the limit mark.
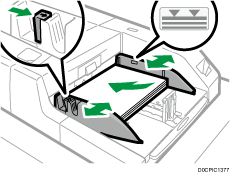
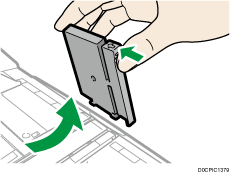
 Set the end fence.
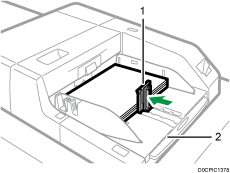
End fence
Extender
To remove the end fence, slide it to the right by pressing the stopper down.
 Press the elevator switch on the multi bypass tray (Tray A).
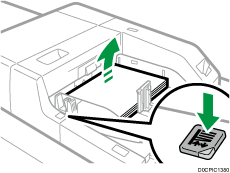
The lamp of the elevator switch is blinking while the tray is going up, and keeps lit when it stops.
Press the elevator switch to move down the tray if you want to either add paper or remove jammed ones.
 Specify the paper settings.

Pull the extender out when loading A4
 , 81/2 × 11
 or larger sheets in the multi bypass tray (Tray A).
Letterhead paper must be loaded in a specific orientation.
You can load envelopes into the multi bypass tray (Tray A). Envelopes must be loaded in a specific orientation.
Specify the sizes of paper that are not automatically detected.
Specifying the Paper Size That Is Not Automatically Detected
Loading tab stock into the multi bypass tray (Tray A)
When setting tab stock, always use the tab fence. Tabs must be set at the right side of the multi bypass tray (Tray A).
Specify the paper settings before you start printing.
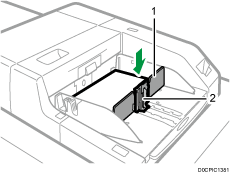
Tab fence
End fence
Loading Paper into the Large Capacity Tray (LCT)
 (mainly Europe and Asia)
The LCT can hold A4![]() paper only. If you want to print on 81/2 × 11
paper only. If you want to print on 81/2 × 11![]() or B5 JIS
or B5 JIS![]() from the LCT, contact your service representative.
from the LCT, contact your service representative.
 (mainly North America)
The LCT can hold 81/2 × 11![]() paper only. If you want to print on A4
paper only. If you want to print on A4![]() or B5 JIS
or B5 JIS![]() from the LCT, contact your service representative.
from the LCT, contact your service representative.
The extension unit is required to load A4![]() , B4 JIS
, B4 JIS![]() , 81/2 × 14
, 81/2 × 14![]() , or 81/2 × 11
, or 81/2 × 11![]() .
.

Check that the paper edges are aligned at the left side.
 Check that paper in the paper tray is not being used, and then open the top cover of the LCT.
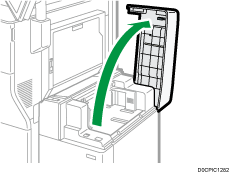
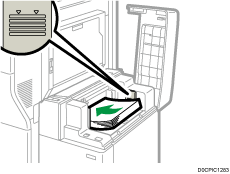
 Load paper into the paper tray with the print side up.
Do not stack paper over the limit mark.
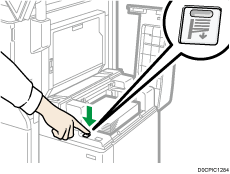
 Press the [Down] key.
The key blinks while the bottom plate is moving down.
 Load paper by repeating Steps 2 and 3.
 Close the top cover of the LCT.
 Specify the paper settings.
Loading Paper into the Wide LCT
Various sizes of paper can be loaded in the wide LCT by adjusting the positions of side fences and end fence.

Check that the paper edges are aligned with the left side.
When loading translucent paper, always use long grain paper, and set the paper direction according to the grain.
 Check that paper in the paper tray is not being used, and then pull the tray carefully out until it stops.
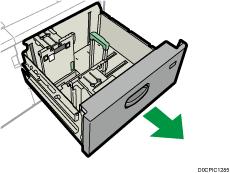
 Remove paper if loaded.
 Loosen the screws holding the side fences in position.
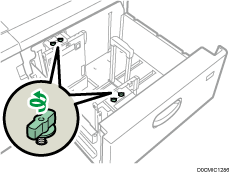
 Holding the labeled parts of the side fences, slide the fences outward.
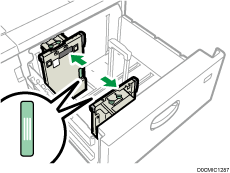
 While pressing the release button of the end fence, slide the end fence outward.
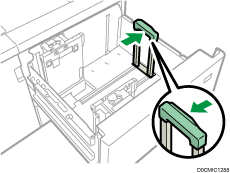
 Load paper into the paper tray with print side up.
Load a stack of paper about 5–10 mm (0.2–0.4 inches) high, using the symbol at the bottom of the side fence as a guide.
Make sure that the paper rest on top of the supporting plates on both sides.
Set the paper flush against the left fence and align the paper edges.
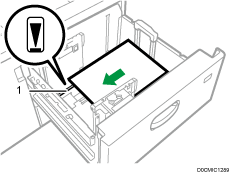
Supporting plate
 Holding the labeled parts of the side fences, adjust the fences to the paper size.
Set the paper flush against the protrusions in the bottom of the inner side fence. Make sure that there is no space between the paper and the side fences.
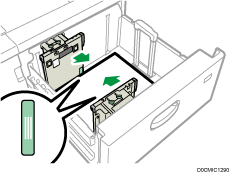
Check that the positions of the scale numbers on the top of both of the side fences are almost the same. When loading regular size paper, align the screw holes on the side fences to the paper size mark.
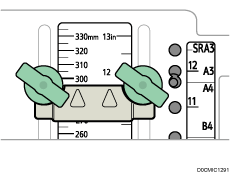
 Hold the inner side fence, and then tighten the screws to the inner side fence.
Fasten the front side fence in the same way.
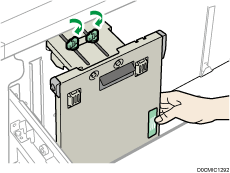
 Load additional sheets, if necessary.
Do not stack paper over the limit mark.
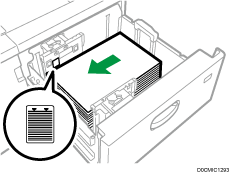
 While pressing the release button of the end fence, align the end fence gently against the paper you loaded.
Make sure that there is no space between the paper and end fence.
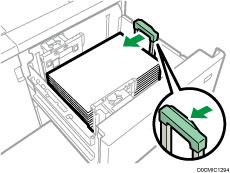
 Carefully slide the paper tray fully in.
If you push the paper tray too forcefully when you put it back in place, the position of the paper might change and print accuracy becomes lower.
 Specify the paper settings.

If you select Paper Weight 6 to 9, [Coated Paper: High Gloss], [Coated: Glossy], [Coated: Matte], [Label Paper], or [Transparency] in [Tray Paper Settings], air is blown out automatically to fan the paper loaded in the wide LCT. Fan this paper before loading it.
You can load envelopes in the wide LCT. When loading envelopes, place them in the correct orientation.
Loading Tab Stock into the Wide LCT
When loading tab stock, attach the tab sheet fence.
 Open the front cover of the wide LCT, and then take out the tab sheet fence.
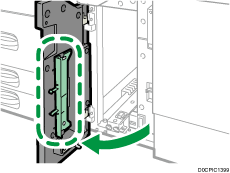
 Close the front cover.
 Check that paper in the paper tray is not being used, and then pull the tray carefully out until it stops.

 Set the side fences to the size of the tab stock to be loaded, and then load it.
 Attach the tab sheet fence, and then align the end fence gently against the paper you loaded while pressing the release button of the end fence.
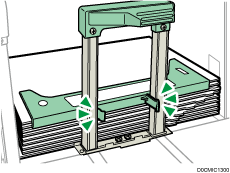
 Carefully slide the paper tray fully in.
 Specify the paper settings.

Replace the tab sheet fence after use.
Loading Paper with a Vertical Size of 100.0 mm to 139.2 mm in Wide LCT
When loading paper that is 100.0 to 139.2 mm (3.94 to 5.48 inches) in vertical length, attach the postcard side fences.
 Open the front cover of the wide LCT, remove the screws from the postcard side fences, and then take them out.
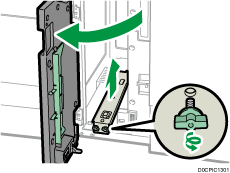
 Close the front cover.
 Check that paper in the paper tray is not being used, and then pull the tray carefully out until it stops.

 Fit the indentation on the bottom of the postcard side fence with the limit mark into the head of the screw on the bottom of the inner side fence.
 Fit the hole on the top of the postcard side fence into the projection on the top of the side fence.
Set the other postcard side fence to the front side fence in the same way.
 Fasten the postcard side fences with the screws.
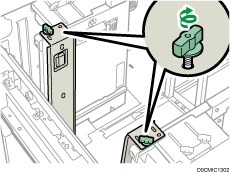
 Align the end fence and side fences with the paper size to be loaded, and then load the paper.
 Carefully slide the paper tray fully in.
 Specify the paper settings.

Replace the postcard side fences after use.
Loading B5 Vertical or Larger Paper in Wide LCT
When loading paper that is B5 JIS![]() or larger, attach the paper supports.
or larger, attach the paper supports.
 Open the front cover of the wide LCT, remove the screws from the postcard side fences, and then take them out.

 Take out the paper supports.
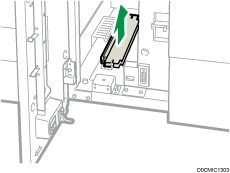
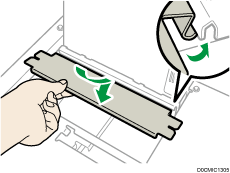
 Replace the postcard side fences, and then close the front cover of the wide LCT.
 Check that paper in the paper tray is not being used, and then pull the tray carefully out until it stops.

 Loosen the screws holding the side fences in position.

 Slide the end fence and side fences outward.
To slide the end fence, move the end fence while pressing the release button.
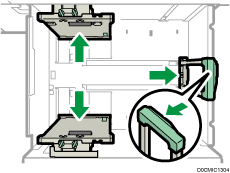
 Attach the paper supports by fitting the groove of the paper supports into the supporting plates of the fences.
 Check whether the paper supports and side fences are connected by moving the side fences.
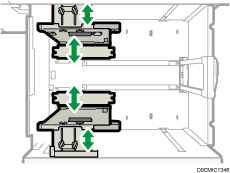
 Align the end fence and side fences with the paper size to be loaded, and then load the paper.
 Carefully slide the paper tray fully in.
 Specify the paper settings.

Replace the paper supports after use.
Loading Paper into the Two-tray Wide LCT
The two-tray wide LCT is identified as Tray T1 and T2.
To use carbonless paper, the optional carbonless paper unit is required.

Check that the paper edges are aligned with the left side.
When you use paper of Paper Weight 8 with a convex curl greater than 5 mm, paper of Paper Weight 9 with a convex curl greater than 3 mm, or paper with a paper thickness of 350 gsm or greater with a convex curl, a paper jam may occur if the height of the stacked paper is less than 4 mm. To use paper in such condition, set the paper in the tray as follows:
Set as many as 5 to 10 more sheets than the number of sheets you intend to print
Correct the curl amount before setting the paper
Turn over the paper so that the paper is with a concave curl
 Check that paper in the paper tray is not being used, and then pull the tray carefully out until it stops.
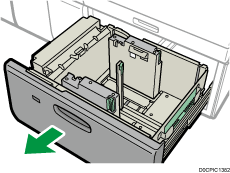
 Remove paper if loaded.
 Release the end fence.
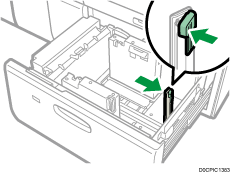
 Release the side fence.
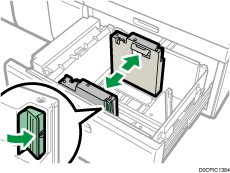
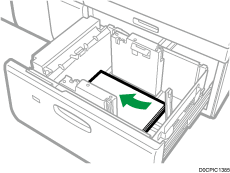
 Load paper by aligning the paper with the left side of the paper tray.
Place paper with print side up.
Load a stack of paper about 5–10 mm (0.2–0.4 inches) high.
Make sure the paper rest on top of the supporting plates on both sides.
When you load paper that is 204 mm (8.04 inches) or smaller, remove the supporting plates from the bottom of the paper tray.
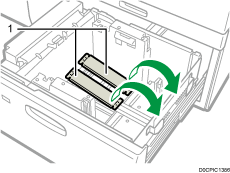
Supporting plates
 Take the grip of the side fences with your fingers, and adjust the side fences to the paper size.
Set the paper flush against the bottom of the inner side fence.
Check that the scale numbers on the top of the side fences are roughly the same.
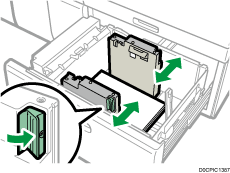
 Load additional sheets, if necessary.
Do not stack paper over the limit mark.
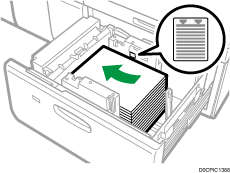
 Tightly fit the end fence to the loaded paper, and then re-lock the end fence again.
Make sure there are no gaps between the paper and end fence.
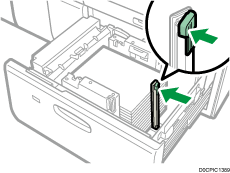
 Carefully push the paper tray fully in until it clicks.
 Specify the paper settings.

Do not push in the paper presser on the upper part of the side fence. If it is pushed in, return it to its original position by hand.
When printing on normal paper that is 487.8 mm (19.20 inches) long or more with a thickness of Paper Weight 2 or below or coated paper with a thickness of Paper Weight 3 or below, output paper may bend in the paper output tray so that it may curl or clog in the paper output entrance. In this case, use long-grain paper. If the output paper still bends when coated long-grain paper of Paper Weight 3 or below, remove the output paper one by one or place a single sheet of paper in the shift tray then resume printing.
After sliding the paper tray in, make sure that the paper size is changed correctly on the printer's initial screen. To display the printer's initial screen, display the Home screen and press the [Printer (Classic)] icon.
You can load envelopes into the two-tray wide LCT. When loading envelopes, place them in the correct orientation.
When you load paper that is 420.0 mm (16.54 inches) or wider in the banner sheet tray of the two-tray wide LCT, load it as follows:
Press the elevator switch to move the bottom plate down until the lamp goes out, and then open the cover and load the paper.
Hold the paper lengthwise and load it little by little.
If you load thin paper or coated paper, load it little by little. Press down on the paper while you load it so that the paper loaded in the bottom is not dragged.
If you load thick paper, load it little by little and align the side fence with the horizontal side of the paper.
Check that the paper is correctly positioned against the back of the paper feed tray and the label on which is printed the paper sizes for the paper tray.
When you load paper that is 420.0-559.9 mm (16.54–22.00 inches) wide, use two short-end fences.
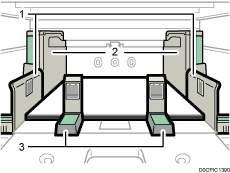
Side fence extension
Side fence
Short-end fences
When you load paper that is 560.0-700.0 mm (22.00–27.55 inches) wide, use one long-end fence.
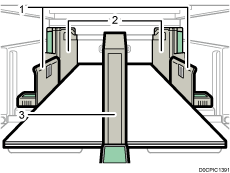
Side fence extension
Side fence
Long-end fences
When you load paper, load the paper and set the auxiliary side fence. Align the auxiliary side fence against the side of the paper that is higher than the side fence extension.
Adjust the side fences according to the corresponding instructions on the label attached to the tray.
Loading Tab Stock into the Two-tray Wide LCT
When loading tab stock, attach the tab fence.
 Check that paper in the paper tray is not being used, and then pull the tray carefully out until it stops.

 Take out the tab fence from the pocket on the right-hand side of the paper tray.
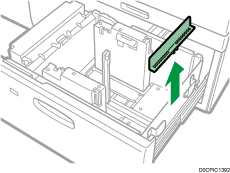
 Adjust the side fences according to the size of the tab stock to be loaded, and then load the tab stock.
Load the tab stocks with their side with the tabs facing the end fence.
 Attach the tab fence, and then align the end fence gently against the paper you loaded while pressing the release button of the end fence.
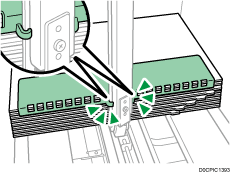
 Carefully push the paper tray fully in until it clicks.
 Specify the paper settings.

Replace the tab fence after use.
Attaching the small tab end fence to the two-tray wide LCT
When loading the following paper, attach the small tab end fence:
B5 JIS
 (width: 182 mm; length: 257 mm)–SRA4
 (width: 225 mm; length: 320 mm) of Paper Weight 9
Carbonless paper of Paper Weight 2 or less
 Check that paper in the paper tray is not being used, and then pull the tray carefully out until it stops.
 Take out the small tab end fence from the pocket on the right-hand side of the paper source tray.
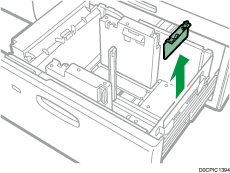
 Set the side fences to the size of the paper to be loaded, and then load paper into the tray.
 Attach the small tab end fence, and then align the end fence gently against the paper you loaded while pressing the release button of the end fence.
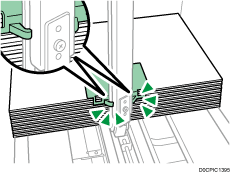
 Carefully push the paper tray fully in until it clicks.
 Specify the paper settings.

Replace the small tab end fence after use.
Loading Paper into the Interposer

Do not place anything on top of or leave documents on the sensor. This may lead to the paper size not being correctly scanned or paper jams.
When using the Z-fold function, the paper in the interposer must be of the same size as the prints after they have been folded. If the paper in the interposer is larger than the Z-folded sheets, a misfeed might occur.
Do not use paper that has already been printed onto by this machine.
 Load paper orderly.
Do not stack paper over the limit mark.
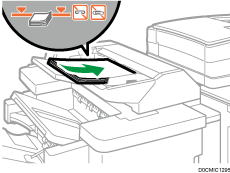
 Adjust the side fences to the paper size.
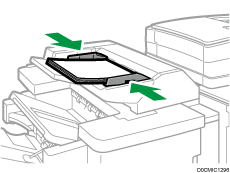

Load paper with its printed side up (the front side).
Load paper in the interposer in the same orientation as paper in the paper tray.
The staple position or punch hole position will be on the left side of the paper, when you are facing the machine.
To load the paper in the interposer, align the orientation of originals in the ADF as shown below.
Interposer
ADF


Loading Paper into the Twin Interposer

Do not place anything on top of or leave documents on the sensor. This may lead to the paper size not being correctly scanned or paper jams.
Load paper in the Interposer Upper Tray and Interposer Lower Tray in the same way. This procedure for the Interposer Upper Tray is described.
 While pressing the release lever, align the side fences with the paper size to be loaded.
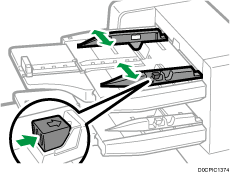
 Load paper orderly.
Do not stack paper over the limit mark.
The interposer tray automatically starts the operation shortly after loading paper. Adjust the side fences and end fence before that.
Align the side fences gently against the paper you loaded, if necessary.
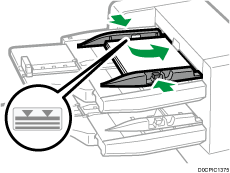
While pressing the release lever, align the end fence to the loaded paper.
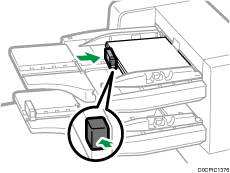
 Specify the paper settings.

Load paper with its printed side up (the front side).
Load paper in the twin interposer in the same orientation as paper in the paper tray.
The staple position or punch hole position will be on the left side of the paper, when you are facing the machine.
To load the paper in the twin interposer, align the orientation of originals in the ADF as shown below.
Twin interposer
ADF


Specifying the Paper Size That Is Not Automatically Detected
 Press [Tray Paper Settings] on the Home screen.

 Select the tray for which you want to change the paper size.
 Press [Manual Paper Settings].
 Press [Paper Size] tab.
The size of the paper in Tray 1 and the large capacity tray (LCT) is fixed and cannot be changed.
 Select the loaded paper size, and then press [OK].
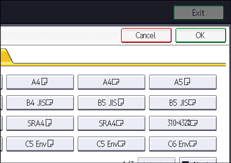
 Press [Home] (
 ) to close the [Tray Paper Settings] screen.
Specifying a Custom Size Paper
 Press [Tray Paper Settings] on the Home screen.

 Select the tray for which you want to change the paper size.
 Press [Manual Paper Settings].
 Press [Paper Size] tab.
The size of the paper in Tray 1 and the large capacity tray (LCT) is fixed and cannot be changed.
 Press [Custom Size].
If a custom size is already specified, press [Change Size].
 Press [Vertical].
 Enter the vertical size using the number keys, and then press [
![]() ].
].
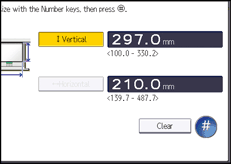
 Press [Horizontal].
 Enter the horizontal size using the number keys, and then press [
![]() ].
].
 Press [OK] twice.
 Press [Home] (
 ) to close the [Tray Paper Settings] screen.
