Envelope Orientation and Recommended Status
The way to place an original on the exposure glass and load envelopes varies depending on the shape and orientation of the envelopes.

Do not print on the following envelopes:
Window envelopes
Envelopes with moisture
Before setting envelopes
To load envelopes with the flaps opened, use only envelopes that are at least 148 mm (5.9 inches) long including the open flap. Set the envelopes with the flaps fully open. A paper jam may occur depending on the length or shape of the envelope flap.
Before loading envelopes, press down on them to remove any air from inside and flatten out all four edges. If they are bent or curled, flatten their leading edges (the edge going into the machine) by running a pencil or ruler across them.

For information about recommended envelopes, contact your local dealer.
The Duplex function cannot be used with envelopes.
To get better output quality, it is recommended that you set the margins of the four sides, to at least the following values:
Leading edge: 4 mm (0.16 inches)
Trailing edge: 4 mm (0.16 inches)
Right/Left edge: 2 mm (0.08 inches)
An image may not be printed clearly on a sheet whose thickness is uneven. Print a few sheets and check the result.
The printing result may not be adequate or the envelope may become wrinkled when the temperature or humidity is high.
The printing result may not be adequate or output envelopes may become wrinkled depending on the printing environment even when using the recommended envelopes.
Using the Copy Function
Orientation of envelopes | Exposure glass | Trays 2–3 | Bypass tray or Wide LCT or Two-tray wide LCT or Multi bypass tray (Tray A) |
|---|---|---|---|
Side-opening envelopes  | 
| 
| 
|
Side-opening envelopes  | 
| 
| *1 
|


*1 You cannot print from the two-tray wide LCT or the multi bypass tray.
When loading envelopes, specify the envelope size and thickness.
Using the Printer Function
Types of envelopes | Trays 2–3 | Bypass tray or Wide LCT or Two-tray wide LCT or Multi bypass tray (Tray A) |
|---|---|---|
Side-opening envelopes |
|
|
Side-opening envelopes |
| *1
|
*1 You cannot print from the two-tray wide LCT or the multi bypass tray.
When loading envelopes, select "Envelope" as the paper types using both [Tray Paper Settings] and printer driver and specify the thickness of envelopes.
When loading envelopes, select the check box of [Rotate by 180 Degrees] on [Detailed Settings] tab ![]() [Basic] menu, and then print.
[Basic] menu, and then print.
Rotate the print image by 180 degrees using the printer driver when printing on the following paper:
Envelopes that are loaded with their short edges against the machine body
Envelopes that are loaded with their long edges against the machine body in the bypass tray and wide LCT
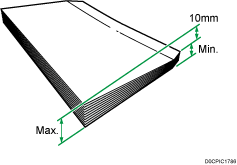
Loading envelopes on the two-tray wide LCT:
If a paper jam occurs, load 5 more envelopes.
Keep the height difference between the bottom of the envelopes and flaps within 10 mm.