Using Web Printing Tool
You can easily send files and configure print settings without printing instructions using a command line, uploading a file, or designating printing options.
The files that you can print using Web Printing Tool are HP-GL, HP-GL/2, HP-RTL, TIFF, CALS, JPEG, PDF, and PostScript files. The file types that you can print vary depending on the printer language installed on the machine.
RP-GL/2
Supports printing of HP-GL, HP-GL/2, and HP-RTL files.
For an overview of RP-GL/2 and other details such as printable data, see the following:
Major Differences between RP-GL and RP-GL/2
Description of HP-GL, HP-GL/2, and HP RTL
For printing using commands such as ftp or lpr, see "Printing Files Directly from Windows", Appendix.
RTIFF
Supports printing of TIFF, CALS, and JPEG files.
For an overview of RTIFF and other details such as printable data, see the following:
For printing using commands such as ftp or lpr, see "Printing Files Directly from Windows", Appendix.
Supports printing of PDF files.
For details about with PDF printable data and commands, see Using UNIX Commands.
PS
Supports printing of PostScript files.

Only some of the print settings can be configured in Web Printing Tool. Other print settings can be configured only on the control panel. When you print data using Web Printing Tool, the print settings specified in Web Printing Tool have priority over the settings configured on the control panel. In order to configure the print settings that cannot be configured in Web Printing Tool, open the [Printer Settings] screen on the machine's control panel.
For details about the print settings, see the following:
Web Printing Tool Operating Environment
Supported Operating Systems
Microsoft Windows 8.1/10/11
Installing Web Printing Tool
To Instal Web Printing Tool, prepare the CD-ROM provided with the machine or download the installer from Web Image Monitor.
 Start the Web Printing Tool installer.
To start the installer from the CD-ROM
Set the CD-ROM on the computer.
If automatic reproduction begins, exit the driver installer.
Double-click the Web Printing Tool Installer.
If the CD-ROM drive is D:\, the file is stored in the following folder:
D:\Windows\WebPrintingTool
To start the installer from Web Image Monitor
Enter "http://(IP address of the machine) or (host name)/" in the address bar of the Web browser, and then press Enter.
Enter the user name and password to log in to Web Image Monitor.
Click [Status/Information]
 [Job] in the menu area.
Click [Download Web Printing Tool].
Click [Download].
Double-click the downloaded file.
 Select a language, and then click [OK].
 On the "License Agreement" screen, click [I accept the agreement] and then click [Next].
 Select where to install Web Printing Tool, and then click [Next].
 Click [Install].
 When the installation is complete, click [Finish].
Starting Web Printing Tool
On the [Start] menu, click [IP CW2200 Web Printing Tool].
Enter the IP address of this machine in "Machine IP Address".
Click [OK].
Screen Configuration
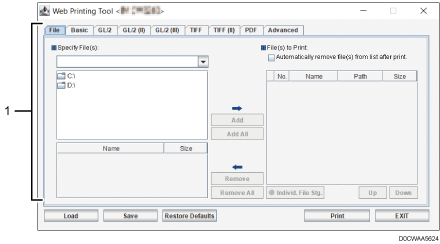
Area for selecting files to print and configuring print settings
This area is used for selecting the files to print and configuring print settings.
For details, see Web Printing Tool's Help.
Basic Operations of Web Printing Tool
On the [Basic] tab or corresponding tab in the area for selecting files to print and configuring print settings, configure the printer settings.
Click the [File] tab, and then select the folder containing the file or files you want to print in the "Specify File(s):" area on the left.
The files in the selected folder appear in the bottom section of the Specify File(s): area.
Select a file you want to print, and then click [Add].
You may also click [Add All] to select all the files in the folder.
The selected files appear in the File(s) to Print: area on the right.
Click [Print].
Before printing, you can also select each file in the File(s) to Print: area, click [Individ. File Stg.], and then configure the print settings for it.
You can also drag files or folders to the File(s) to Print: area. If you drag and drop a folder, the files in any sub-folders will also be added.