Configuring the RPGL Menu
Available setting items in the RPGL Menu differ between RP-GL and RP-GL/2.
For an explanation of each symbol, see the following table:
Mark | Description |
|---|---|
 | Available on RP-GL only. |
 | Available on RP-GL/2 only. |
 | Available on both RP-GL and RP-GL/2. |
 | Also available in Web Printing Tool. |
List of RPGL Menu Configuring Items
The setting marked with an asterisk " " indicates the default for the setting.
Default may differ depending on the country.
"Paper Input 2: Regular (Portrait)", "Paper Input 2: Regular (Landscape)", and "Paper Input 2: Custom Size" appear on "24. Paper Input Location" only when the optional Paper Input Location 2 is attached.
The default setting for "86. Print Quality" is [Speed Priority] when you specify for Paper Type a paper type other than plain paper, inkjet plain, thin paper, or coated (CAD).
No. | Sub No. | Item | Setting | |||||||
|---|---|---|---|---|---|---|---|---|---|---|
1 | 2 | 3 | 4 | 5 | 6 | 7 | 8 | |||
9 | 10 | 11 | 12 | 13 | 14 | 15 | 16 | |||
17 | 18 | 19 | 20 | 21 | 22 | 23 | 24 | |||
25 | 26 | 27 | 28 | 29 | 30 | 31 | 32 | |||
33 | 34 | 35 | 36 | 37 | 38 | 39 | 40 | |||
41 | 42 | 43 | 44 | 45 | 46 | 47 | 48 | |||
5 | No | Axis Rotation |
| 90 degrees | 180 degrees | 270 degrees | ||||
6 | Partly Yes | Plotter ID | 7475A |
| 7570A | 7575A | 7576A | 7580B | 7585B | 7586B |
7595A | 7596A | RP-GL/2 | ||||||||
11 | RP-GL/2 | Type1 | Type2 | Type3 |
| |||||
7 | No | Adjust X Offset |
| (Range: ± 199 mm; specify in increments of 1 mm) | ||||||
8 | No | Adjust Y Offset |
| (Range: ± 199 mm; specify in increments of 1 mm) | ||||||
9 | Yes | Pen 1 Settings | 9-1. Pen 1: Width | 9-2. Pen 1: Density | 9-3. Pen 1: Color | 9-5. Custom Width (mm) | 9-6. Custom Width (dot) | |||
1 | Pen 1: Width | 0.00 mm | 0.10 mm | 0.13 mm | 0.18 mm | 0.20 mm | 0.25 mm | 0.30 mm | 0.35 mm | |
| 0.50 mm | 0.60 mm | 0.65 mm | 0.70 mm | 0.80 mm | 0.90 mm | 1.0 mm | |||
1.1 mm | 1.2 mm | 1.3 mm | 1.4 mm | 1.5 mm | 2.0 mm | 3.0 mm | 5.0 mm | |||
8.0 mm | 12 mm | Custom Width (mm) | Custom Width (dot) | |||||||
9 | 2 | Pen 1: Density |
| 90% | 80% | 70% | 60% | 50% | 40% | 30% |
20% | 10% | 0% | ||||||||
3 | Pen 1: Color |
| (Specify a palette number between 0-255) | |||||||
5 | Custom Width (mm) |
| (Range: 0.00-100.00 mm; specify in increments of 0.01 mm) | |||||||
6 | Custom Width (dot) |
| (Range: 0-2362 dot; specify in increments of 1 dot) | |||||||
10 | Yes | Pen 2 Settings | 10-1. Pen 2: Width | 10-2. Pen 2: Density | 10-3. Pen 2: Color | 10-5. Custom Width (mm) | 10-6. Custom Width (dot) | |||
1 | Pen 2: Width | 0.00 mm | 0.10 mm | 0.13 mm | 0.18 mm |
| 0.25 mm | 0.30 mm | 0.35 mm | |
0.40 mm | 0.50 mm | 0.60 mm | 0.65 mm | 0.70 mm | 0.80 mm | 0.90 mm | 1.0 mm | |||
1.1 mm | 1.2 mm | 1.3 mm | 1.4 mm | 1.5 mm | 2.0 mm | 3.0 mm | 5.0 mm | |||
8.0 mm | 12 mm | Custom Width (mm) | Custom Width (dot) | |||||||
10 | 2 | Pen 2: Density |
| 90% | 80% | 70% | 60% | 50% | 40% | 30% |
20% | 10% | 0% | ||||||||
3 | Pen 2: Color |
| (Specify a palette number between 0-255) | |||||||
5 | Custom Width (mm) |
| (Range: 0.00-100.00 mm; specify in increments of 0.01 mm) | |||||||
6 | Custom Width (dot) |
| (Range: 0-2362 dot; specify in increments of 1 dot) | |||||||
11 | Yes | Pen 3 Settings | 11-1. Pen 3: Width | 11-2. Pen 3: Density | 11-3. Pen 3: Color | 11-5. Custom Width (mm) | 11-6. Custom Width (dot) | |||
1 | Pen 3: Width | 0.00 mm |
| 0.13 mm | 0.18 mm | 0.20 mm | 0.25 mm | 0.30 mm | 0.35 mm | |
0.40 mm | 0.50 mm | 0.60 mm | 0.65 mm | 0.70 mm | 0.80 mm | 0.90 mm | 1.0 mm | |||
1.1 mm | 1.2 mm | 1.3 mm | 1.4 mm | 1.5 mm | 2.0 mm | 3.0 mm | 5.0 mm | |||
8.0 mm | 12 mm | Custom Width (mm) | Custom Width (dot) | |||||||
11 | 2 | Pen 3: Density |
| 90% | 80% | 70% | 60% | 50% | 40% | 30% |
20% | 10% | 0% | ||||||||
3 | Pen 3: Color |
| (Specify a palette number between 0-255) | |||||||
5 | Custom Width (mm) |
| (Range: 0.00-100.00 mm; specify in increments of 0.01 mm) | |||||||
6 | Custom Width (dot) |
| (Range: 0-2362 dot; specify in increments of 1 dot) | |||||||
12 | Yes | Pen 4 Settings | 12-1. Pen 4: Width | 12-2. Pen 4: Density | 12-3. Pen 4: Color | 12-5. Custom Width (mm) | 12-6. Custom Width (dot) | |||
1 | Pen 4: Width | 0.00 mm | 0.10 mm | 0.13 mm | 0.18 mm |
| 0.25 mm | 0.30 mm | 0.35 mm | |
0.40 mm | 0.50 mm | 0.60 mm | 0.65 mm | 0.70 mm | 0.80 mm | 0.90 mm | 1.0 mm | |||
1.1 mm | 1.2 mm | 1.3 mm | 1.4 mm | 1.5 mm | 2.0 mm | 3.0 mm | 5.0 mm | |||
8.0 mm | 12 mm | Custom Width (mm) | Custom Width (dot) | |||||||
12 | 2 | Pen 4: Density |
| 90% | 80% | 70% | 60% | 50% | 40% | 30% |
20% | 10% | 0% | ||||||||
3 | Pen 4: Color |
| (Specify a palette number between 0-255) | |||||||
5 | Custom Width (mm) |
| (Range: 0.00-100.00 mm; specify in increments of 0.01 mm) | |||||||
6 | Custom Width (dot) |
| (Range: 0-2362 dot; specify in increments of 1 dot) | |||||||
13 | Yes | Pen 5 Settings | 13-1. Pen 5: Width | 13-2. Pen 5: Density | 13-3. Pen 5: Color | 13-5. Custom Width (mm) | 13-6. Custom Width (dot) | |||
1 | Pen 5: Width | 0.00 mm | 0.10 mm | 0.13 mm | 0.18 mm |
| 0.25 mm | 0.30 mm | 0.35 mm | |
0.40 mm | 0.50 mm | 0.60 mm | 0.65 mm | 0.70 mm | 0.80 mm | 0.90 mm | 1.0 mm | |||
1.1 mm | 1.2 mm | 1.3 mm | 1.4 mm | 1.5 mm | 2.0 mm | 3.0 mm | 5.0 mm | |||
8.0 mm | 12 mm | Custom Width (mm) | Custom Width (dot) | |||||||
13 | 2 | Pen 5: Density |
| 90% | 80% | 70% | 60% | 50% | 40% | 30% |
20% | 10% | 0% | ||||||||
3 | Pen 5: Color |
| (Specify a palette number between 0-255) | |||||||
5 | Custom Width (mm) |
| (Range: 0.00-100.00 mm; specify in increments of 0.01 mm) | |||||||
6 | Custom Width (dot) |
| (Range: 0-2362 dot; specify in increments of 1 dot) | |||||||
14 | Yes | Pen 6 Settings | 14-1. Pen 6: Width | 14-2. Pen 6: Density | 14-3. Pen 6: Color | 14-5. Custom Width (mm) | 14-6. Custom Width (dot) | |||
1 | Pen 6: Width | 0.00 mm | 0.10 mm | 0.13 mm | 0.18 mm |
| 0.25 mm | 0.30 mm | 0.35 mm | |
0.40 mm | 0.50 mm | 0.60 mm | 0.65 mm | 0.70 mm | 0.80 mm | 0.90 mm | 1.0 mm | |||
1.1 mm | 1.2 mm | 1.3 mm | 1.4 mm | 1.5 mm | 2.0 mm | 3.0 mm | 5.0 mm | |||
8.0 mm | 12 mm | Custom Width (mm) | Custom Width (dot) | |||||||
14 | 2 | Pen 6: Density |
| 90% | 80% | 70% | 60% | 50% | 40% | 30% |
20% | 10% | 0% | ||||||||
3 | Pen 6: Color |
| (Specify a palette number between 0-255) | |||||||
5 | Custom Width (mm) |
| (Range: 0.00-100.00 mm; specify in increments of 0.01 mm) | |||||||
6 | Custom Width (dot) |
| (Range: 0-2362 dot; specify in increments of 1 dot) | |||||||
15 | Yes | Pen 7 Settings | 15-1. Pen 7: Width | 15-2. Pen 7: Density | 15-3. Pen 7: Color | 15-5. Custom Width (mm) | 15-6. Custom Width (dot) | |||
1 | Pen 7: Width | 0.00 mm | 0.10 mm | 0.13 mm | 0.18 mm |
| 0.25 mm | 0.30 mm | 0.35 mm | |
0.40 mm | 0.50 mm | 0.60 mm | 0.65 mm | 0.70 mm | 0.80 mm | 0.90 mm | 1.0 mm | |||
1.1 mm | 1.2 mm | 1.3 mm | 1.4 mm | 1.5 mm | 2.0 mm | 3.0 mm | 5.0 mm | |||
8.0 mm | 12 mm | Custom Width (mm) | Custom Width (dot) | |||||||
15 | 2 | Pen 7: Density |
| 90% | 80% | 70% | 60% | 50% | 40% | 30% |
20% | 10% | 0% | ||||||||
3 | Pen 7: Color |
| (Specify a palette number between 0-255) | |||||||
5 | Custom Width (mm) |
| (Range: 0.00-100.00 mm; specify in increments of 0.01 mm) | |||||||
6 | Custom Width (dot) |
| (Range: 0-2362 dot; specify in increments of 1 dot) | |||||||
16 | Yes | Pen 8 Settings | 16-1. Pen 8: Width | 16-2. Pen 8: Density | 16-3. Pen 8: Color | 16-5. Custom Width (mm) | 16-6. Custom Width (dot) | |||
1 | Pen 8: Width | 0.00 mm | 0.10 mm | 0.13 mm | 0.18 mm |
| 0.25 mm | 0.30 mm | 0.35 mm | |
0.40 mm | 0.50 mm | 0.60 mm | 0.65 mm | 0.70 mm | 0.80 mm | 0.90 mm | 1.0 mm | |||
1.1 mm | 1.2 mm | 1.3 mm | 1.4 mm | 1.5 mm | 2.0 mm | 3.0 mm | 5.0 mm | |||
8.0 mm | 12 mm | Custom Width (mm) | Custom Width (dot) | |||||||
16 | 2 | Pen 8: Density |
| 90% | 80% | 70% | 60% | 50% | 40% | 30% |
20% | 10% | 0% | ||||||||
3 | Pen 8: Color |
| (Specify a palette number between 0-255) | |||||||
5 | Custom Width (mm) |
| (Range: 0.00-100.00 mm; specify in increments of 0.01 mm) | |||||||
6 | Custom Width (dot) |
| (Range: 0-2362 dot; specify in increments of 1 dot) | |||||||
17 | No | SP Command if Parameter None/0 |
| Do not Eject Paper | ||||||
18 | No | IW Command |
| Inactive | ||||||
19 | No | Line Pattern Ratio |
| (Range: 20-255%; specify in increments of 1%) | ||||||
20 | No | Reproduction Ratio |
| (Range: 20.0-400.0%; specify in increments of 0.1%) | ||||||
21 | No | Horizontal Adjustment |
| (Range: 99.00-101.00%; specify in increments of 0.01%) | ||||||
22 | No | Vertical Adjustment |
| (Range: 99.00-101.00%; specify in increments of 0.01%) | ||||||
23 | No | Printable Area (Hard Clip) | Plotter Size | Standard Size |
| |||||
24 | No | Paper Input Location |
| Paper Input 1: Regular (Landscape) | System Default | Paper Input 1: Custom Size | Paper Input 2: Regular (Portrait) | Paper Input 2: Regular (Landscape) | Paper Bypass Location | Paper Input 2: Custom Size |
25 | No | Auto Paper Input Switching | On |
| ||||||
26 | No | Resolution |
| |||||||
29 | No | Auto Reduce / Enlarge |
| Auto 1: Reduce/Enlarge (+Rotate) | Auto 2: Reduce/Enlarge Only | |||||
30 | No | Text Font |
| Nimbus Sans Regular | ||||||
39 | No | Margin Adjustment for Auto Reduce/Enlarge |
| (Range: ± 50 mm; specify in increments of 1 mm) | ||||||
40 | No | Pen Setting Priority |
| Machine Setting(s) | ||||||
41 | No | Merge Control | Superimpose |
| ||||||
42 | No | Mirror Image Printing | On |
| ||||||
43 | Partly Yes | Method to Select Paper Input Automatically | Off | Auto 1: Long Edge |
| Auto 2 (L&S Edge) + Auto R/E Ratio: Paper Size Set. | Orig. Size Determined + Auto R/E Ratio: Correct Value | |||
43 | 4 | Auto 2 (L&S Edge) + Auto R/E Ratio: Paper Size Set. | A0: Full Size | A1: Full Size | A2: Full Size | A3: Full Size | A4: Full Size | B1 JIS: Full Size | B2 JIS: Full Size | B3 JIS: Full Size |
B4 JIS: Full Size | 36 x 48: Full Size | 34 x 44: Full Size | 30 x 42: Full Size | 24 x 36: Full Size | 22 x 34: Full Size | 21 x 30: Full Size | 18 x 24: Full Size | |||
17 x 22: Full Size | 15 x 20: Full Size | 12 x 18: Full Size | DL: Full Size | 9 x 12: Full Size | LG: Full Size | 8 1/2 x 13 2/5 / Full Size | LT: Full Size | |||
A0 | A1 | A2 | A3 |
| B1 JIS | B2 JIS | B3 JIS | |||
B4 JIS | 36 x 48 | 34 x 44 | 30 x 42 | 24 x 36 | 22 x 34 | 21 x 30 | 18 x 24 | |||
17 x 22 | 15 x 20 | 12 x 18 | DL | 9 x 12 | LG | 8 1/2 x 13 2/5 |
| |||
43 | 5 | Orig. Size Determined + Auto R/E Ratio: Correct Value |
| 1 mm | 5 mm | 10 mm | 20 mm | 30 mm | 40 mm | 50 mm |
100 mm | 150 mm | |||||||||
44 | No | Raster Image Density |
| Dark | ||||||
45 | Yes | Line Attributes | 45-1. Line Caps | 45-2. Line Joins | ||||||
1 | Line Caps |
| Square Cap | Triangle Cap | Round Cap | None | ||||
2 | Line Joins |
| Projecting Join | Projecting/Bevel Join | Triangle Join | Round Join | Bevel Join | None | ||
46 | No | Paper Type for Auto Select Paper Input |
| Translucent Paper | Recycled Paper | Inkjet Plain Paper | Special Paper | Film (Matte) | Coated Paper (CAD) | |
Coated Paper | Thin Paper | |||||||||
47 | No | Method to Determine Original Size | PS/IP Command | Entire Image |
| |||||
48 | No | Margin Adjustment for Original Size |
| (Range: ± 99 mm; specify in increments of 1 mm) | ||||||
49 | Partly Yes | Centering | On |
| ||||||
2 | On |
| Positive Printable Area | |||||||
50 | Yes | Pen 9 Settings | 50-1. Pen 9: Width | 50-2. Pen 9: Density | 50-3. Pen 9: Color | 50-5. Custom Width (mm) | 50-6. Custom Width (dot) | |||
1 | Pen 9: Width | 0.00 mm | 0.10 mm | 0.13 mm | 0.18 mm | 0.20 mm | 0.25 mm | 0.30 mm |
| |
0.40 mm | 0.50 mm | 0.60 mm | 0.65 mm | 0.70 mm | 0.80 mm | 0.90 mm | 1.0 mm | |||
1.1 mm | 1.2 mm | 1.3 mm | 1.4 mm | 1.5 mm | 2.0 mm | 3.0 mm | 5.0 mm | |||
8.0 mm | 12 mm | Custom Width (mm) | Custom Width (dot) | |||||||
50 | 2 | Pen 9: Density |
| 90% | 80% | 70% | 60% | 50% | 40% | 30% |
20% | 10% | 0% | ||||||||
3 | Pen 9: Color |
| (Specify a palette number between 0-255) | |||||||
5 | Custom Width (mm) |
| (Range: 0.00-100.00 mm; specify in increments of 0.01 mm) | |||||||
6 | Custom Width (dot) |
| (Range: 0-2362 dot; specify in increments of 1 dot) | |||||||
51 | Yes | Pen 10 Settings | 51-1. Pen 10: Width | 51-2. Pen 10: Density | 51-3. Pen 10: Color | 51-5. Custom Width (mm) | 51-6. Custom Width (dot) | |||
1 | Pen 10: Width | 0.00 mm | 0.10 mm | 0.13 mm | 0.18 mm | 0.20 mm | 0.25 mm | 0.30 mm |
| |
0.40 mm | 0.50 mm | 0.60 mm | 0.65 mm | 0.70 mm | 0.80 mm | 0.90 mm | 1.0 mm | |||
1.1 mm | 1.2 mm | 1.3 mm | 1.4 mm | 1.5 mm | 2.0 mm | 3.0 mm | 5.0 mm | |||
8.0 mm | 12 mm | Custom Width (mm) | Custom Width (dot) | |||||||
51 | 2 | Pen 10: Density |
| 90% | 80% | 70% | 60% | 50% | 40% | 30% |
20% | 10% | 0% | ||||||||
3 | Pen 10: Color |
| (Specify a palette number between 0-255) | |||||||
5 | Custom Width (mm) |
| (Range: 0.00-100.00 mm; specify in increments of 0.01 mm) | |||||||
6 | Custom Width (dot) |
| (Range: 0-2362 dot; specify in increments of 1 dot) | |||||||
52 | Yes | Pen 11 Settings | 52-1. Pen 11: Width | 52-2. Pen 11: Density | 52-3. Pen 11: Color | 52-5. Custom Width (mm) | 52-6. Custom Width (dot) | |||
1 | Pen 11: Width | 0.00 mm | 0.10 mm | 0.13 mm | 0.18 mm | 0.20 mm | 0.25 mm | 0.30 mm |
| |
0.40 mm | 0.50 mm | 0.60 mm | 0.65 mm | 0.70 mm | 0.80 mm | 0.90 mm | 1.0 mm | |||
1.1 mm | 1.2 mm | 1.3 mm | 1.4 mm | 1.5 mm | 2.0 mm | 3.0 mm | 5.0 mm | |||
8.0 mm | 12 mm | Custom Width (mm) | Custom Width (dot) | |||||||
52 | 2 | Pen 11: Density |
| 90% | 80% | 70% | 60% | 50% | 40% | 30% |
20% | 10% | 0% | ||||||||
3 | Pen 11: Color |
| (Specify a palette number between 0-255) | |||||||
5 | Custom Width (mm) |
| (Range: 0.00-100.00 mm; specify in increments of 0.01 mm) | |||||||
6 | Custom Width (dot) |
| (Range: 0-2362 dot; specify in increments of 1 dot) | |||||||
53 | Yes | Pen 12 Settings | 53-1. Pen 12: Width | 53-2. Pen 12: Density | 53-3. Pen 12: Color | 53-5. Custom Width (mm) | 53-6. Custom Width (dot) | |||
1 | Pen 12: Width | 0.00 mm | 0.10 mm | 0.13 mm | 0.18 mm | 0.20 mm | 0.25 mm | 0.30 mm |
| |
0.40 mm | 0.50 mm | 0.60 mm | 0.65 mm | 0.70 mm | 0.80 mm | 0.90 mm | 1.0 mm | |||
1.1 mm | 1.2 mm | 1.3 mm | 1.4 mm | 1.5 mm | 2.0 mm | 3.0 mm | 5.0 mm | |||
8.0 mm | 12 mm | Custom Width (mm) | Custom Width (dot) | |||||||
53 | 2 | Pen 12: Density |
| 90% | 80% | 70% | 60% | 50% | 40% | 30% |
20% | 10% | 0% | ||||||||
3 | Pen 12: Color |
| (Specify a palette number between 0-255) | |||||||
5 | Custom Width (mm) |
| (Range: 0.00-100.00 mm; specify in increments of 0.01 mm) | |||||||
6 | Custom Width (dot) |
| (Range: 0-2362 dot; specify in increments of 1 dot) | |||||||
54 | Yes | Pen 13 Settings | 54-1. Pen 13: Width | 54-2. Pen 13: Density | 54-3. Pen 13: Color | 54-5. Custom Width (mm) | 54-6. Custom Width (dot) | |||
1 | Pen 13: Width | 0.00 mm | 0.10 mm | 0.13 mm | 0.18 mm | 0.20 mm | 0.25 mm | 0.30 mm |
| |
0.40 mm | 0.50 mm | 0.60 mm | 0.65 mm | 0.70 mm | 0.80 mm | 0.90 mm | 1.0 mm | |||
1.1 mm | 1.2 mm | 1.3 mm | 1.4 mm | 1.5 mm | 2.0 mm | 3.0 mm | 5.0 mm | |||
8.0 mm | 12 mm | Custom Width (mm) | Custom Width (dot) | |||||||
54 | 2 | Pen 13: Density |
| 90% | 80% | 70% | 60% | 50% | 40% | 30% |
20% | 10% | 0% | ||||||||
3 | Pen 13: Color |
| (Specify a palette number between 0-255) | |||||||
5 | Custom Width (mm) |
| (Range: 0.00-100.00 mm; specify in increments of 0.01 mm) | |||||||
6 | Custom Width (dot) |
| (Range: 0-2362 dot; specify in increments of 1 dot) | |||||||
55 | Yes | Pen 14 Settings | 55-1. Pen 14: Width | 55-2. Pen 14: Density | 55-3. Pen 14: Color | 55-5. Custom Width (mm) | 55-6. Custom Width (dot) | 55 | ||
1 | Pen 14: Width | 0.00 mm | 0.10 mm | 0.13 mm | 0.18 mm | 0.20 mm | 0.25 mm | 0.30 mm |
| |
0.40 mm | 0.50 mm | 0.60 mm | 0.65 mm | 0.70 mm | 0.80 mm | 0.90 mm | 1.0 mm | |||
1.1 mm | 1.2 mm | 1.3 mm | 1.4 mm | 1.5 mm | 2.0 mm | 3.0 mm | 5.0 mm | |||
8.0 mm | 12 mm | Custom Width (mm) | Custom Width (dot) | |||||||
55 | 2 | Pen 14: Density |
| 90% | 80% | 70% | 60% | 50% | 40% | 30% |
20% | 10% | 0% | ||||||||
3 | Pen 14: Color |
| (Specify a palette number between 0-255) | |||||||
5 | Custom Width (mm) |
| (Range: 0.00-100.00 mm; specify in increments of 0.01 mm) | |||||||
6 | Custom Width (dot) |
| (Range: 0-2362 dot; specify in increments of 1 dot) | |||||||
56 | Yes | Pen 15 Settings | 56-1. Pen 15: Width | 56-2. Pen 15: Density | 56-3. Pen 15: Color | 56-5. Custom Width (mm) | 56-6. Custom Width (dot) | |||
1 | Pen 15: Width | 0.00 mm | 0.10 mm | 0.13 mm | 0.18 mm | 0.20 mm | 0.25 mm | 0.30 mm |
| |
0.40 mm | 0.50 mm | 0.60 mm | 0.65 mm | 0.70 mm | 0.80 mm | 0.90 mm | 1.0 mm | |||
1.1 mm | 1.2 mm | 1.3 mm | 1.4 mm | 1.5 mm | 2.0 mm | 3.0 mm | 5.0 mm | |||
8.0 mm | 12 mm | Custom Width (mm) | Custom Width (dot) | |||||||
56 | 2 | Pen 15: Density |
| 90% | 80% | 70% | 60% | 50% | 40% | 30% |
20% | 10% | 0% | ||||||||
3 | Pen 15: Color |
| (Specify a palette number between 0-255) | |||||||
5 | Custom Width (mm) |
| (Range: 0.00-100.00 mm; specify in increments of 0.01 mm) | |||||||
6 | Custom Width (dot) |
| (Range: 0-2362 dot; specify in increments of 1 dot) | |||||||
57 | Yes | Pen 0 Settings | 57-1. Pen 0: Width | 57-2. Pen 0: Density | 57-3. Pen 0: Color | 57-5. Custom Width (mm) | 57-6. Custom Width (dot) | |||
1 | Pen 0: Width | 0.00 mm | 0.10 mm | 0.13 mm | 0.18 mm | 0.20 mm | 0.25 mm | 0.30 mm |
| |
0.40 mm | 0.50 mm | 0.60 mm | 0.65 mm | 0.70 mm | 0.80 mm | 0.90 mm | 1.0 mm | |||
1.1 mm | 1.2 mm | 1.3 mm | 1.4 mm | 1.5 mm | 2.0 mm | 3.0 mm | 5.0 mm | |||
8.0 mm | 12 mm | Custom Width (mm) | Custom Width (dot) | |||||||
57 | 2 | Pen 0: Density | 100% | 90% | 80% | 70% | 60% | 50% | 40% | 30% |
20% | 10% |
| ||||||||
3 | Pen 0: Color |
| (Specify a palette number between 0-255) | |||||||
5 | Custom Width (mm) |
| (Range: 0.00-100.00 mm; specify in increments of 0.01 mm) | |||||||
6 | Custom Width (dot) |
| (Range: 0-2362 dot; specify in increments of 1 dot) | |||||||
81 | No | Color Mode |
| Black & White | ||||||
83 | No | Gray Reproduction |
| CMY + K | CMY | K (Black) | ||||
85 | Yes | Image Quality Adjustment | 85-1. Brightness | 85-2. Color Saturation | ||||||
1 | Brightness |
| (Range: ± 50; specify in integer units) | |||||||
2 | Color Saturation |
| (Range: ± 50; specify in integer units) | |||||||
86 | No | Print Quality |
| Speed Priority | Standard | Quality Priority | ||||
87 | No | Ink Saving |
| On (Lighter) | On (Lightest) | Apply Detailed Settings | ||||
88 | Yes | Ink Saving Detailed Settings | 88-1. Raster Image | 88-2. Paint | 88-3. Line | 88-4. Text | ||||
1 | Raster Image |
| On (Lighter) | On (Lightest) | ||||||
2 | Paint |
| On (Lighter) | On (Lightest) | ||||||
3 | Line |
| On (Lighter) | On (Lightest) | ||||||
4 | Text |
| On (Lighter) | On (Lightest) | ||||||
93 | No | Auto Rotation for Landscape Printing | On |
| ||||||
95 | No | Top Margin |
| |||||||
96 | No | Bottom Margin |
| |||||||
97 | No | Left Margin |
| |||||||
98 | No | Right Margin |
| |||||||
99 | No | Print Position for Custom Size | Center | Right Align |
| |||||
101 | No | Rotate Image for Finishing Option(s) |
| None | 90 Degrees Clockwise | 180 Degrees | ||||
103 | No | Paper Orientation Priority |
| Portrait (Short Edge Feed) | ||||||
S3 | No | Correct Line Width |
| |||||||
S13 | No | Effective Mode of Margin Adjustment |
| Mode 2: Original Size & Auto Reduce/Enlarge | ||||||
S14 | No | No Paper for Auto Select Paper Input | 0: Do not Include |
| ||||||
S19 | No | Fine Length Adjustment for Custom Size Print | 0: None |
| ||||||
S21 | No | Priority for Auto Select Paper Input |
| 2: Paper Orientation | ||||||
S22 | No | Default Transparency Mode (TR Command) | 0: Off |
| ||||||
S23 | No | Line Cap for GL Mode | 0: None |
| ||||||
5. Axis Rotation
Specify the angle at which the coordinate axis of the paper is rotated when printing. The actual rotation angle is determined by the orientation of the paper set in the paper input location.
0 degree
90 degrees
180 degrees
270 degrees
Default: 0 degree
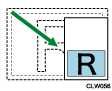
When set to 0 degree:
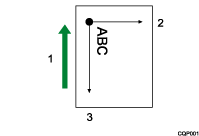
Paper feed direction
Y-axis
X-axis
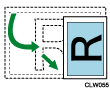
When set to 90 degrees:
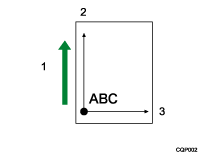
Paper feed direction
Y-axis
X-axis

When RP-GL is used, only 0-degree rotation and 90-degree rotation are valid. If you select 180 degrees, the axis will be rotated by 0 degrees. Likewise, if you specify 270 degrees, the axis will be rotated by 90 degrees.
This function has no effect on image data.
6. Plotter ID
Select the plotter specified in the CAD application. The actual coordinate system applied is determined according to the selected plotter.
7475A
7550A
7570A
7575A
7576A
7580B
7585B
7586B
7595A
7596A
RP-GL/2
When "RP-GL/2" is selected, you can select the type of RP-GL/2 mode.
Type1
Select this type if DesignJet 600 or equivalent can be selected in the application. Data is printed in black and white.
Type2
Select this type if DesignJet 650C or equivalent can be selected in the application. Data is printed in color.
Type3
Select this type if DesignJet 700 or equivalent can be selected in the application. Data is printed in black and white.
Type4
Select this type if DesignJet 750C or equivalent can be selected in the application. The data is printed in color.
Default: 7550A
"7550A", "7580B", or "Type4" can be selected in Web Printing Tool.
RP-GL/2 mode is activated when RP-GL/2 is selected. If RP-GL/2 mode is not selected, the product operates in GL-GL/2 switching mode.
In "7475A", "7550A", and "RP-GL/2" the plotting origin is located in the bottom left corner of the plotting area. The plotting origin for the other plotters is in the center of the plotting area.
For details about RP-GL/2 switching and RP-GL/2 modes, see Operation Modes for RP-GL/2.
For details about how to configure the Plotter ID, see Configuring the Output Plotter.
7. Adjust X Offset
Specify the offset distance to shift the plotting origin on the X-axis in increments of 1 mm. The "-" symbol moves the plotting position to the left, and the "+" symbol moves the origin to the right.
You can use this function to print on paper on which a drawing frame has already been printed. This function is also useful when any parts close to the edge of the drawing are not printed. You may be able to print the drawing correctly by moving the coordinate position within the following range:
±199 mm
Default: 0 mm
When the X offset is set to "0 mm":
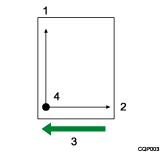
Y-axis
X-axis
Paper feed direction
Origin
When the X offset is set to "+10 mm":
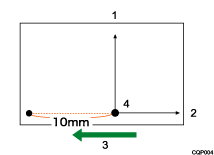
Y-axis
X-axis
Paper feed direction
Origin
8. Adjust Y Offset
Specify the offset distance to move the origin on the Y-axis in increments of 1 mm. The "-" symbol moves the plotting origin closer to the bottom edge of the paper, and the "+" symbol moves the origin away from the bottom edge.
You can use this function to print on paper on which a drawing frame has already been printed. This function is also useful when any parts close to the edge of the drawing are not printed. You may be able to print the drawing correctly by moving the coordinate position within the following range:
±199 mm
Default: 0 mm
When the Y offset is set to "0 mm":
Y-axis
X-axis
Paper feed direction
Origin
When the Y offset is set to "10 mm":
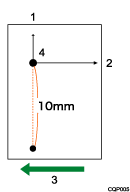
Y-axis
X-axis
Paper feed direction
Origin
9. Pen 1 Settings - 16.Pen 8 Settings/50.Pen 9 Settings - 57.Pen 0 Settings
Specify the line width and pen density by each pen from No. 0 to No. 15.
The pen numbers that can be specified for RP-GL/2 are 0 to 15, and 1 to 8 for RP-GL.
The line width can be specified in the following range. Lines are rendered in groups of dots, therefore the actual line width may be slightly different from the specified line width within the following range:
0.00-12 mm
The density can be specified in increments of 10% within the following range:
0-100%
The pen color can be specified using a palette number in the following range:
0-255
When you select [Custom Width (mm)] for pen width setting, specify the number for pen width in increments of 0.01 mm within the following range:
0.00–100.00 mm
When you select [Custom Width (dot)] for pen width setting, specify the number for pen width in increments of 0.01 dot within the following range:
0–2362 dot
For RP-GL/2, this function is effective if "Machine Setting(s)" is selected for "40. Pen Setting Priority".
The pen density specification is invalidated if "81. Color Mode" is set to "Color".
The pen color specification is invalidated if "81. Color Mode" is set to "Black & White".
The palette numbers can be confirmed in the color samples. For the color samples, see Printing the Color Sample.
17. SP Command if Parameter None/0
Specify whether or not to eject paper when the "SP;" or "SP0;" command is received.
Eject Paper
Ejects the paper when one of these commands is received.
Do not Eject Paper
Waits for the next data even when one of these commands has been received.
Default: Eject Paper
"17. SP Command if Parameter None/0" is used to specify a pen number. Use this item to specify how the plotter behaves when the "17. SP Command if Parameter None/0" is accompanied by any parameter that specifies the pen number, or if No. 0 is specified.
18. IW Command
Specify whether to enable or disable the IW command.
Active
Prints the data inside the drawing area specified by the IW command.
Inactive
Ignores the received IW command.
Default: Active
The IW command is used to specify the printable area using X- and Y-coordinate values.
19. Line Pattern Ratio
Specify the scaling factor of the line pattern length specified by the LT command in increments of 1% within the following range:
20-255%
Default: 100%
20. Reproduction Ratio
Specify the ratio of reduction or enlargement to apply on printed images in increments of 0.1% within the following range:
20.0–400.0%
Images are reduced or enlarged based on the coordinate origin.
Use the following table as a reference to specify a reproduction ratio.
Data size | Paper size |
|---|---|
A0 | A0: 100.0%, A1: 71.0%, A2: 50.0%, A3: 35.0%, A4: 25.0% |
A1 | A0: 141.0%, A1: 100.0%, A2: 71.0%, A3: 50.0%, A4: 35.0% |
A2 | A0: 200.0%, A1: 141.0%, A2: 100.0%, A3: 71.0%, A4: 50.0% |
A3 | A0: 282.0%, A1: 200.0%, A2: 141.0%, A3: 100.0%, A4: 71.0% |
A4 | A0: 400.0%, A1: 282.0%, A2: 200.0%, A3: 141.0%, A4: 100.0% |
12 × 18 | A0:260.0%, A1:184.0%, A2:130.0%, A3: 92.0%, A4: 65.0% |
11 × 17 | A0: 275.0%, A1: 195.0%, A2: 138.0%, A3: 97.0%, A4: 69.0% |
81/2 × 14 | A0: 236.0%, A1: 167.0%, A2: 118.0%, A3: 83.0%, A4: 59.0% |
81/2 × 11 | A0: 300.0%, A1: 212.0%, A2: 150.0%, A3: 106.0%, A4: 75.0% |
Default: 100%
21. Horizontal Adjustment
Adjust the length of the print area in the main scanning direction (the direction perpendicular to the paper feed direction) in increments of 0.01% within the following range:
99.00–101.00%
Default: 100.00%
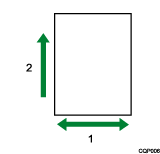
Main scanning direction
Paper feed direction
22. Vertical Adjustment
Adjust the length of the print area in the auxiliary scanning direction (the direction parallel to the paper feed direction) in increments of 0.01% within the following range:
99.00-101.00%
Default: 100.00%
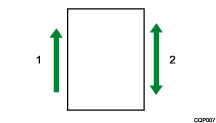
Paper feed direction
Auxiliary scanning direction
23. Printable Area (Hard Clip)
Specify the printable area on paper.
Plotter Size
The printable area is the same as that of the plotter specified in "6. Plotter ID".
Standard Size
The printable area is approximately 5 mm smaller on each side (top, bottom, left and right) of the paper.
Paper Size
The printable area is the same as the paper size.
Default: Paper Size
The printing quality within the 5-mm margin around the edges of the paper is not guaranteed.
In RP-GL/2, the printable area is the same as that of "Standard Size", even if you have selected "Plotter Size".
24. Paper Input Location
Specify the paper input location you want to use. When you select "System Default", paper is fed from the paper input location that is currently selected.
Setting | Selected paper input location |
|---|---|
Paper Input 1: Regular (Portrait) | Paper Input Location 1: Regular size short-edge paper input location |
Paper Input 1: Regular (Landscape) | Paper Input Location 1: Regular size long-edge paper input location |
System Default | System Default |
Paper Input 1: Custom Size | Paper Input Location 1: Custom size paper input location |
Paper Input 2: Regular (Portrait) | Paper Input Location 2: Regular size short-edge paper input location |
Paper Input 2: Regular (Landscape) | Paper Input Location 2: Regular size long-edge paper input location |
Paper Bypass Location | Paper bypass location |
Paper Input 2: Custom Size | Paper Input Location 2: Custom size paper input location |
Default: Paper Input 1: Regular (Portrait)
If "System Default" is specified for the paper input location, the paper input location specified in "Paper Input Location/Paper Settings"
 "Paper Input Priority" "Paper Input Priority: Printer" is selected.
"Paper Input 2: Regular (Portrait)", "Paper Input 2: Regular (Landscape)", and "Paper Input 2: Custom Size" appear on "24. Paper Input Location" only when the optional Paper Input Location 2 is attached.
25. Auto Paper Input Switching
Specify whether to automatically switch to another paper input location when the paper input location currently selected runs out of paper.
The paper input location is automatically switched to a paper input that is loaded with paper of the same size and type.
On
The printer automatically switches paper input locations.
Off
The paper input location is not automatically switched. Load more paper.
Default: Off
Auto Paper Input Switching is invalid if "Off" is selected for "43. Method to Select Paper Input Automatically".
Auto Paper Input Switching is invalidated if "On" is selected in "Printer Settings"
"System" "Paper In/Out" "Extended Auto Paper Input Switching", even if "Off" is selected for "25. Auto Paper Input Switching".
26. Resolution
Specify the resolution to use for printing.
600dpi
29. Auto Reduce/Enlarge
Specify the original size from the sent data based on settings for "47. Method to Determine Original Size" and "39. Margin Adjustment for Auto Reduce/Enlarge", and automatically reduces/enlarges the image size to match the paper size of the paper input location that is selected on "24. Paper Input Location".
Off
Auto Reduce/Enlarge is not performed.
Auto 1: Reduce/Enlarge (+Rotate)
The size of the original is reduced/enlarged and rotated so that the image is printed at the maximum size that matches the paper. (In the case of RP-GL/2, the operation is the same as that of "Auto 2: Reduce/Enlarge Only".)
An example of an original printed in the landscape orientation.
To print on a landscape sheet, change the reduction/enlargement ratio.

To print on a portrait sheet, change the reduction/enlargement ratio so that the orientation of the original matches the paper orientation.
Auto 2: Reduce/Enlarge Only
Print the original by changing the reduction/enlargement ratio so as to match the set paper orientation without rotating the image.
An example of an original that is printed in the landscape orientation.
To print on a landscape sheet, change the reduction/enlargement ratio.
Print on a portrait sheet by changing the reduction/enlargement ratio but without changing the orientation of the original.
Default: Off
Print data size is specified in "47. Method to Determine Original Size".
If "PS/IP Command" is specified in "47. Method to Determine Original Size", apply a PS command (RP-GL/2) or IP command (RP-GL) to data to use Auto Reduce/Enlarge. Specify "Entire Image" or "Auto" for "47. Method to Determine Original Size".
For RP-GL/2, this function is valid if "Off" is specified for "43. Method to Select Paper Input Automatically".
For RP-GL, this function is valid if "Off" or "Auto" is specified for "43. Method to Select Paper Input Automatically".
In terms of the Reproduction Ratio, print results using Auto Reduce/Enlarge by RP-GL and those using Auto Reduce/Enlarge by RP-GL/2 may differ.
For RP-GL, the Reproduction Ratio varies depending on the settings specified for "23. Printable Area (Hard Clip)".
A PS command specifies vertical and horizontal lengths for a sheet used for print.
An IP command specifies a scaling point. A scaling point is a value that the user refer to when the user configures his or her own coordinate system.
30. Text Font
Specify the font to be used for characters in the drawing.
Stroke
Nimbus Sans Regular
Default: Stroke
In the application, select "Stroke" or configure to use character codes to specify characters. If the application does not allow character codes to be specified, the setting made here is invalid. For details, see the manual for the application.
When printing special characters or symbols, select "Nimbus Sans Regular".
39. Margin Adjustment for Auto Reduce/Enlarge
Specify the margin on the edges of the paper used for Auto Reduce/Enlarge in increments of 1 mm within the following range:
±50 mm
Default: 0 mm
This setting is valid when either "Auto 1: Reduce/Enlarge (+Rotate)" or "Auto 2: Reduce/Enlarge Only" is selected for "29. Auto Reduce/Enlarge" or if "Auto 2 (L&S Edge) + Auto R/E Ratio: Paper Size Set." is selected for "43. Method to Select Paper Input Automatically".
The way that the area near the paper edge is handled differs between GL and GL/2 modes.
In GL mode:
When a positive value is specified, the width of the margin is determined by subtracting the specified value from the point that is derived by shifting 10 mm inward from the position specified in "23. Printable Area (Hard Clip)".
When a negative value is specified, the width of the margin is determined by adding the specified value to the point that is derived by shifting 10 mm inward from the position specified in "23. Printable Area (Hard Clip)".
In GL/2 mode
When a positive value is specified, the width of the margin is determined by subtracting the specified value from the point that is derived by shifting 7 mm inward from the paper edge.
When a negative value is specified, the width of the margin is determined by adding the specified value from the point that is derived by shifting 7 mm inward from the paper edge.
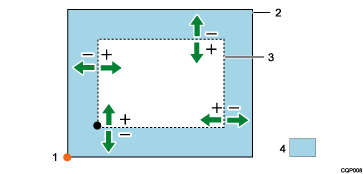
Origin of drawing
Paper
Area used to calculate the reproduction ratio
Margin
In the case of the bottom left origin, the origin is located in the bottom left corner of the area specified in "23. Printable Area (Hard Clip)".
The size used as the reference for "29. Auto Reduce/Enlarge" and "Auto 2 (L&S Edge) + Auto R/E Ratio: Paper Size Set." in "43. Method to Select Paper Input Automatically" is determined based on the settings for "39. Margin Adjustment for Auto Reduce/Enlarge" and "47. Method to Determine Original Size".
If the value calculated from the paper size determined by "47. Method to Determine Original Size" and the value specified in "39. Margin Adjustment for Auto Reduce/Enlarge" is less than 1 mm, it is rounded up to 1 mm in the calculation.
The maximum value of the reproduction ratio calculated from the paper size determined by "47. Method to Determine Original Size" and the setting in "39. Margin Adjustment for Auto Reduce/Enlarge" is as follows:
When "Auto 2 (L&S Edge) + Auto R/E Ratio: Paper Size Set." is selected in "43. Method to Select Paper Input Automatically ": 100.0%
In other cases: 400.0% (the maximum value of "29. Auto Reduce/Enlarge")
40. Pen Setting Priority
Specify whether or not to use the commands in the application or the RPGL Menu to configure the pen settings.
Driver / Command
The settings specified in the application are valid.
Machine Setting(s)
The settings made under the RPGL Menu are valid.
Default: Driver / Command
For details about pen settings, see 9. Pen 1 Settings - 16.Pen 8 Settings/50.Pen 9 Settings - 57.Pen 0 Settings
41. Merge Control
Specify how overlapping elements are processed.
Superimpose
Overlapping elements are processed by superimposition of individual elements ("or").
Replace
Overlapping elements are processed by replacement of individual elements ("replace").
Default: Replace
When an MC command is received, the command has priority over this setting.
42. Mirror Image Printing
Specify whether to enable the mirror-image printing function.
On
Off
Default: Off
43. Method to Select Paper Input Automatically
Specify whether or not to automatically select the paper input location loaded with the paper of the size determined by the setting in "47. Method to Determine Original Size".
Off
Paper input location is not selected automatically.
Auto 1: Long Edge
The paper size is automatically determined based on the setting in "47. Method to Determine Original Size" and the paper input location is selected according to the long-edge length of the data.
Auto 2: Long Edge and Short Edge
The paper size is automatically determined based on the setting in "47. Method to Determine Original Size" and the paper input location is selected according to both the long-edge and short-edge lengths of the data.
For RP-GL/2, the data can be rotated to fit on the paper as required when printing.
Select "Auto 2: Long Edge and Short Edge" also for automatic selection of a paper input location when "100%" is not set in "20. Reproduction Ratio".
Auto 2 (L&S Edge) + Auto R/E Ratio: Paper Size Set.
Select a paper size you want to use for printing from the following settings:
A0: Full Size, A1: Full Size, A2: Full Size, A3: Full Size, A4: Full Size, B1 JIS: Full Size, B2 JIS: Full Size, B3 JIS: Full Size, B4 JIS: Full Size, 36 x 48: Full Size, 34 x 44: Full Size, 30 x 42: Full Size, 24 x 36: Full Size, 22 x 34: Full Size, 21 x 30: Full Size, 18 x 24: Full Size, 17 x 22: Full Size, 15 x 20: Full Size, 12 x 18: Full Size, DL: Full Size, 9 x 12: Full Size, LG: Full Size, 81/2 x 132/5: Full Size, LT: Full Size, A0, A1, A2, A3, A4, B1 JIS, B2 JIS, B3 JIS, B4 JIS, 36 x 48, 34 x 44, 30 x 42, 24 x 36, 22 x 34, 21 x 30, 18 x 24, 17 x 22, 15 x 20, 12 x 18, DL, 9 x 12, LG, 81/2 x 132/5, LT
The scaling ratio is automatically specified based on the settings for "47. Method to Determine Original Size" and "39. Margin Adjustment for Auto Reduce/Enlarge", and the paper input location selected according to the long-edge and short-edge lengths of the data.
When any setting without "Full Size" in its name is selected:
If the data size is larger than the specified paper size, the data is reduced to fit the paper for printing.
If the data size is smaller than the set paper size, the machine behavior differs depending on whether or not the setting value contains "Full Size".
Settings
Sent data size
Result
A0
A2
A2 data is printed at full size on A0 paper.
A0: Full Size
A2
A2 paper is automatically selected, and the data is printed at full size.
Orig. Size Determined + Auto R/E Ratio: Correct Value
A paper input location is automatically selected from the available locations, including those loaded with custom-sized paper, according to the sent data size and reproduction ratio, and based on the setting in "47. Method to Determine Original Size".
Paper input locations with regular sized paper are given priority under automatic selection. A custom size is selected if there is no regular size suitable for the data size, or all available regular sizes are larger than the size calculated by adding the value selected on the submenu to the data size. If a custom size is selected, the paper input location loaded with paper which prints minimum margins is used.
If both regular sizes and custom-sized paper are loaded, the value specified on the submenu is used in cases such as when printing data that is slightly smaller (print data size is in the range of regular size -150 mm) than a regular size on a regular size paper. Paper of regular sizes will be selected if a larger submenu value is specified.
Default: Auto 2: Long Edge and Short Edge
For RP-GL/2, the effective settings are "Off", "Auto 1: Long Edge", "Auto 2: Long Edge and Short Edge", "Auto 2 (L&S Edge) + Auto R/E Ratio: Paper Size Set.", and "Orig. Size Determined + Auto R/E Ratio: Correct Value".
For RP-GL, the effective settings are "Auto 2: Long Edge and Short Edge", "Auto 2 (L&S Edge) + Auto R/E Ratio: Paper Size Set.", and "Orig. Size Determined + Auto R/E Ratio: Correct Value". Selecting "Off" and "Auto 1: Long Edge" is invalid. When "Off" or "Auto 1: Long Edge" is selected, the data is printed on the paper fed from the currently selected paper input location.
When "Off" or "Auto 1: Long Edge" is selected in RP-GL/2, the configuration for "5. Axis Rotation" is valid. Furthermore, normal printing may not be performed if the paper is set in a long-edge orientation in some cases.
The setting in "20. Reproduction Ratio" is ignored if "Auto 2 (L&S Edge) + Auto R/E Ratio: Paper Size Set." is specified.
If "PS/IP Command" is selected in "47. Method to Determine Original Size", the paper input location will not be automatically switched for data without the PS command in RP-GL/2 or data without the IP command in RP-GL. Select either "Entire Image" or "Auto" in "47. Method to Determine Original Size".
A PS command is used to select a printing paper size based on vertical and horizontal lengths.
An IP command specifies a scaling point, which is a value referenced by the user when a unique coordinate system is configured.
When printing GL/GL2 data created in an application, data may be output in a different size to that expected in some cases. To print the data at a regular size, select "Off", "Auto 1: Long Edge", or "Auto 2: Long Edge and Short Edge", or adjust the value under the "Orig. Size Determined + Auto R/E Ratio: Correct Value" submenu so that the data size is correctly recognized as a regular size.
To print custom-sized data, select "Off" or "Orig. Size Determined + Auto R/E Ratio: Correct Value".
If "Auto 1: Long Edge", "Auto 2: Long Edge and Short Edge", "Auto 2 (L&S Edge) + Auto R/E Ratio: Paper Size Set.", or "Orig. Size Determined + Auto R/E Ratio: Correct Value" is selected, the paper input location is automatically selected only from one of those loaded with the paper types selected in "46. Paper Type for Auto Select Paper Input". Paper input locations loaded with other paper types and the paper bypass location are not automatically selected.
For RP-GL/2 data, the valid combinations of the settings under the RPGL Menu are as follows:
Off
Auto 1: Long Edge
Auto 2: Long Edge and Short Edge
Auto 2 (L&S Edge) + Auto R/E Ratio: Paper Size Set.
Orig. Size Determined + Auto R/E Ratio: Correct Value
20. Reproduction Ratio
OK
OK
OK
-
OK
5. Axis Rotation
OK
OK
-
-
-
29. Auto Reduce / Enlarge
OK
-
-
-
-
For RP-GL data, the valid combinations of the settings under the RPGL Menu are as follows:
Off
Auto 1: Long Edge
Auto 2: Long Edge and Short Edge
Auto 2 (L&S Edge) + Auto R/E Ratio: Paper Size Set.
Orig. Size Determined + Auto R/E Ratio: Correct Value
20. Reproduction Ratio
OK
OK
OK
-
OK
5. Axis Rotation
OK
OK
-
-
-
29. Auto Reduce / Enlarge
OK
OK
-
-
-
For configuration of "43. Method to Select Paper Input Automatically", see Selecting a paper input location automatically - Printing at full size, Selecting a paper input location automatically - Performing reduced printing on the paper size specified, or Selecting a paper input location automatically - Printing custom sized data.
44. Raster Image Density
Specify the print density of image data.
Light
Dark
Default: Light
The image density setting is ignored when "RP-GL/2(Type1)" is selected in "6. Plotter ID".
45. Line Attributes
Specify how line caps and line joints are rendered when printing.
45-1. Line Caps
Line caps processing Setting
Shape of line ends
Square Cap

Triangle Cap

Round Cap

None

Do not Specify
Line Caps is not specified.
Square Cap
A line is rendered longer by one half of the line width at each end.
Triangle Cap
An isosceles triangle of a height equivalent to half of the line width is added at each end.
Round Cap
A semicircle with a diameter equivalent to the line width is added at each end.
None
No processing is applied to line caps.
Default: Do not Specify
45-2. Line Joins
Line joint processing Setting
Shapes of line joints
Projecting Join

Projecting/Bevel Join

Triangle Join

Round Join

Bevel Join

None

Do not Specify
Line Joint is not specified.
Projecting Join
The outer edges are extended until two edges intersect.
Projecting/Bevel Join
Bevel Joint processing is applied if the extended section is too long. Projecting Joint processing is applied if the extended section is too short.
Triangle Join
A pointed shape of a height equivalent to half the line width is formed on the line joining the ends of outer edges.
Round Join
A semicircle of a diameter equivalent to the line width is drawn.
Bevel Join
The outer edges of the intersecting lines are connected and filled.
None
No processing is applied to line joints.
Default: Do not Specify
When drawings with lines of large width are rendered, the drawing may not be printed properly depending on the settings for "45-1. Line Caps" and "45-2. Line Joins".
This function is applied on lines wider than 0.35 mm.
If the line width is 0.35 mm or less, "Round Cap" and "Round Join" are applied to Line Caps and Line Joint.
When "Do not Specify" is not selected, the line attributes specified by the LA command are invalidated. The LA command is valid only when "Do not Specify" is selected in both "45-1. Line Caps" and "45-2. Line Joins".
When "Do not Specify" is selected for each submenu in the line attribute settings, "None" for "45-1. Line Caps" and "Projecting Join" for "45-2. Line Joins" are set as the default for each setting.
The settings specified for this function may be ineffective in some applications.
46. Paper Type for Auto Select Paper Input
Specify the paper type to search for when using "43. Method to Select Paper Input Automatically" to automatically select the paper input location.
Plain Paper
Translucent Paper
Recycled Paper
Inkjet Plain Paper
Special Paper
Film (Matte)
Coated Paper (CAD)
Coated Paper
Thin Paper
Default: Plain Paper
47. Method to Determine Original Size
Specify how to detect the original size.
The detected size is used as the reference when applying "29. Auto Reduce/Enlarge", "43. Method to Select Paper Input Automatically", and "49. Centering".
PS/IP Command
For RP-GL, the area specified by the IP command in the drawing data is set as the original size.
For RP-GL/2, the area specified by the PS command in the drawing data is set as the original size.
Entire Image
The entire area of the drawing is set as the original size.
Auto
The original size is automatically determined based on whether the data contains the PS/IP Command or not.
For RP-GL:
The IP command contained in the drawing data is used to determine the original size.
If the drawing data does not contain the IP command, the "Entire Image" setting is used.
For RP-GL/2:
The PS command in the drawing data is used to determine the original size.
If the drawing data does not contain the PS command, the "Entire Image" setting is used.
Default: Auto
When "18. IW Command" is set to "Active", any figure located outside the area specified by the IW command is excluded in determining the original size.
The center of the pen is used in determining the drawing area. The line width and attributes do not affect the result.
In the case of outline font drawing, the font cell is the drawing area.
If "Auto" is selected, the intended paper size cannot be selected for drawing data in which a paper size is not specified by the PS/IP Command. If this is the case, select "Entire Image".
48. Margin Adjustment for Original Size
Adjust the size that has been determined by "47. Method to Determine Original Size" in increments of 1 mm within the range of ±99 mm. If the determined paper size is larger than the desired size, enter a positive value. If the determined paper size that is smaller than the desired size, specify a negative number.
Default: 1 mm
This function is effective only when "Entire Image" is specified in "47. Method to Determine Original Size".
49. Centering
Specify this item to align the center of the drawing's printable area to the center of the paper, and print the drawing in the middle of the paper.
On
Centering is performed.
Entire Printable Area
The entire area of the drawing is considered as the printable area when the drawing on paper is centered.
Positive Printable Area
The positive region (positive values on X and Y axes) originating in the bottom left corner of the drawing is considered as the printable area when the drawing on paper is centered.
Off
Centering is not performed.
Default: Off
The drawing center is derived from the center of the printable area determined in "47. Method to Determine Original Size" and the size adjusted by settings in "39. Margin Adjustment for Auto Reduce/Enlarge" settings.
The center of the paper is the center of the printable area selected in "23. Printable Area (Hard Clip)".
The centering function is invalid when "PS/IP Command" is selected for "47. Method to Determine Original Size" but no PS command (RP-GL/2) or IP command (RP-GL) is in the drawing data.
The "Positive Printable Area" settings are effective if "7475A" or "7550A" is selected for "6. Plotter ID", or either "Entire Image" or "Auto" is selected for "47. Method to Determine Original Size".
When reduced/enlarged by the settings for "20. Reproduction Ratio", "29. Auto Reduce/Enlarge", or "43. Method to Select Paper Input Automatically"; centering is applied to the reduced/enlarged drawing.
When the drawing is rotated by the settings for "5. Axis Rotation", "29. Auto Reduce/Enlarge", or "43. Method to Select Paper Input Automatically"; centering is applied to the rotated drawing.
Centering is applied first, and then the location of the drawing is adjusted according to the values specified in "7. Adjust X Offset " and "8. Adjust Y Offset".
If you select a custom size when "Orig. Size Determined + Auto R/E Ratio: Correct Value" (submenu is ignored) is selected in "43. Method to Select Paper Input Automatically", the same size as the original is automatically selected as the output paper size. The printing result may not appear to reflect the effect of centering, even when "On" is selected for centering.
81. Color Mode
Select the color mode.
Color
Black & White
Default: Color
If "RP-GL/2 (Type1, Type3)" is selected in "6. Plotter ID", the setting in this item is ignored and the drawing is always printed in black and white.
83. Gray Reproduction
Specify how black or gray areas in images are printed.
Auto
Line art and texts are printed using black ink only. Images are printed using black ink only if they contain only white (RGB values are all 255), black (RGB values are all 0), or gray (RGB values are all the same value). Images are printed in four colors (CMY+K) if they contain any other colors.
CMY + K
Black and gray areas in the drawing are printed in four colors (CMY+K).
CMY
Black and gray areas in the drawing are printed in three colors (CMY).
K (Black)
Black and gray areas in the drawing are printed using black ink only. Unwanted hue and luster are suppressed compared to the case where black is printed using CMY+K, and the purity of the black can be increased.
Default: Auto
Specifying Gray Reproduction is effective when "Color" is selected in "81. Color Mode".
This setting may not have any effect in some cases, depending on the application you use to print data. For instance, black or gray elements may be printed in four colors (CMY+K), even if you select "K (Black)" to print them using black ink only.
When "CMY + K" is selected, areas where more than one element overlaps may not be printed correctly, depending on the application you use to print data. If this is the case, select "CMY".
The printed images may appear tinted when "CMY" is selected. Also, the areas of solid fill and line art composed of three colors (CMY) are printed using black ink, and fine moire patterns may appear in such areas.
For details about how to configure "Gray Reproduction", see Printing with Color and Grayscale Adjusted.
85. Image Quality Adjustment
Specify the color brightness and saturation, or the grayscale brightness.
85-1. Brightness
Adjust the lightness of colors. Colors appear lighter as brightness increases. Enter a value within the range of ± 50 to specify brightness.
Default: 0
85-2. Color Saturation
Adjust the color clarity. Colors appear more clearly as Color Saturation increases. Colors appear deeper and grayish as Color Saturation decreases. Enter a value within the range of ± 50 to specify Color Saturation.
Default: 0
This function does not affect black and white areas in vector data.
This function does not affect black and white areas or black-and-white images in image data.
This function is effective only on vector data when "RP-GL/2(Type1)" is selected in "6. Plotter ID".
For details about how to configure "85. Image Quality Adjustment", see Printing with Color and Grayscale Adjusted.
86. Print Quality
Specify the print quality.
Speed Priority (Drawing)
Speed Priority
Standard
Quality Priority
Default: Speed Priority (Drawing)
The default setting for "86. Print Quality" is [Speed Priority] when you specify for Paper Type a paper type other than plain paper, recycled paper, inkjet plain, thin paper, or coated (CAD).
87. Ink Saving
Specify whether or not to reduce ink consumption when printing. In order to apply Ink Saving when printing, specify the degree of ink saving.
Off (Normal)
Printing is performed with normal ink density. No ink saving is applied.
On (Lighter)
Printing is performed at 75% density compared to "Off (Normal)".
On (Lightest)
Printing is performed at 50% density compared to "Off (Normal)".
Apply Detailed Settings
Printing is performed with the setting specified in "88. Ink Saving Detailed Settings".
Default: Off (Normal)
When "Off (Normal)", "On (Lighter)", or "On (Lightest)" is selected, Ink Saving is applied to all objects except characters.
When the setting is modified, images may appear faded, and fine lines may not be printed.
When "6. Plotter ID" is set to "Type1" of "RP-GL/2", Ink Saving on image data becomes invalid.
The results may not be apparent on some data, even if the settings have been modified.
88. Ink Saving Detailed Settings
Specify the degree to reduce ink consumption for each type of object. The ink-saving settings can be specified separately for "88-1. Raster Image", "88-2. Paint", "88-3. Line" and "88-4. Text". To enable those settings, select "88. Ink Saving Detailed Settings" in "87. Ink Saving".
Off (Normal)
Printing is performed with normal ink density. No ink saving is applied.
On (Lighter)
Printing is performed at 75% density compared to "Off (Normal)".
On (Lightest)
Printing is performed at 50% density compared to "Off (Normal)".
Default: Off (Normal)
When the setting is modified, images may appear faded, and fine lines may not be printed.
When "6. Plotter ID" is set to "Type1" of "RP-GL/2", Ink Saving on image data becomes invalid.
The results may not be apparent on some data even if the settings have been modified.
93. Auto Rotation for Landscape Printing
Specify whether or not to rotate the data that has been created to be printed in landscape orientation when printing on paper set in portrait orientation.
On
The print data is rotated for printing.
Off
The print data is printed as it is, without rotating the data to match the orientation of the paper set in the paper input location.
Default: Off
This function is valid if "Off" or "Auto 1: Long Edge" is selected for "43. Method to Select Paper Input Automatically".
This setting is invalid when printing on paper set in portrait orientation.
When printing data which can be printed normally only on paper set in landscape orientation, select "Off" in "93. Auto Rotation for Landscape Printing" or select "90 degrees" in "5. Axis Rotation".
95. Top Margin
Specify the width of the margin to be added to the top of the print data.
This function is effective when "Orig. Size Determined + Auto R/E Ratio: Correct Value" is selected in "43. Method to Select Paper Input Automatically", and a custom-sized paper input location is selected.
0-200 mm
Specify the margin in increments of 1 mm.
Default: 0 mm
No margin is added if the sum of the drawing length, top margin, and bottom margin exceeds the maximum paper length that can be printed on the machine.
96. Bottom Margin
Specify the width of the margin to be added to the bottom of the print data.
This function is effective when "Orig. Size Determined + Auto R/E Ratio: Correct Value" is selected in "43. Method to Select Paper Input Automatically", and a custom-sized paper input location is selected.
0-200 mm
Specify the margin in increments of 1 mm.
Default: 0 mm
No margin is added if the sum of the drawing length, top margin, and bottom margin exceeds the maximum paper length that can be printed on the machine.
97. Left Margin
Specify the width of the margin to be added to the left of the print data.
This function is effective when "Orig. Size Determined + Auto R/E Ratio: Correct Value" is selected in "43. Method to Select Paper Input Automatically", and a custom-sized paper input location is selected.
0-200 mm
Specify the margin in increments of 1 mm.
Default: 0 mm
No margin is added if the sum of the drawing width, left margin, and right margin exceeds the maximum paper width that can be printed on the machine.
98. Right Margin
Specify the width of the margin to be added to the right of the print data.
This function is effective when "Orig. Size Determined + Auto R/E Ratio: Correct Value" is selected in "43. Method to Select Paper Input Automatically", and a custom-sized paper input location is selected.
0-200 mm
Specify the margin can in increments of 1 mm.
Default: 0 mm
No margin is added if the sum of the drawing width, left margin, and right margin exceeds the maximum paper width that can be printed on the machine.
99. Print Position for Custom Size
Specify the position on custom-sized paper to print the data.
This function is effective when "Orig. Size Determined + Auto R/E Ratio: Correct Value" is selected in "43. Method to Select Paper Input Automatically", and a custom-sized paper input location is selected.
Center
Right Align
Left Align
Default: Left Align
101. Rotate Image for Finishing Option(s)
Specify how the images are rotated when post-processing is specified in the printing option specification command.
90 Degrees Counterclockwise
None
90 Degrees Clockwise
180 degrees
Default: 90 Degrees Counterclockwise
For details about the printing option specification command, see Printing Option Specification Command (RP-GL/2).
103. Paper Orientation Priority
Specify the orientation that you want to set priority on when "Auto 2: Long Edge and Short Edge", "Auto 2 (L&S Edge) + Auto R/E Ratio: Paper Size Set." or "Orig. Size Determined + Auto R/E Ratio: Correct Value" is selected in "43. Method to Select Paper Input Automatically".
Landscape (Long Edge Feed)
Portrait (Short Edge Feed)
Default: Landscape (Long Edge Feed)
S3. Correct Line Width
Specify the amount of compensation to apply on the line width by creasing/decreasing the number of dots.
This function applies line width correction to all lines in a drawing. If lines appear too wide, or thin lines appear faint, adjust the value of this function.
-2 to 6
Specify the number of dots to be added to the line width in increments of 1 dot.
Default: 0
The value specified in "S3. Correct Line Width" does not affect the line width of the stroke font.
The value specified in this function applies to all lines in a drawing. You cannot specify the lines on which to apply this function.
S13. Effective Mode of Margin Adjustment
Specify the effective range of "48. Margin Adjustment for Original Size".
Mode 1: Original Size
The value of "48. Margin Adjustment for Original Size" becomes effective when printing drawing in at the real size using "43. Method to Select Paper Input Automatically".
Mode 2: Original Size & Auto Reduce/Enlarge
The value of "48. Margin Adjustment for Original Size" becomes effective when selecting a paper input location automatically via "Mode 1: Original Size", and also when auto scaling is performed. Auto scaling applies when either of the following conditions is met:
"Auto 1: Reduce/Enlarge (+Rotate)" or "Auto 2: Reduce/Enlarge Only" is selected in "29. Auto Reduce/Enlarge".
"Auto 2 (L&S Edge) + Auto R/E Ratio: Paper Size Set." is selected in "43. Method to Select Paper Input Automatically" and automatic reduction/enlargement is performed.
Default: Mode 1: Original Size
The difference in line widths may become unrecognizable when dots are added to the lines width.
S14. No Paper for Auto Select Paper Input
Specify whether or not to include the paper input location without paper as the input location to be searched automatically by "43. Method to Select Paper Input Automatically".
If this print setting is set to "0: Do not Include", you can automatically exclude paper input location that are out of paper from the input location to be searched, and force print from a input location that has paper. In such a case, the data is printed on paper that is one size larger than the print data.
0: Do not Include
The paper input location is only selected from those with paper loaded.
1: Include
The paper input location is also selected from those without paper loaded.
Default: 1: Include
S19. Fine Length Adjustment for Custom Size Print
This print setting is useful if the bottom edge of the drawing data appears cropped or faded when "43. Method to Select Paper Input Automatically" is set to "Orig. Size Determined + Auto R/E Ratio: Correct Value" and "47. Method to Determine Original Size" is set to "Entire Image".
0: None
Printing is performed in the custom-sized length calculated according to the settings for the RPGL Menu.
1: Add 1 mm (Feed Direction)
Printing is performed for the length derived by adding 1 mm to the custom-sized length calculated according to the settings for the RPGL Menu. Using this function, you can prevent the bottom edge of the drawing data from being cropped due to the effect of unit conversion when the paper is the same size as the drawing data.
Default: 1: Add 1 mm (Feed Direction)
Selecting "1: Add 1 mm (Feed Direction)" increases the frame size, and it may affect the billing counter as a result.
When "1: Add 1 mm (Feed Direction)" is selected the value derived by adding 1 mm is printed as "Custom Size" in the Settings List (RPGL).
This function does not apply if the calculated length exceeds the maximum custom-sized length.
S21. Priority for Auto Select Paper Input
Specify whether or not to give priority to the paper set status (Paper Input with Paper) or the paper orientation when "Auto 2: Long Edge and Short Edge", "Auto 2 (L&S Edge) + Auto R/E Ratio: Paper Size Set.", or "Orig. Size Determined + Auto R/E Ratio: Correct Value" is selected in "43. Method to Select Paper Input Automatically".
1: Paper Input with Paper
Gives priority to the paper set status.
2: Paper Orientation
Gives priority to the paper orientation.
Default: 1: Paper Input with Paper
S22. Default Transparency Mode (TR Command)
Specify the default of the transparency mode select (TR) command. When a value is specified in the received command, the value in the command is given priority.
If "Entire Image" is specified in "47. Method to Determine Original Size", and "0: Off" is selected in this print setting, the machine determines the original size including the lines drawn in white (pen density: 0%).
0: Off
Determines the original size including the lines drawn in white (pen density: 0%).
1: On
Determines the original side excluding the lines drawn in white (pen density: 0%).
Default: 1: On
This print setting is effective when "41. Merge Control" is set to "Superimpose".
Depending on the print data, this print setting may become effective regardless of the setting specified in "41. Merge Control".
If the print data contains the TR command, the command is given priority over the print settings.
S23. Line Cap for GL Mode
Specify how the line caps are rendered.
If dotted or dashed lines of wide width in a drawing appear as solid lines when printed, use this print settings to specify how the line ends are rendered.
Setting | Shape of line ends |
|---|---|
0: None | |
1: Round Cap | |
0: None
No processing is applied to each end.
1: Round Cap
A semicircle with a diameter equivalent to the line width is rendered at each end.
Default: 1: Round Cap