Copying at the Image Quality Suitable for the Original
Specify the type of original, whether it is comprised mostly of text or contains photos (Original Type). Also, adjust the image density to copy the original at better quality.
Specifying the Original Type
 Press [Copy] on the Home screen.
 Press [Original Type] on the Copy screen.
 Select the original type.
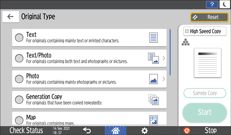
When you select [Text/Photo] or [Photo], further select [Printed Photo], [Glossy Photo], or [Copied Photo].
 Place the original.
Basic Procedure for Copying Documents
The original is fed into the machine automatically, and copying starts. If the original is not fed automatically, press [Start].

[Shiny Materials] is a setting suitable for metals and glossy originals.
You can change the default value when you press [Original Type] on the Copy screen.
[Highlight Pen], [Erase Background Lines], and [Patched Original] can be used only if [Black & White] is selected.
When you select [Patched Original], thick lines, text, or solid images in the original are recognized as dark background that may not be copied.
If you select [Text] for a dot photograph or complex image, moiré may occur. If you print an image other than a dot photograph or complex image, moiré may occur as a result of enlargement or reduction.
If you select [Text] and uneven printing appears as a vertical belt every 0.5 mm (0.02 inches) in half-tone images, select [Text/Photo] or [Photo].
If you select [Photo], the resolution or sharpness of lines and text may be affected or text may become illegible.
Adjusting the Image Density
There are three methods for adjusting the image density as described below.
Adjusting Method | Settings | Results |
|---|---|---|
Adjust the contrast of the entire original. | Adjust the image density manually. |  |
Decrease the base color of the original. | Adjust the image density automatically. |  |
Adjust the contrast of the part from which the base color of the original is deleted. | Combine the manual and automatic image density adjustments. | 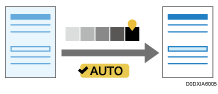 |
Press [Copy] on the Home screen.
Press [Density] on the Copy screen.

Adjusting the image density.
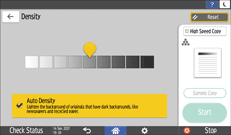
To adjust the density of the entire original manually, drag
 right and left. Dragging to the left decreases the density, and to the right increases it.
To decrease the base color of the original, select the [Auto Density] check box.
To adjust the contrast of the part from which the base color of the original is deleted, adjust the density by dragging
right and left, and then select the [Auto Density] check box.
Place the original.
Basic Procedure for Copying Documents
The original is fed into the machine automatically, and copying starts. If the original is not fed automatically, press [Start].
You can also adjust the image density by dragging
on the [Density] key right and left on the Copy screen.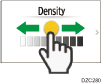
When selecting [Auto Density], images 10 mm from the edges of the original may not be colored.
The density of the images in a printout may vary when you copy photos or images pasted to the original.