Loading Paper into the Paper Tray
The method of loading paper varies for each tray type.

- When loading paper, take care not to trap or injure your fingers.
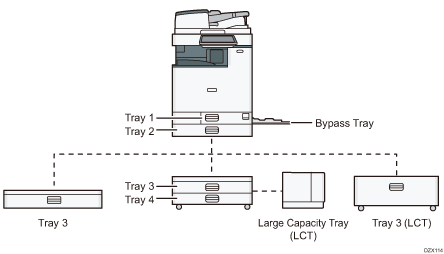
Before loading paper into a tray, check the paper size and type that can be loaded in the tray, and confirm the paper size that is automatically detected.
When loading paper of a size that is not automatically detected, specify the paper size in [Tray Paper Settings] of [Settings].
Settings screen type: Standard
Specifying the Paper Size That Is Not Automatically Detected (Settings Screen Type: Standard)
Settings screen type: Classic
Specifying the Paper Size That Is Not Automatically Detected (Settings Screen Type: Classic)
To load thin paper, thick paper or other special paper, specify the paper type or thickness by the following setting items.
Settings screen type: Standard
Tray/Paper Settings
Settings screen type: Classic
Tray Paper Settings
When loading paper on a tray which has a few sheets of paper, multiple sheets of paper may be fed at once from the tray. Take out all sheets, fan the sheets, and then load them again.
You may hear the sound of rubbing paper. This is not a malfunction.
Loading Paper into Tray 1 to 4
Adjust the side and end fences according to the paper size. When loading paper larger than A3, also change the position of the auxiliary side fence.

Do not stack paper over the limit mark. If you load paper over the limit mark, the printed images may become slanted or a paper jam may occur.

Load paper into every tray in the same way. In the following example procedure, Tray 2 is used.
 Pull the tray out carefully.
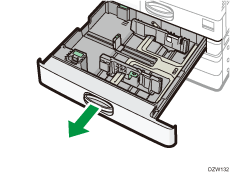
 While pressing the release lever of the side fence, slide the side fences outward.
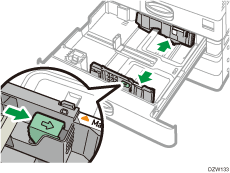
 To load paper larger than A3, pull the tray out completely and then change the positions of the two auxiliary side fences.
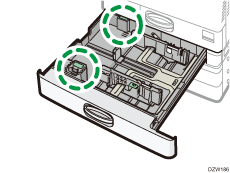
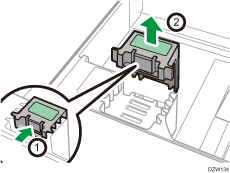
Press the concave part to distort the auxiliary side fence (1), and then take it out of the tray (2).
Put the auxiliary side fence into the groove for the paper size to use.
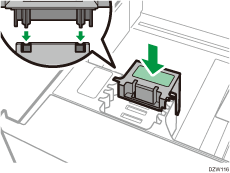
*1 You do not need to use the auxiliary side fence when loading B4 paper.
Change the position of the auxiliary side fence in the back in the same way.
 While pressing the release lever of the end fence, slide the end fence outward.
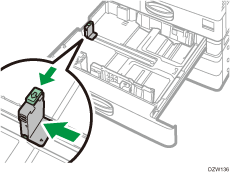
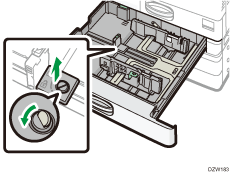
If the end fence is fixed with the stopper, rotate the fixing screw of the stopper 90 degrees counterclockwise with a coin or similar object and remove the stopper.
 Square the paper and load it with the print side facing up.
Fan sheets before loading so that multiple sheets of paper do not stick to each other and are not fed at once.
Do not stack paper over the limit mark.
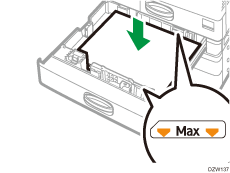
 While pressing the release lever, adjust the side and end fences to the paper size.
Do not leave spaces between the paper and fences.
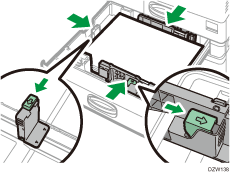
To fix the end fence, engage the two projections of the stopper with the holes on the end fence, and then tighten the fixing screw by rotating it 90 degrees clockwise with a coin or similar object.
If you will not fix the end fence, put the stopper in the position as shown in the illustration, and then rotate the fixing screw 90 degrees clockwise with a coin or similar object.
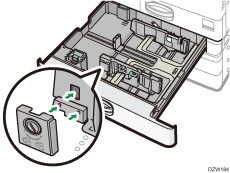
 Push the tray in the original position carefully.
To return the completely pulled out tray to the original position, push the tray straight in. If the paper tray is damaged, it may cause a paper jam. Also, if you push the tray forcibly, the side fence of the tray may be moved.

Tray 1 does not have the auto detect function for the paper size. On the control panel, specify the paper size to use.
Settings screen type: Standard
Specifying the Paper Size That Is Not Automatically Detected (Settings Screen Type: Standard)
Settings screen type: Classic
Specifying the Paper Size That Is Not Automatically Detected (Settings Screen Type: Classic)
You can load envelopes into Tray 2 to 4.
Loading Paper into the Bypass Tray
Use the bypass tray to load paper of a size that cannot be loaded into Tray 1 to 4, such as transparency film and label paper (adhesive labels).
The maximum number of sheets you can load into the bypass tray depends on the paper type.
Recommended Paper Sizes and Types

Do not stack paper over the limit mark. If you load paper over the limit mark, the print image may be slanted or the paper may be jammed.
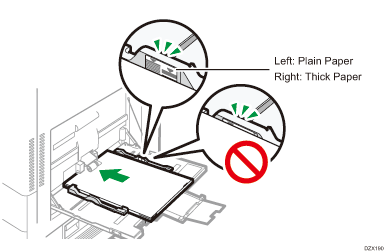
 Open the bypass tray.
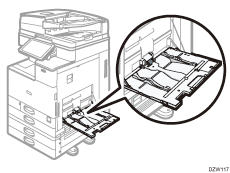
When loading paper larger than the bypass tray (longer than A4 paper in landscape orientation), pull out the extender.
 Load the paper with the print side down, and push it in lightly until you hear a beep.
Fan sheets before loading so that multiple sheets of paper do not stick to each other and are not fed at once.
When loading envelopes or letterhead paper, confirm the orientation, face and back, or location of flaps.
 Align the paper guides to the paper size.
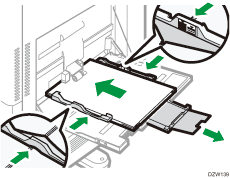

To load paper on the bypass tray, it is better to orient it in the direction of
 .
.
Loading paper into the banner paper guide tray
 Turn the knob clockwise until its triangle mark stops at the unlock mark.
Be careful that your hand does not hit the banner paper guide tray when turning the knob.
If you cannot turn the knob, turn it while pushing the banner paper guide tray toward the machine.
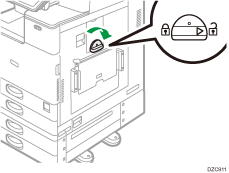
 Hold the handle in one hand while supporting the back of the bypass tray with the other hand, and then open the bypass tray slowly.
Open the bypass tray until it is parallel to the floor.
When loading paper that has a horizontal width of 148–457.2 mm (5.83–18.00 inches), proceed to Step 4.
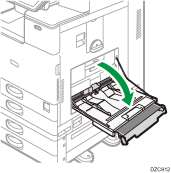
 Raise the banner paper guide tray, and then insert it into the bypass tray until it becomes stable.
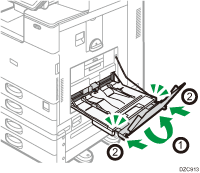
 Load the paper face down until you hear the beep.
 Align the paper guides to the paper size.
If the guides are not flush against the paper, images might be skewed or paper misfeeds might occur.
When loading paper that has a horizontal width of 148–900.0 mm (5.83–35.5 inches), proceed to Step 7.
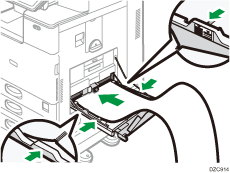
 Open the subtray, and then raise the minor banner paper guide tray.
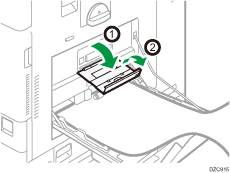
 Set the leading edge of the paper according to the paper size.
When using paper that has a horizontal width of 1,200 mm (47.3 inches), curl the paper so that its leading edge touches the minor banner paper guide tray.
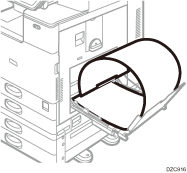
When using paper that has a horizontal width of 900 mm (35.5 inches), curl the paper so that its leading edge touches the side of the machine.
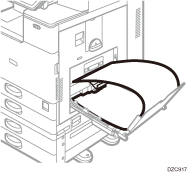
When using paper that has a horizontal width of 457.2–900 mm (18.00–35.5 inches), set the paper so that its leading edge protrudes from the banner paper guide tray.
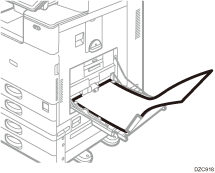
When using paper that has a horizontal width of 148–457.2 mm (5.83–18.00 inches), set the paper as loading paper into the bypass tray.
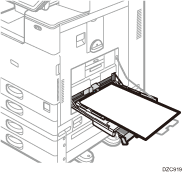

You can load up to 10 sheets of paper that has a horizontal width of 457.2–1,260 mm (18.00–49.60 inches) into the banner paper guide tray. When loading multiple sheets of paper into the banner paper guide tray, be sure to separate them one by one before loading them.
When [Notification Sound] is set to [No Sound], it does not sound if you load paper into the banner paper guide tray.
Closing the banner paper guide tray
 Remove any paper that is loaded.
 Fold the subtray up.
 Slide the paper guides outward to the maximum width.
 Fold up the banner paper guide tray.
 Hold the handle in one hand while supporting the back of the bypass tray with the other hand, and then close the bypass tray slowly.
 Turn the knob counter-clockwise until its triangle mark stops at the lock mark.
Loading Paper into Tray 3 (LCT)
Tray 3 (LCT) can hold A4 portrait paper only. Contact a service representative to set paper of 81/2 × 11 size.
You can load paper in both the left and right sides of the tray.
The paper in the right side of Tray 3 (LCT) is fed to the machine. When the paper loaded in the right side of Tray 3 (LCT) runs out, paper on the left side is automatically shifted to the right, and the tray continues to feed the paper.
While printing from Tray 3 (LCT), you can pull out the left side of the tray and load new paper.

When the paper loaded in the right side of Tray 3 (LCT) runs out, paper on the left is automatically shifted to the right. Do not pull out Tray 3 (LCT) while you hear the sound of moving paper.
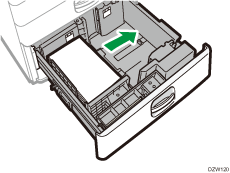
 Pull Tray 3 (LCT) out carefully.
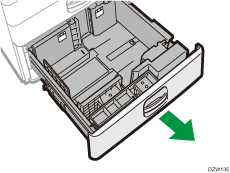
 Square the paper and load it with the print side facing up.
Fan sheets before loading so that multiple sheets of paper do not stick to each other and are not fed at once.
For the right stack, align the right edge of the paper with the right edge of the tray. For the left stack, align the left edge of the paper with the left edge of the tray.
Do not stack paper over the limit mark.
When the whole tray can be pulled out
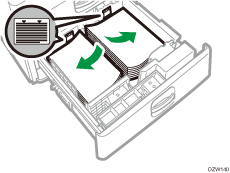
When half of the tray can be pulled out
Load 30 or more sheets of paper in the left half of the tray.
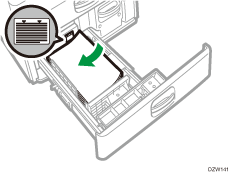
 Carefully push Tray 3 (LCT) fully in.
Loading Paper into the Large Capacity Tray (LCT)
The Large Capacity Tray (LCT) can hold A4 portrait paper only. Contact a service representative to set paper of B5 or 81/2 × 11 size.
 Open the cover of the Large Capacity Tray (LCT).
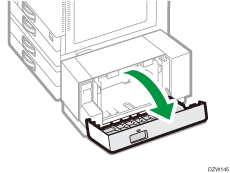
 Square the paper and load it with the print side facing down.
Fan sheets before loading so that multiple sheets of paper do not stick to each other and are not fed at once.
Do not stack paper over the limit mark.
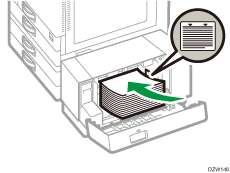
 Close the cover of the Large Capacity Tray (LCT).
Specifying the Paper Size That Is Not Automatically Detected (Settings Screen Type: Standard)
 Press [Settings] on the Home screen.
 Press [Tray/Paper Settings].
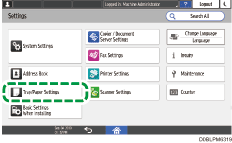
 Press [Paper Size/Paper Type]
 [Paper Size/Paper Type].
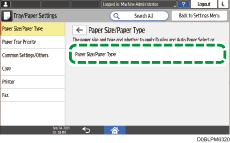
 Press the name of the tray on which the paper is loaded.
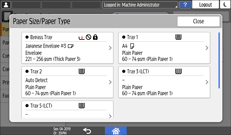
 Clear the [Apply Auto Paper Select/Auto Tray Select] check box, and then press [Paper Size].
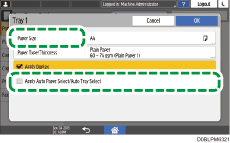
For the bypass tray, press [Paper Size: Printer].
 Select the size of the loaded paper from the list, and then press [OK]
 [OK].
[OK].
 After completing the procedure, press [Home] (
 ).
).
Specifying a Custom Size Paper Using the Control Panel (Settings Screen Type: Standard)
 Press [Settings] on the Home screen.
 Press [Tray/Paper Settings].

 Press [Paper Size/Paper Type]
 [Paper Size/Paper Type].
 Press the name of the tray on which the paper is loaded.

 Press [Paper Size].
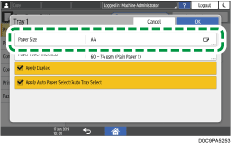
To specify for the bypass tray, press [Paper Size: Printer].
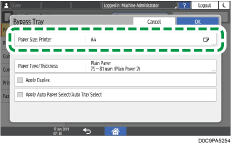
 Press [Custom] from the list shown.
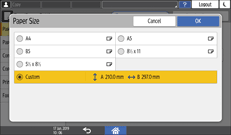
 Press the button to the right of "A" or "B".
Specify the values within the numbers of "< >", and then press [Done].
 Press [OK] three times.
 After completing the configuration, press [Home] (
 ).
).
Specifying Paper Type and Thickness Settings (Settings Screen Type: Standard)
If the print settings and the loaded paper that are used for a print job do not match, a mismatch error occurs.
Check and specify the paper settings before you start printing.

Before you change the settings, confirm the priority of the paper settings for printing (priority to the printer driver or to the control panel).
On the printer driver
Check the settings of paper tray and paper type on the printer driver and make sure the settings match the loaded paper.
On the control panel
 Press [Settings] on the Home screen.
 Press [Tray/Paper Settings].

 Press [Paper Size/Paper Type]
 [Paper Size/Paper Type].
 Press the name of the tray on which the paper is loaded.

 Press [Paper Type/Thickness].
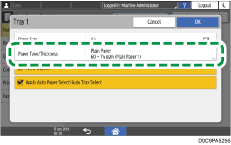
 Choose one paper type and paper thickness from the list shown, and then press [OK].
 Press [OK].
 After completing the configuration, press [Home] (
 ).
).
Specifying the Paper Size That Is Not Automatically Detected (Settings Screen Type: Classic)
To load paper into Tray 1, or to load paper of a size that is not automatically detected into Tray 2 to 4, specify the paper size on the control panel.
 On the Home screen, press [Settings].
 Press [Tray Paper Settings].
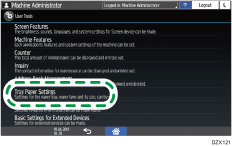
 Select the paper size specified in "Paper Size Setting" of the tray with loaded the paper.
Select from [Tray Paper Size: Tray 1] to [Tray Paper Size: Tray 4] or [Printer Bypass Paper Size].
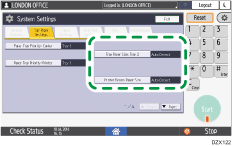
 Select the size of the loaded paper.
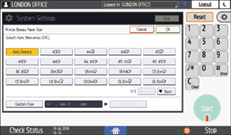
 Press [OK].
 After completing the configuration, press [Home](
 ).
).

To use paper that can be detected automatically after using paper that cannot be detected automatically, restore the setting of Auto Detect. To restore the setting of Auto Detect, load the paper again, operate steps 1 to 4, select [Auto Detect], and then press [OK].
Specifying a Custom Size Paper Using the Control Panel (Settings Screen Type: Classic)
 On the Home screen, press [Settings].
 Press [Tray Paper Settings].

 Select the paper size specified in "Paper Size Setting" of the tray with loaded the paper.
Select from [Tray Paper Size: Tray 1] to [Tray Paper Size: Tray 4] or [Printer Bypass Paper Size].

 Press [Custom Size].
If a custom size is already specified, press [Change Size].
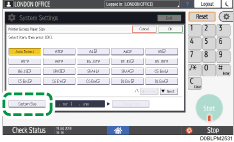
 Press [Vertical].
 Enter the vertical size using the number keys, and then press [
![]() ].
].
 Press [Horizontal].
 Enter the horizontal size using the number keys, and then press [
![]() ].
].
 Press [OK] twice.
 After completing the configuration, press [Home](
 ).
).
Specifying Paper Type and Thickness Settings (Settings Screen Type: Classic)

Before you change the settings, confirm the priority of the paper settings for printing (priority to the printer driver or to the control panel).
On the printer driver
Check the settings of paper tray and paper type on the printer driver and make sure the settings match the loaded paper.
On the control panel
 On the Home screen, press [Settings].
 Press [Tray Paper Settings].

 Select the paper size specified in "Paper Type Setting" of the tray with loaded the paper.
Select from [Paper Type: Tray 1] to [Paper Type: Tray 4] or [Paper Type: Bypass Tray].
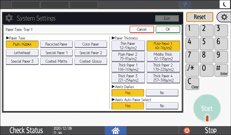
 Select the proper items in "Paper Type" and "Paper Thickness", according to the paper type you want to specify.
 Press [OK].
 After completing the configuration, press [Home](
 ).
).
