Loading Paper into the Paper Tray
The method of loading paper varies for each tray type.

- When replacing paper or removing jammed paper, make sure not to trap or injure your fingers.
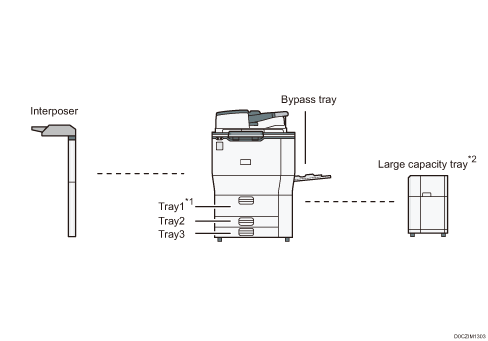
*1 The A3/11 × 17 tray unit can be attached.
*2 The extension unit of LCT can be attached.
Before loading paper into a tray, check the paper size and type that can be loaded in the tray, and confirm the paper size that is automatically detected.
When loading paper of a size that is not automatically detected, specify the paper size in [Tray/Paper Settings] of [Settings].
Specifying the Paper Size That Is Not Automatically Detected
To load thick paper or other special paper, specify the paper type or thickness in [Tray/Paper Settings] of [Settings].
Check the paper setting before printing. If the paper differs from the paper setting, a mismatch error will occur when you print.
Straighten curled or warped paper before loading.
When loading paper on a tray which has a few sheets of paper, multiple sheets of paper may be fed at once from the tray. Take out all sheets, fan the sheets, and then load them again.
You may hear the sound of rubbing paper. This is not a malfunction.
Do not stack paper over the limit mark.
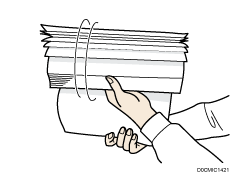
Fanning the Paper

If you load label paper or thick paper of 150.1–300.0 g/m2 (55.1 lb. Cover–165.0 lb. Index), it is important that you fan the sheets thoroughly. Misfeeds may occur if paper is not fanned thoroughly.
 Loosen the stack by riffling the sheets.
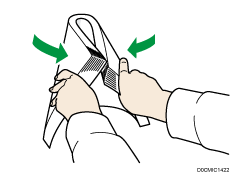
 Holding its shorter ends, flex the stack back and forth to create space between the sheets. Repeat this several times.
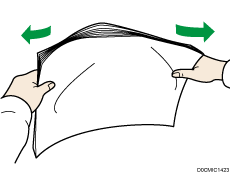
 Make sure there is space between the sheets.
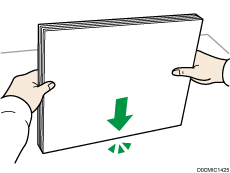
 Hold the stack of paper in both hands and tap the long and short edges of the paper against a flat surface to align them.
Loading Paper into Tray 1
 (mainly Europe and Asia)
Tray 1 can hold A4 paper only. If you want to print on 81/2 × 11 from Tray 1, contact your service representative.
 (mainly North America)
Tray 1 can hold 81/2 × 11 paper only. If you want to print on A4 from Tray 1, contact your service representative.
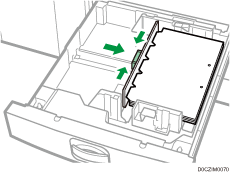
For the right stack, align the right edge of the paper with the right edge of the tray. For the left stack, align the left edge of the paper to the left edge of the tray.
When paper loaded in the right side of Tray 1 runs out, paper on the left is automatically shifted to the right. Do not pull out Tray 1 while the tray is moving paper; wait until sounds stop coming from the tray.
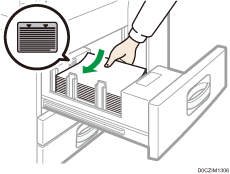
Carefully pull out tray 1 until it stops.
Square the paper and load it print side down.
Do not stack paper over the limit mark.
Whole tray pulled out
Left half of the tray pulled out
Carefully push the paper tray fully in.

You can load paper even if tray 1 is in use. It is okay to pull out the left half of the tray while tray 1 is in use.
Loading Paper into the A3/11 × 17 Tray Unit
- (mainly Europe and Asia)
A3/11 × 17 tray unit can hold A3 paper only. If you want to print on A4, B4 JIS, 11 × 17, 81/2 × 14, or 81/2 × 11, contact your service representative.
 - (mainly North America)
A3/11 × 17 tray unit can hold 11 × 17 paper only. If you want to print on A3, A4, B4 JIS, 81/2 × 14, or 81/2 × 11, contact your service representative. Check the paper edges are aligned at the right side.
Carefully pull out the paper tray until it stops.
Square the paper and load it print side down.
Do not stack paper over the limit mark.
Carefully push the paper tray fully in.
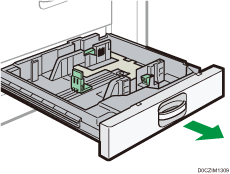
Loading Paper into Trays 2 and 3
Each paper tray is loaded in the same way. In the following example procedure, paper is loaded into Tray 2.
Check that the paper edges are aligned at the right side.
If a paper tray is pushed vigorously when putting it back into place, the position of the tray's side fences may slip out of place.
When loading a low number of sheets, be sure not to squeeze the side fences in too tightly. If the side fences are squeezed too tightly against the paper, the edges may crease, the paper may misfeed, or if it weighs between 52–59 g/m2 (14–15 lb. Bond), it may wrinkle.
Do not stack paper over the limit mark. If you load paper over the limit mark, the printed images may become slanted or a paper jam may occur.
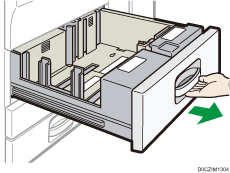
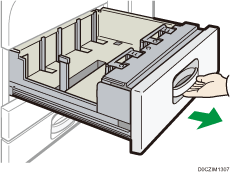
Check that paper in the paper tray is not being used, and then pull the tray carefully out until it stops.
Release the lock on the side fence.
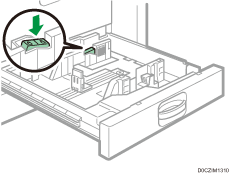
While pressing down the release lever of the side fence, slide the side fences outward.
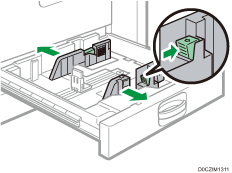
While pinching the release lever of the end fence, slide the end fence outward.
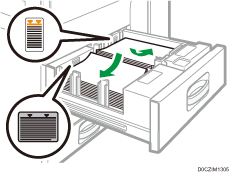
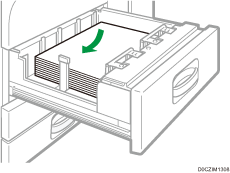
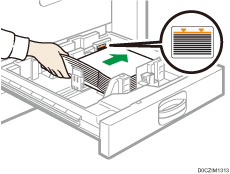
 Square the paper and load it print side down.
Do not stack paper over the limit mark.
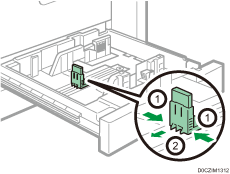
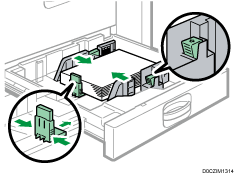
 Align the end and side fences gently against the paper you loaded.
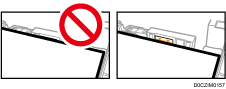
Make sure that there is no space between the paper and the side fences or end fence.
When loading paper weighing 52–59 g/m2 (14–15 lb. Bond), keep the gap between the paper and each side fence within 0.5 mm. If the gap is too wide, creases may occur.
 Re-lock the side fences.
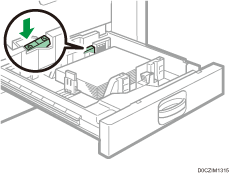
 Carefully push the paper tray fully in.
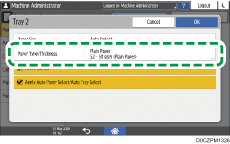
 Specify the paper type and thickness.
Specifying Paper Type and Thickness Settings
When loading paper of a size that is not automatically detected, specify the paper size.
Specifying the Paper Size That Is Not Automatically Detected
Loading Tab Stock into Trays 2 and 3
When loading tab stock, always use the optional tab sheet holder.
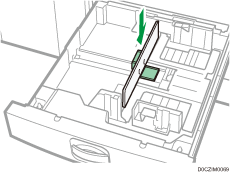
Load tab stock so that the side with the tab faces the tab sheet holder.
Pressing the release lever, adjust the end fence position so that the tab sheet holder fits against the tab stock.
Specify the paper type and thickness before you start printing.
Specifying Paper Type and Thickness Settings
When loading paper of a size that is not automatically detected, specify the paper size.
Specifying the Paper Size That Is Not Automatically Detected
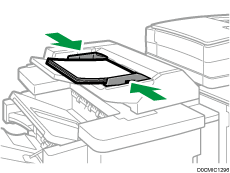
Loading Paper into the Bypass Tray
Use the bypass tray to use adhesive labels, translucent paper, and paper that cannot be loaded in the paper trays.
The maximum number of sheets you can load at the same time depends on paper type.
Recommended Paper Sizes and Types
Load only as much paper as can be held between the paper guides on the bypass tray. If you load paper over the limit mark, the print image may be slanted or the paper may be jammed.
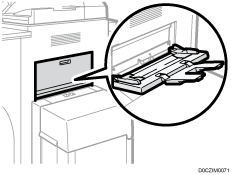
Open the bypass tray, and then open the extender.
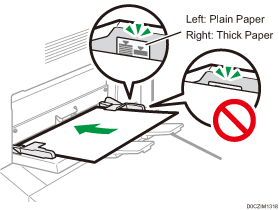
Insert the paper print side up as far as it will go into the machine.
Fan sheets before loading so that multiple sheets of paper do not stick to each other and are not fed at once.
When loading letterhead paper, confirm the orientation, face and back, or location of flaps.
Align the paper guides to the paper size.
If the guides are not flush against the paper, images might be skewed or paper misfeeds might occur.
When loading paper weighing 52–59 g/m2 (14–15 lb. Bond), keep the gap between the paper and each paper guide within 0.5 mm. If the gap is too wide, creases may occur.
Specify the paper type and thickness.
Specifying Paper Type and Thickness Settings
When loading paper of a size that is not automatically detected, specify the paper size.
Specifying the Paper Size That Is Not Automatically Detected
To load paper on the bypass tray, it is better to orient it in the direction of
.Certain types of paper might not be detected properly when placed on the bypass tray. If this happens, remove the paper and place it on the bypass tray again.
When loading paper weighing 52–59 g/m2 (14–15 lb. Bond), thick paper, or translucent paper, specify the paper size and the paper type.
Loading Paper into the Large Capacity Tray (LCT)
(mainly Europe and Asia)
The LCT can hold A4 paper only. If you want to print on 81/2 × 11 or B5 JIS from the LCT, contact your service representative.
(mainly North America)
The LCT can hold 81/2 × 11 paper only. If you want to print on A4 or B5 JIS from the LCT, contact your service representative.
The extension unit is required to load A4, B4 JIS, 81/2 × 14, or 81/2 × 11.
Check that the paper edges are aligned at the left side.
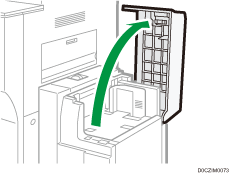
Check that paper in the paper tray is not being used, and then open the top cover of the LCT.
Load paper into the paper tray with the print side up.
Do not stack paper over the limit mark.
Press the [Down] key.
The key blinks while the bottom plate is moving down.
Load paper by repeating Steps 2 and 3.
Close the top cover of the LCT.
Specify the paper type and thickness.
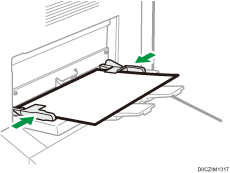
Loading Paper into the Interposer
Do not place anything on top of or leave documents on the sensor. This may lead to the paper size not being correctly scanned or paper jams.
When using the Z-fold function, the paper in the interposer must be of the same size as the prints after they have been folded. If the paper in the interposer is larger than the Z-folded sheets, a misfeed might occur.
Do not use paper that has already been printed onto by this machine.
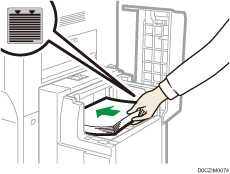
Load paper orderly.
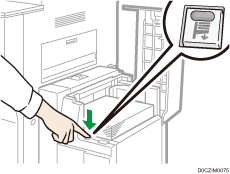
Do not stack paper over the limit mark.
Adjust the side fences to the paper size.
Load paper with its printed side up (the front side).
Load paper in the interposer in the same orientation as paper in the paper tray.
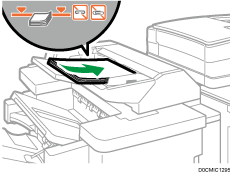
The staple position or punch hole position will be on the left side of the paper, when you are facing the machine.
To load the paper in the interposer, align the orientation of originals in the ADF as shown below.
Interposer
ADF


Specifying the Paper Size That Is Not Automatically Detected
Press [Settings] on the Home screen.
Press [Tray/Paper Settings].
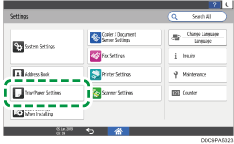
Press [Paper Size/Paper Type].
Press one tray to set.
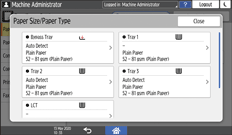
Press [Paper Size].
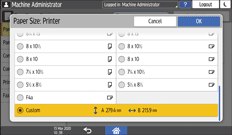
To specify for the bypass tray, press [Paper Size: Printer].
The size of the paper in Tray 1 and the large capacity tray (LCT) is fixed and cannot be changed.
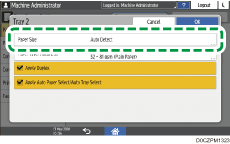
Choose one paper size from the list shown, and then press [OK].
Press [OK].
After completing the configuration, press [Home] ( ).
).
To use paper that can be detected automatically after using paper that cannot be detected automatically, restore the setting of Auto Detect. To restore the setting of Auto Detect, load the paper again, operate steps 1 to 6, select [Auto Detect], and then press [OK].
Specifying a Custom Size Paper Using the Control Panel
Press [Settings] on the Home screen.
Press [Tray/Paper Settings].
Press [Paper Size/Paper Type].
Press one tray to set.
Press [Paper Size].
To specify for the bypass tray, press [Paper Size: Printer].
The size of the paper in Tray 1 and the large capacity tray (LCT) is fixed and cannot be changed.
Press [Custom] from the list shown.
Press the value in the "A" or "B" field, and then enter the new value.
Specify the values within the numbers of "< >", and then press [Done].
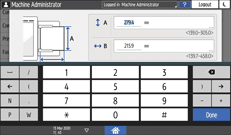
Press [OK] three times.
After completing the configuration, press [Home] ().
Specifying Paper Type and Thickness Settings
If the print settings and the loaded paper that are used for a print job do not match, a mismatch error occurs.
Check and specify the paper settings before you start printing.
Before you change the settings, confirm the priority of the paper settings for printing (priority to the printer driver or to the control panel).
[Settings]
 [Printer Settings][System][Paper In/Out][Tray Setting Priority]
On the printer driver
Check the settings of paper tray and paper type on the printer driver and make sure the settings match the loaded paper.
On the control panel
Press [Settings] on the Home screen.
Press [Tray/Paper Settings].
Press [Paper Size/Paper Type].
Press one tray to set.
Press [Paper Type/Thickness].
Choose one paper type and paper thickness from the list shown, and then press [OK].
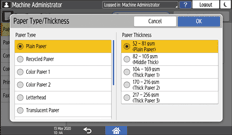
Press [OK].
After completing the configuration, press [Home] ().