Scanning Documents into an Application on a Computer Using TWAIN
Use the TWAIN scanner from a computer to scan the original placed on the machine into an application that supports TWAIN.
Connect the machine to the network and install the TWAIN driver in advance.
TWAIN supporting application
To use the TWAIN scanner, install an application that supports TWAIN on the computer. Various image editing applications support TWAIN. For the installation and operation procedure of each application, see the use manual provided with the application.
![]()
While the machine is processing an OCR file, scanning with the TWAIN scanner is possible only with the ADF Read-ahead function enabled in the Scanner Control dialog box.
![]()
The TWAIN driver operates in 32-bit mode. On a computer running an operating system in 64-bit mode, use an application operating in 32-bit mode.
Connect the machine and computer in the same network segment as shown below.
The IP addresses of the machine and computer match except in the last number "ddd" in "aaa.bbb.ccc.ddd"
The machine is connected via the link local address when using IPv6
You cannot specify the file format as multi-page TIFF when you use the TWAIN driver to scan.
Change the file format of the document after saving it.
Basic Procedure for Using the TWAIN Scanner
![]() Place the original on the machine.
Place the original on the machine.
![]() Start a TWAIN supported application on the computer.
Start a TWAIN supported application on the computer.
In some applications, specify the machine as the scanner to use in the setting screen such as the scanner settings.
![]() Display the configuration screen of the TWAIN driver.
Display the configuration screen of the TWAIN driver.
![]() Specifying the original orientation.
Specifying the original orientation.
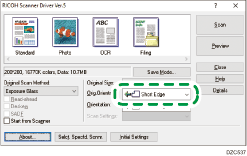
To display the scanned pages in the correct vertical orientation on the computer, specify the orientation that matches the orientation of the original placed on the machine in the TWAIN driver.
Select the location where the original is set in [Original Scan Method:].
Select [
 ] or [
 ] in [Orig.Orientn.:].
Specify [Orientation:].
When placing the original on the exposure glass
When placing the original in the ADF
Orientation to place the original
[Orientation]
Orientation to place the original
[Orientation]


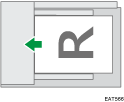


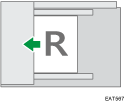


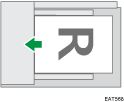


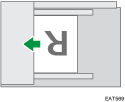

When placing the original in the ADF, select [1 Sided], [2 Sided(Top to Top)] or [2 Sided(Top to Bottom)] in [Scan Settings:].
![]() Configure the other scan settings according to the purpose of the scanned data.
Configure the other scan settings according to the purpose of the scanned data.
For details, see the TWAIN driver Help.
![]() Click [Scan].
Click [Scan].
![]() If you are scanning another page, place it in the same location and continue scanning until all pages are scanned.
If you are scanning another page, place it in the same location and continue scanning until all pages are scanned.
![]()
You cannot use the auto blank page detection function when using the TWAIN scanner.
