Specifying Scan Settings for Originals for FAX Transmission
Displaying Confirmation of Transmission
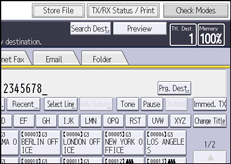
 Press [Check Modes], and then check the transmission settings.
 Press [Exit].
Setting the Original Orientation
To preview scanned originals or documents using Document Server, configure the [Original Orientation] setting to display the top/bottom orientation of the original correctly in the preview.
Press [Original Feed Type].
Specify the original orientation.
Select the readable orientation  or unreadable orientation
  according to the orientation of the original that you place.
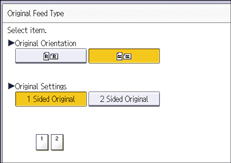
 Press [OK].
Scanning Two-Sided Originals
Use this function to scan the front and back side of two-sided originals page by page.
You must place originals into the ADF and use Memory Transmission when using this function. The exposure glass and Immediate Transmission cannot be used with this function.
How to specify the orientation and page opening orientation settings
To transmit the original so that its front and back sides can be printed in the same orientation, configure the [Original Orientation] and [Page Opening Orientation] settings according to the orientation of the original to be placed.
Unless the [Original Orientation] and [Page Opening Orientation] settings are configured properly, the orientation of the front and back sides of the original may be in reverse when printed at the destination.
Original | Original position | Original Orientation | Page Opening Orientation |
|---|---|---|---|
 |  |  | Top to Top |
 |  |  | Top to Bottom |
 |  | | Top to Top |
Checking the Content of a Scanned Original (Preview Before Transmission)
This function cannot be used with the following functions:
Immediate Transmission
Parallel Memory Transmission
On Hook Dial
Manual Dial
SEP Code Reception
When [Store Only] is set for [Store File]
Transmission of a stored file only
Memory File Transfer (If Unable to Print)
Place the original, and then specify the scan settings you require.
Specify the [Original Orientation] setting correctly. If you do not, the top/bottom orientation of the original will not be displayed correctly in the preview.
Press [Preview].
Specify the destination, and then press [Start].
 Check the preview.
Press [Zoom Out] or [Zoom In] to reduce or enlarge the preview image. You can also double-tap to reduce or enlarge the preview image.
Press [
 ] [
] [ ] [
] [ ] [
] [ ] to scroll the preview image. You can also tap to scroll the preview image.
Press [Switch] under [Display File] to display another selected file.
Press [Switch] under [Display Page] to change the displayed page.
To start transmission, press [Send].
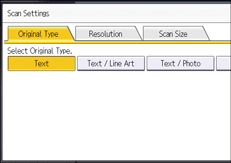
Original Type
If the original contains photographs, illustrations, or diagrams with complex shading patterns or grays, select the appropriate original type to optimize image clarity.
Text
Select [Text] to send high-contrast black-and-white image originals. Use this setting when you only want to send clearer text, even if the original contains text and photographs.
Text / Line Art
Select [Text / Line Art] to send high-contrast black-and-white graphic originals at improved resolution. The [Text] mode gives priority to scanning speed; [Text / Line Art] mode gives priority to scanning quality.
Text / Photo
Select [Text / Photo] to send an original containing both a high-contrast black-and-white image, such as text, and a halftone image, such as a photograph.
Photo
Select [Photo] to send an original containing a halftone image, such as a photograph or a color original.
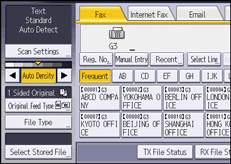
Press [Scan Settings].
Make sure that [Original Type] is selected.
Select the original type you require, and then press [OK].

If you select [Text / Line Art], [Text / Photo], or [Photo], the transmission will take longer than when [Text] is selected.
If you send a fax document with [Text / Line Art], [Text / Photo], or [Photo] and the background of the received image is dirty, reduce the density setting and resend the fax.
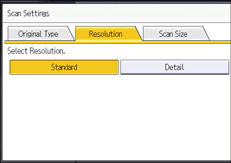
Resolution
Specify the resolution according to the size of the text on the original.
Standard (8 × 3.85 lines/mm, 200 × 100 dpi)
Select for originals containing normal size characters.
Detail (8 × 7.7 lines/mm, 200 × 200 dpi)
Select for originals containing small characters or when you require greater clarity. This resolution is twice as fine as Standard.
Super Fine (16 × 15.4 lines/mm, 400 × 400 dpi)
Select for originals with very fine details or when you require the best possible image clarity. This resolution is eight times finer than Standard.
For details about the optional units required for Super Fine, see "Functions Requiring Optional Configurations", Specifications.
If the other party's machine does not support the resolution at which you are sending, this machine automatically switches to a resolution that is supported. You can check the resolution at which you actually sent by printing the Records.
When using the Cloud Fax function, you can always send originals with the Detail (200 × 200 dpi) resolution.
Press [Scan Settings].
Press [Resolution].
Select the resolution you require, and then press [OK].
The machine supports Standard and Detail resolutions for reception.
Scan Size
You can specify the scan area manually. Specifying the scan area manually can be useful for cropping excess border space around an image.
Scan size settings are as follows:
Auto Detect
 (mainly Europe and Asia)
When the ADF is used, the machine scans the vertical size of originals as that of A4 size and detects the horizontal size of originals automatically.
When the exposure glass is used, the machine scans originals as A4 size, and the original size is not detected automatically.
 (mainly North America)
When the ADF is used, the machine scans the vertical size of originals as that of 81/2 × 11 size and detects the horizontal size of originals automatically.
When the exposure glass is used, the machine scans originals as 81/2 × 11 size, and the original size is not detected automatically.
Regular
The placed original is scanned according to specified standard size regardless of actual size.
Area
Only the area in the specified size is scanned regardless of the actual size of a placed original.
Two sizes can be registered in advance. You must first register the sizes of the originals that you want to scan in [Register/Change/Delete Scan Size] on the Fax Settings menu.
Press [Scan Settings].
Press [Scan Size].
Select a scan size.
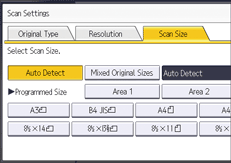
Press [OK].
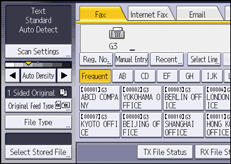
Density (Contrast)
You can adjust the density at which the originals are scanned.
The text and diagrams on originals should stand out clearly from the paper they are on.
If the original has a darker background than normal (for example, a newspaper clipping), or if the writing is faint, adjust the density.
Auto Density
The appropriate density setting for the original is automatically selected.
Make sure that [Auto Density] is selected.
Manual Density
Use manual density to set density manually.
You can select one of seven density levels.
If [Auto Density] is selected, press [Auto Density] to turn it off.
Press [
 ] or [
 ] to adjust the density.
The indicator moves.
Combined Auto and Manual Density
You can only adjust density for photographs, illustrations, or diagrams if the original has a dark background.
You can select one of seven density levels.
Make sure that [Auto Density] is selected.
Press [
] or [] to adjust the density.The indicator moves.

Selecting [Text], [Text / Line Art], or [Text / Photo] for the original type causes [Auto Density] to be selected.
Mixing Scan Settings for a Multiple Page Original
When sending an original of several pages, you can select a different scan setting for each page.
It is recommended that originals be placed on the exposure glass when mixing scan settings for a multiple page original.
If you are using the ADF, do not change the [Resolution] setting while originals are being scanned.
When placing originals on the exposure glass
Check which pages you want to scan with different settings.
Remove the previous page and place the next page that you checked on the exposure glass.
Make the scan settings.
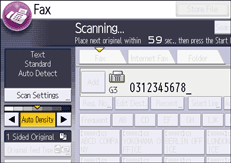
You have about 60 seconds (10 seconds for Immediate Transmission) to make the scan settings. The time remaining is shown on the display.
Adjust the settings for each page before you press [Start].
When placing originals in the ADF
Check which pages you want to scan with different settings.
Make the scan settings before the page you want to change the settings for starts being scanned.
Depending on what time the scan settings are adjusted, the settings may not be reflected in the resulting operation.
Selecting the File Format for Documents for Fax Transmission
You can select TIFF, PDF, or PDF/A as the file format to send a document by e-mail or to a folder.
If you select PDF or PDF/A as the file format, you can attach an electronic signature.
Applying Encryption and Using a Signature for Enhanced Security When Sending an Internet Fax
Even if you specify a format for files being sent to fax, IP-Fax, or Internet Fax destinations, the files will not be converted to the format you specify.
Press [File Type].
Press [TIFF], [PDF], or [PDF/A].
To attach an electronic signature, press [Digital Signature] to highlight it.
Press [OK].