Using the Address Book to Specify Destinations
When destinations are registered in the Address Book, you can specify a destination by selecting a destination key from the destination list.
The programmed name appears on destination key.
You need to pre-register a destination in the Address Book.
Transferring a Received Fax Document to Email Address or Folder
When registering an e-mail destination, select [Email Destination & Internet Fax Destination] for [Use Email Address As].
 Press [Fax], [Internet Fax], [Email], or [Folder] to switch the transmission type.
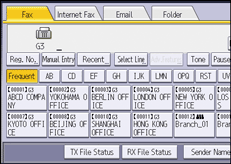
 Press the title word key where the desired destination is programmed.
For example, if you want to specify "New York Office" programmed in "LMN", press [LMN].
 Press the destination key programmed with the desired destination.
If the desired destination key is not shown, press [![]() ] and [
] and [![]() ] to look through the list.
] to look through the list.
To cancel the selection, press the selected destination key again. You can also press [Clear] to cancel the selection.
To select more destinations, repeat Steps 2 and 3.

The Fax Settings menu includes a User Parameter (switch 17, bit 2) that enables you to configure the machine to force the user to press [Add] whenever s/he specifies a destination using a destination key. This prevents users accidentally sending documents to the wrong destination.
To check the contents of destination keys, print the destination list using Print Address Book: Destination List under System Settings.
Switching the type of title in the Address Book
There are three types of titles for destination lists; [Title 1], [Title 2], and [Title 3].
 Press [Change Title].
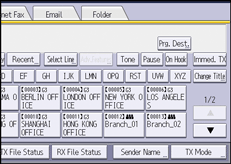
 Select the type of the title, and then press [OK].
Specifying group destinations
If you program multiple destinations into a group, you can send documents to all destinations in that group using just a few keystrokes.
Destinations programmed in a group are indicated by a group icon  .
.
Registering Groups in the Address Book
 Press [Fax], [Internet Fax], [Email], or [Folder] to switch the transmission type.

 Press the destination key programmed with the desired group.
To select more groups, repeat this step.

To view which destinations are registered in a group, print the group list using the Print Address Book: Destination List function under System Settings.
A confirmation message appears if the destination group includes an address that is incompatible with the specified transmission type. Press [Select] to specify destinations where the numbers or addresses of the specified transmission type are registered. Press [Cancel] to change the destination.
To cancel any destination(s) among the group, press [Expand Group Dest.] in [Check Modes]. Then, on the standby screen, press [
 ] and [
 ] to display the desired destination, and then press [Clear]. You can also cancel a transmission by pressing the highlighted destination key to deselect it.
Search by destination name
You can search the Address Book or LDAP server for a destination by entering the destination name.
To use an LDAP server, the LDAP server must be registered in [Register/Change/Delete LDAP Server] and [LDAP Search] must be set to [On] on the System Settings menu in advance.
The search returns only destinations whose first characters match the entered characters.
You cannot use the LDAP server to search for a folder.
 Press [Search Dest.].
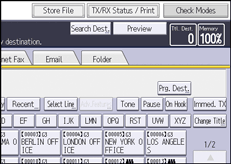
 Select a location to search.
To search through the Address Book, select [Address Book].
To search through an LDAP server, select the relevant LDAP server.
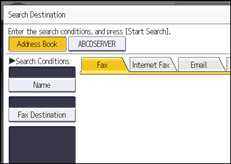
 Press [Fax], [Internet Fax], [Email], or [Folder] to switch the transmission type.
 Press [Name].
 Enter the destination name you want to search for, and then press [OK].
 Check the characters you have entered are correct, and then press [Start Search].
When the search is finished, a result appears.
 Select a destination, and then press [OK].
If the destination you require does not appear, use [![]() ] or [
] or [![]() ] to scroll through the list.
] to scroll through the list.
Press [Details] to display the details of a selected destination.

For details about text entry, see How to Enter Text (Classic Application).
A warning message appears if the search returns more than the maximum number of destinations you can search for at a time. Press [Exit] and change the destination name to view fewer destinations.
Although one user can program multiple e-mail addresses, only one address can be retrieved by the search. The address retrieved by the search depends on the searching method supported by the LDAP server. However, the address programmed first is normally retrieved.
Search by a destination's number or address
You can search the Address Book or LDAP server for a destination by entering the destination's fax number, e-mail address, or path to the folder.
To use an LDAP server, the LDAP server must be registered in [Register/Change/Delete LDAP Server] and [LDAP Search] must be set to [On] on the System Settings menu in advance.
The search returns only destinations whose first characters match the entered characters.
You cannot use the LDAP server to search for a folder.
 Press [Search Dest.].

 Select a location to search.
To search through the Address Book, select [Address Book].
To search through an LDAP server, select the relevant LDAP server.

 Press [Fax], [Internet Fax], [Email], or [Folder] to switch the transmission type.
 Select [Fax Destination], [Email Address], or [Folder Name] according to the type of destination that you want to search for.
 Enter the characters you want to search for, and then press [OK].
 Check that the characters you have entered are correct, and then press [Start Search].
 Select a destination, and then press [OK].
If the destination you require does not appear, use [![]() ] or [
] or [![]() ] to scroll through the list.
] to scroll through the list.
Press [Details] to display the details of a selected destination.

For details about text entry, see How to Enter Text (Classic Application).
A warning message appears if the search returns more than the maximum number of destinations you can search for at a time. Press [Exit] and change the destination name to view fewer destinations.
Although one user can program multiple e-mail addresses, only one address can be retrieved by the search. The address retrieved by the search depends on the searching method supported by the LDAP server. However, the address programmed first is normally retrieved.
Search using Advanced Search
You can search the Address Book or LDAP server for a destination by specifying search parameters.
To use an LDAP server, the LDAP server must be registered in [Register/Change/Delete LDAP Server] on the System Settings menu and [LDAP Search] must be set to [On] on the System Settings menu in advance.
The following conditions can be specified for Address Book searches: Name, Fax Destination, Email Address, and Folder Name.
The following conditions can be specified for LDAP server searches: Name, Fax Destination, Email Address, Company Name, and Department Name.
You cannot use the LDAP server to search for a folder.
 Press [Search Dest.].

 Select a location to search.
To search through the Address Book, select [Address Book].
To search through an LDAP server, select the relevant LDAP server.

 Press [Fax], [Internet Fax], [Email], or [Folder] to switch the transmission type.
 Press [Advanced Search].
 Press the key for each condition, and then enter a partial string.
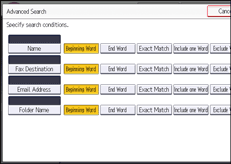
When searching via LDAP servers, the string you enter in the [Name] condition field is read as the first or last name, depending on the administrator's setting. For example, to search for the name "John Smith", ask the system administrator whether you should enter "John" or "Smith".
 Select search criteria for each condition.
The meanings of the search criteria are as follows:
[Beginning Word]: Search for strings that start with the specified character.
Example: When searching for "ABC", enter "A".
[End Word]: Search for strings that end with the specified character.
Example: When searching for "ABC", enter "C".
[Exact Match]: Search for strings that fully match the specified character.
Example: When searching for "ABC", enter "ABC".
[Include one Word]: Search for strings that include the specified character.
Example: When searching for "ABC", enter "A", "B", or "C".
[Exclude Words]: Search for strings that do not include the specified character.
Example: When searching for "ABC", enter "D".
[Fuzzy Search]: Perform a fuzzy search.
This item appears when selecting an LDAP server in Step 2. The performance of fuzzy search depends on the search method supported by the LDAP server.
 Press [OK].
 Press [Start Search].
 Select a destination, and then press [OK].
If the destination you require does not appear, press [![]() ] or [
] or [![]() ] to display it.
] to display it.
Press [Details] to display the details of a selected destination.

You can add one additional search condition for LDAP servers by specifying the Search Options under Register/Change/Delete LDAP Server under System Settings.
For details about text entry, see How to Enter Text (Classic Application).
A warning message appears if the search returns more than the maximum number of destinations you can search for at a time. Press [Exit] and change the destination name to view fewer destinations.
Although one user can program multiple e-mail addresses, only one address can be retrieved by the search. The address retrieved by the search depends on the searching method supported by the LDAP server. However, the address programmed first is normally retrieved.
Search by registration number
This section explains how to search for a destination by specifying a registration number stored in the Address Book.
 Press [Fax], [Internet Fax], [Email], or [Folder] to switch the transmission type.

 Press [Reg. No.].
 Enter a registration number using the number keys, and then press [
![]() ].
].
While usually a registration number is displayed in the five-digit format, you do not need to enter the first zeros of a registration number.
If the “Cannot find the specified Registration No.” message appears, the specified registration number or selected type of transmission is wrong or does not exist. Press [Exit], check the registration number again, and then follow the procedure from Step 1 or 3.
 Press [OK].
