Scanning an Original with Suitable Quality and Density
Specify the quality and density to scan on the [Send Settings] screen.
 Press [Scanner] on the Home screen.
 Press [Send Settings] on the scanner screen and specify the original type (quality), density and resolution.
When specifying the original type
Original Type | Appropriate for |
|---|---|
Black & White: Text | A document mainly composed of text in black and white. The original is scanned in two tones of black and white. |
Black & White: Text / Photo | A document with text and photos in black and white. The original is scanned in two tones of black and white. |
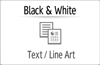
Black & White: Text / Line Art | A document with text and figures in black and white. The original is scanned in two tones of black and white. |
Black & White: Photo | A document with figures and photos in black and white. The original is scanned in two tones of black and white. |
Black & White: Drawing | Scans lines clearly. Prevents smudges on originals appearing on scanned images. |
Gray Scale | A document with figures and photos in black and white. The original is scanned as an image comprising many shades of gray. |
Full Color: Text / Photo | A document mainly comprising text in color. |
Full Color: Glossy Photo | An original in color such as silver-halide prints or pictures. |
You can select only [Gray Scale], [Full Color: Text / Photo], or [Full Color: Glossy Photo] when [PDF (JPEG 2000)] is specified in [File Type].
Specifying the File Type or File Name When Scanning a Document
If you select the original type not compatible with the file format specified in [File Type], a message suggesting you to change the file type or original type is displayed. In this case, select a file type or original type from those suggested in the message.
When adjusting the density

Move
 to the left or right to adjust the density. The colors in the scanned image darken as you move the slider to the right.
Select the [Auto Density] check box to adjust the density automatically when scanning an original with a non-white background such as newspaper or a document that has show-through.
You can specify the shading level in [Scanner Settings]
 [Scan][Color/Density][Background Density of ADS (Full Color)].
When specifying the resolution

Select the resolution to use for scanning the original. Image quality improves as the resolution increases, but the size of the scanned data also increases.
To ensure the quality of scanned data, [150 dpi] cannot be selected in the following cases:
[PDF (JPEG 2000)] is specified in [File Type]
Specifying the File Type or File Name When Scanning a Document
PDF is selected in [File Type] and OCR setting is specified
 To send the scanned document to an e-mail address, press [Sender] and then specify the sender.
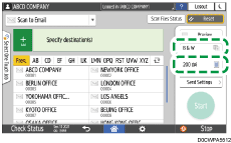
 Specify the destination on the scanner screen.
 Place the original. If scanning does not start automatically, press [Start].

You can also specify the quality and resolution from the scanner screen. Press items on the screen to specify them.