Setting Items on the RTIFF Menu
For an explanation of each symbol, see the following table:
Mark | Description |
|---|---|
 | Also available in Web Printing Tool. |
1. Select Paper Input Location
Specify the paper input location to be used.
Settings
System Default
Paper Input 1: Regular (Portrait)
Paper Input 1: Regular (Landscape)
Paper Input 1: Custom Size
Paper Input 2: Regular (Portrait)
Paper Input 2: Regular (Landscape)
Paper Input 2: Custom Size
Paper Bypass Location
Default: System Default
Behavior
If "System Default" is selected as the paper input location, the paper input location specified in "Paper Input Location/Paper Settings"
 "Paper Input Priority" "Paper Input Priority: Printer" is used.
Conditions
If a paper size is selected in "2. Paper Size", this setting is ignored.
If "On" is selected for "U. Auto Paper Select", this setting is ignored.
If paper cannot be fed from the paper input location specified in this setting due to the limitations of the machine's printer functions, the paper is fed from the paper input location displayed on the control panel.
If either of "tray", "paper", or "autopaper" is specified in the printing option, this setting is ignored.
If Rotate Sort is specified in PJL or its relevant printing option, paper may be fed from a paper input location that differs from the selected paper input location.

If Auto Paper Input Switching is enabled, paper may be fed from a paper input location that differs from the selected paper input location. To specify a paper input location, select "Auto" or "Off" in "4. Auto Paper Input Switching", or specify the "noautotray" printing option.
"Paper Input 2: Regular (Portrait)", "Paper Input 2: Regular (Landscape)", and "Paper Input 2: Custom Size" appear on "1. Select Paper Input Location" only when the optional Paper Input Location 2 is attached.
2. Paper Size
Specify the size and orientation of the paper to be used for printing.
Settings
Do not Specify, A0R, A1, A1R, A2, A2R, A3, A3R, A4, B1R JIS, B2 JIS, B2R JIS, B3 JIS, B3R JIS, B4 JIS, B4R JIS, AC, ACR, LT, LTR, DL, DLR, LG, LGR, 12 x 18, 12 x 18R, 36 x 48R, 34 x 44R, 30 x 42R, 24 x 36, 24 x 36R, 22 x 34, 22 x 34R, 21 x 30, 18 x 24, 18 x 24R, 9 x 12, 9 x 12R, 8 1/2 x 13, 15 x 20R
Default: Do not Specify
Behavior
If paper of the size and orientation specified in this setting is not loaded in any of the paper input location, paper is fed from the paper input location displayed on the control panel.
If "Do not Specify" is selected, paper is fed from the paper input location specified in "1. Paper Input Location".
Conditions
If an item other than "Do not Specify" is selected, the setting for "1. Select Paper Input Location" is ignored.
If "On" is selected for "U. Auto Paper Select", this setting is ignored.
If either of "tray", "paper", or "autopaper" is specified in the printing option, this setting is ignored.
Some paper input location may not be selected.
If Auto Paper Input Switching is enabled, paper may be fed from a different paper input location than the one selected. In order to specify a paper input location, select "Auto" or "Off" in "4. Auto Paper Input Switching" or specify the "noautotray" printing option.
4. Auto Paper Input Switching
Specify whether or not to automatically switch to another paper input location when the currently selected paper input location runs out of paper while printing.
The paper input locations to which the paper source is automatically switched must be loaded with the paper of the same size and type.
Settings
Auto
On
Off
Default: Auto
Behavior
Paper input location switching occurs automatically when "Auto" or "On" is selected.
If "Off" is selected, paper input location switching does not occur. In such a case, load paper.
Conditions
If either the "autotray" or "noautotray" printing option is specified, this setting is ignored.
Even if "Auto" is selected, the paper input location is not automatically switched if a paper input location is selected in "1. Select Paper Input Location" or if a specific paper input location is specified by the "tray" printing option.
5. Orientation
Specify the orientation in which to print images.
Settings
Portrait
Landscape
Default: Portrait
Output result of "Portrait":
Output result of "Landscape":
Conditions
If "On" is selected for "U. Auto Paper Select" and neither the "tray" nor "paper" printing options is specified, this setting is ignored.
If either of "portrait", "landscape", or "autopaper" is selected in the printing option, this setting is ignored.
If opposite orientation printing is enabled by PJL or its relevant printing option, images on the paper may be rotated by 180 degrees when printed.
7. Resolution
Specify the resolution to use for printing.
Setting
600dpi
8. Reproduction Ratio
Specify the Reproduction Ratio for enlarging or reducing images when printing. Specify a value within the range 25-1,000% in increments of 1%. The aspect ratio of the image remains unchanged, even if the image is enlarged or reduced.
Default: 100%
Conditions
If either of the "xmag", "ymag", "fit", "nofit", "tifffit", "notifffit", or "autoreduce" printing options are specified, or if either of "J. Reduce/Enlarge Ratio: Horizontal", "K. Reduce/Enlarge Ratio: Vertical", "P. Auto Reduce/Enlarge to Printable Area", "T. Auto Reduce/Enlarge to Scanned Image Size", or "b. Auto Reduce" have been configured, images are enlarged or reduced in the ratio that is calculated by multiplying the reproduction ratio specified for those settings by the reproduction ratio specified for this printing option.
If the "mag" printing option is specified, this setting is ignored.
The "b. Auto Reduce" and the "autoreduce" printing option have priority over the settings made in "P. Auto Reduce/Enlarge to Printable Area" or the "fit" printing option.
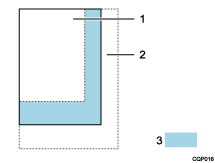
9. Left Margin
Specify the distance (mm) from the left edge of the printable area to the area where the printing starts on paper, within the range 0-100 mm in increments of 1 mm.
Note that there may be some discrepancy in the actual printing.
Default: 0 mm
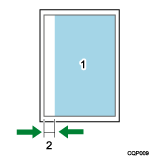
Printable area
Left Margin (leftspace)
When the "leftspace" printing option is specified, the actual margin is calculated by adding this value and the value specified for "leftspace".
A. Right Margin
Specify the distance (mm) from the right edge of the printable area to the area where the printing ends, within the range 0-100 mm in increments of 1 mm.
Note that there may be some discrepancy in the actual printing.
Default: 0 mm
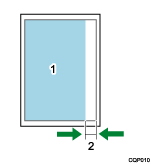
Printable area
Right Margin (rightspace)
If the "rightspace" printing option is specified, the actual margin is calculated by adding this item and the value specified for "rightspace".
If you specify "A. Right Margin" while "O. Centering" is enabled, the image is positioned in the center or the area identified by subtracting the specified distance from the paper width. The left side of the images may be trimmed if the print range does not match the paper.
B. Top Margin
Specify the distance (mm) between the top edge of the printable area to the area where printing starts, within the range 0-100 mm in increments of 1 mm.
Note that there may be some discrepancy in the actual printing.
Default: 0 mm
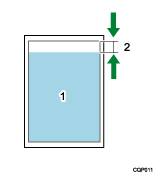
Printable area
Top Margin (topspace)
If the "topspace" printing option is specified, the actual margin is calculated by adding this value and the value specified for "topspace".
C. Bottom Margin
Specify the distance (mm) from the bottom edge of the printable area to the area where printing ends, within the range 0-100 mm in increments of 1 mm.
Note that there may be some discrepancy in the actual printing.
Default: 0 mm
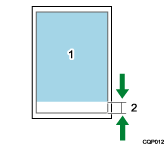
Printable area
Bottom Margin (bottomspace)
If the "bottomspace" printing option is specified, the actual margin is calculated by adding this value and the value specified for "bottomspace".
D. X Offset
Specify the distance to move (offset) the print position in the horizontal direction within the range of ± 100 mm in increments of 1 mm. A negative value moves the print position to the left, and a positive value moves the position to the right.
Default: 0 mm
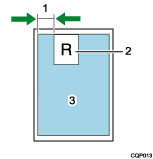
X Offset (xoffset)
Image
Printable area
If the "xoffset" printing option is specified, the actual distance to move the print position is calculated by adding this value and the value specified for "xoffset".
If the "O. Centering" setting is specified, or either the "center" or "nocenter" printing option is specified, the print position moves in the horizontal direction according to the value specified for the setting and the value specified for this printing option.
E. Y Offset
Specify the distance to move (offset) the print position in the vertical direction within the range of ± 100 mm in increments of 1 mm. A negative value moves the print position upward, and a positive moves the position downward.
Default: 0 mm
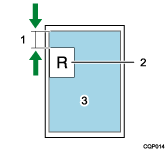
Y Offset (yoffset)
Image
Printable area
If the "yoffset" print option is specified, the actual distance to move the print position is calculated by adding this value and the value specified for "yoffset".
If the "O. Centering" setting is specified, or either the "center" or "nocenter" printing option is specified, the print position moves in the vertical direction according to the value specified for the setting and the value specified for this printing option.
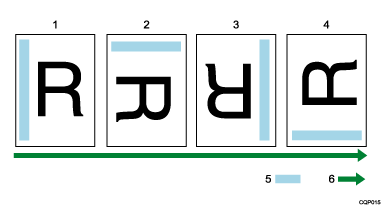
H. Multipages per Sheet: No. of Columns
Specify the number of images to be combined horizontally (number of columns) on a single sheet of paper in the range 1 to 10.
Default: 1
Conditions
If "On" is selected for "U. Auto Paper Select" and neither the "tray" nor "paper" printing options is specified, this setting is ignored.
If the "multicols" or "autopaper" printing option is specified, this setting is ignored.
In order to specify the number of images (number of rows) to be combined vertically, use the "I. Multipages per Sheet: No. of Rows" setting or the "multirows" printing option.
The size of each image varies depending on the specified number of images to be combined and the printable area.
If multiple-image printing is specified, images are printed even if the number of images received is less than the specified number, if either of the following occurs:
An ESC sequence command such as the Printer Language switch command is received.
When the machine is connected via a network, an "EOF" is received.
I. Multipages per Sheet: No. of Rows
Specify the number of images to be combined vertically (number of rows) on a single sheet of paper in the range 1 to 10.
Default: 1
Conditions
If "On" is selected for "U. Auto Paper Select" and neither the "tray" nor "paper" printing options is specified, this setting is ignored.
If the "multirows" or "autopaper" printing option is selected, this setting is ignored.
In order to specify the number of images (number of columns) to be combined horizontally, use the "H. Multipages per Sheet: No. of Columns" setting or the "multicols" printing option.
The size of each image varies depending on the specified number of images to be combined and printable area.
If you specify multiple-image printing, images are printed even if the number of images received is less than the specified number, when either of the following occurs:
An ESC sequence command such as the Printer Language switch command is received.
When the machine is connected via a network, an "EOF" is received.
J. Reduce/Enlarge Ratio: Horizontal
Specify the Reduce/Enlarge Ratio in the horizontal direction within the range 25-1,000% in increments of 1%. Images are enlarged or reduced horizontally in the specified ratio when printing.
Default: 100%
Conditions
If either of the "mag", "fit", "nofit", "tifffit", "notifffit", or "autoreduce" printing options are specified, or if either of "8. Reproduction Ratio", "P. Auto Reduce/Enlarge to Printable Area", "T. Auto Reduce/Enlarge to Scanned Image Size", or "b. Auto Reduce" has been configured, images are enlarged or reduced in the ratio calculated by multiplying the ratio specified in this setting by the ratio specified in "J. Reduce/Enlarge Ratio: Horizontal" when printing.
If the "xmag" printing option is specified, this setting is ignored.
The setting specified for "b. Auto Reduce" or the "autoreduce" printing option has priority over the setting specified for "P. Auto Reduce/Enlarge to Printable Area" or the "fit" printing option.
K. Reduce/Enlarge Ratio: Vertical
Specify the Reduce/Enlarge Ratio in the vertical direction within the range 25-1,000% in increments of 1%. Images are enlarged or reduced vertically in the specified ratio when printing.
Default: 100%
Conditions
If either of the "mag", "fit", "nofit", "tifffit", "notifffit", or "autoreduce" printing options is specified, or if either of "8. Reproduction Ratio", "P. Auto Reduce/Enlarge to Printable Area", "T. Auto Reduce/Enlarge to Scanned Image Size", or "b. Auto Reduce" has been configured, images are enlarged or reduced in the ratio calculated by multiplying the ratio specified in this setting by the ratio specified in "K. Reduce/Enlarge Ratio: Vertical" when printing.
If the "ymag" printing option is specified, this setting is ignored.
The setting specified for "b. Auto Reduce" or the "autoreduce" printing option has priority over the setting specified for "P. Auto Reduce/Enlarge to Printable Area" or the "fit" printing option.
L. Positive/Negative
Specify whether or not to invert tones (black and white) of images when printing.
Settings
Off
On
Default: Off
Condition
If the "positive" or "negative" printing option is specified, this setting is ignored.
M. Brightness
Specify the brightness to print multi-level images (gray scale) within the range 1-1,000% in increments of 1%. Images appear brighter (whitish) overall if a value larger than "100%" is specified, and darker (blackish) if a value smaller than "100%" is specified.
Default: 100%
Conditions
This setting has no effect on two-level (black and white only) images.
If the "brightness" printing option is specified, this setting is ignored.
This setting may be invalid on some color data.
N. Contrast
Specify the contrast to print multi-level images (gray scale) within the range 1-1,000% in increments of 1%. The difference in appearance between the lightest and the darkest spots in the printed image increases if a value larger than "100%" is specified, and it decreases if a value smaller than "100%" is specified.
Default: 100%
Conditions
This setting has no effect on two-level images (black and white only).
If the "contrast" printing option is specified, this setting is ignored.
This setting may be invalid on some color data.
O. Centering
Specify whether or not to position an image in the center of the printable area when printing.
Settings
On
Off
Default: On
Operations
If "Off" is selected, printing starts from the top left edge of the printable area (top left edge of the image).
Even if "On" is specified, the position of the image printed on paper moves by the amount specified by "D. X Offset" or "E. Y Offset", or the "xoffset" or "yoffset" printing option, if those settings or options have been configured.
Condition
If the "center" or "nocenter" printing option is specified, this setting is ignored.
The printable area is determined by the settings for "S. Printable Area", or calculated from the values specified by the "maxarea" and "normalarea" printing options and the settings for "9. Left Margin", "A. Right Margin", "B. Top Margin", "C. Bottom Margin", "H. Multipages per Sheet: No. of Columns", and/or "I. Multipages per Sheet: No. of Rows". The values specified by the "leftspace", "rightspace", "topspace", "bottomspace", "multicols", or "multirows" printing options are also included in the calculation.
P. Auto Reduce/Enlarge to Printable Area
Specify whether or not to automatically reduce or enlarge a received image to match the printable area. The aspect ratio of the image remains unchanged.
Settings
On
Off
Default: Off
Operations
If "Off" is specified, images are printed at full size.
If either of "8. Reproduction Ratio", "J. Reduce/Enlarge Ratio: Horizontal", "K. Reduce/Enlarge Ratio: Vertical", or "T. Auto Reduce/Enlarge to Scanned Image Size" is specified, or if either of the "mag", "xmag", "ymag", "tifffit", or "notifffit" printing options are specified, images are reduced or enlarged in the ratio that is calculated by multiplying the reproduction ratio specified in those settings or options by the ratio derived for this setting, even if "On" is selected for this item.
Conditions
If the "fit" or "nofit" printing option is specified, this setting is ignored.
If a size smaller than the image size is specified in "b. Auto Reduce", this setting is ignored.
If the "autoreduce" printing option is specified, this setting is ignored.
A printable area is determined by the settings for "S. Printable Area", or calculated from the values specified by the "maxarea" and "normalarea" printing options, and the settings for "9. Left Margin", "A. Right Margin", "B. Top Margin", "C. Bottom Margin", "H. Multipages per Sheet: No. of Columns", and/or "I. Multipages per Sheet: No. of Rows". The values specified by the "leftspace", "rightspace", "topspace", "bottomspace", "multicols", or "multirows" printing option are also included in the calculation.
Q. Print Error Message
Specify whether or not to print an error message when an error occurs.
Settings
On
Off
Default: Off
Operation
If "On" is selected, an error message is printed if errors occur after switching to RTIFF, or if errors occur after the previous error message has been printed.
Condition
If the "errorprint" or "noerrorprint" printing option is specified, this setting is ignored.
Even if "On" is selected, no error message is printed if a RTIFF reset occurs.
Even if "Off" is selected, an error message is printed in the error field on the Settings List (RTIFF) if you print the list using the control panel or the command to print the summary.
For details about error messages, see Error Messages.
S. Printable Area
Specify whether or not to leave margins on the paper or use the entire area of the paper to print images. The actual print position on the paper may differ from the position you expect, even if you have specified the printable area.
Settings
Standard
Edge to Edge
Default: Edge to Edge
Operations
If "Standard" is specified, a margin approximately 5 mm in width is placed on each of the top, bottom, left and right edges of the printable area.
If "Edge to Edge" is specified, nearly the entire area on the paper is used for printing.
Condition
If the "maxarea" or "normalarea" printing option is specified, this setting is ignored.
T. Auto Reduce/Enlarge to Scanned Image Size
Specify whether or not to automatically reduce or enlarge a received image to print it at the real size (the specified dimensions).
Settings
On
Off
Default: On
Operations
If "Off" is specified, images are not printed at the real size. They are printed at full size (dot-by-dot).
If either of "8. Reproduction Ratio", "J. Reduce/Enlarge Ratio: Horizontal", "K. Reduce/Enlarge Ratio: Vertical", and/or "P. Auto Reduce/Enlarge to Printable Area" has been configured, or if either of the "mag", "xmag", "ymag", "fit", "nofit", and/or "autoreduce" printing option is specified, the image is reduced/enlarged at the ratio calculated by multiplying its reproduction ratio by the reproduction ratio specified in "T. Auto Reduce/Enlarge to Scanned Image Size" to print it at the real size, even if "On" is selected.
This setting is ignored on image data in any format other than TIFF or CALS.
A reduce/enlarge ratio can be calculated from the horizontal and vertical resolution information in the tag of the TIFF data and the printing resolution. For example, when printing TIFF data, which has the horizontal resolution of 200 dpi and vertical resolution of 400 of dpi specified in its tag, on the machine at a resolution of 600 dpi, the image size is enlarged 3.0 times (600/200) horizontally and 1.5 times (600/400) vertically when printed.
Images in multipage TIFF data are reduced/enlarged based on the resolution information of each page.
Conditions
If the received TIFF or CALS data does not contain the resolution information tab or the page or header record, this setting is ignored even if "On" is selected.
If the "tifffit" or "notifffit" printing option is specified, this setting is ignored.
If the "autoreduce" printing option is specified along with either of the following items, the setting for "autoreduce" or "b. Auto Reduce" is given priority over this setting.
"On" is specified for "P. Auto Reduce/Enlarge to Printable Area".
The "fit" printing option is specified.
U. Auto Paper Select
Use this setting to enable the function to automatically select a paper input location with the appropriate paper size for the input image size. Images are also rotated in appropriate orientation when printing.
Settings
On
Off
Default: On
Operations
If "Off" is selected, Automatic paper selection is disabled.
If "On" is selected, Automatic paper selection is enabled.
If "On" is selected, the settings for "1. Paper Input Location", "2. Paper Size", "5. Orientation", "H. Multiple Pages Per Sheet: No. of Columns", and "I. Multiple Pages Per Sheet: No. of Rows" and the "portrait", "landscape", "multicols", and "multirows" printing options are ignored.
Some paper input locations may be excluded as targets of the automatic paper input selection. Paper is fed from the paper input location indicated on the control panel if all paper input locations are excluded as selection targets.
If either of "8. Reproduction Ratio", "J. Reduce/Enlarge Ratio: Horizontal", "K. Reduce/Enlarge Ratio: Vertical", "T. Auto Reduce/Enlarge to Scanned Image Size", "b. Auto Reduce", "9. Left Margin", "A. Right Margin", "B. Top Margin", "C. Bottom Margin", "D. X Offset", or "E. Y Offset" has been configured, or if either of the "mag", "xmag", "ymag", "tifffit", "notifffit", "autoreduce", "leftspace", "rightspace", "topspace", "bottomspace", "xoffset", or "yoffset" printing options is specified, a paper input location is selected according to the image size that reflects these configurations and settings.
Configure "V. Auto Paper Select: Margin Tolerance" to specify tolerance values for an image that is larger than the appropriate size paper or margins that may be created.
If an image size is larger than the largest paper size loaded in the selected target paper input locations, the paper input location loaded with the largest size paper is selected from these paper input locations.
Priority may be given to a custom size paper input location if "On" is selected for "X. Synchro Cut" or if "freecut" is specified in the "autopaper" printing option.
Conditions
If either of the "tray", "paper", or "autopaper" printing option is specified, this setting is ignored.
If opposite orientation printing is enabled by PJL or its related printing option, images may be rotated by 180 degrees when printing.
V. Auto Paper Select: Margin Tolerance
Specify tolerance values to allow for the difference between the paper size and the image size within the range of ± 50% in increments of 1% when a paper input location that is appropriate for the image is selected automatically.
Default: 5%
Operations
If the tolerance is set to "10%", a paper input location is selected assuming that the paper is large enough to allow printing of an image 10% larger in size (110% overall) than otherwise determined. When it is set to "-10%", a paper input location is selected assuming that the paper only allows printing of an image 10% smaller (90% overall).
Conditions
If "Off" is selected for "U. Auto Paper Select", or "tray" and "paper" are specified in the printing option but not "autopaper", this setting is ignored.
If "tolerance" is specified in the "autopaper" printing option, this setting is ignored.
In order to automatically select a paper input location with the appropriate size paper for the input image size, specify "U. Auto Paper Select" or the "autopaper" printing option.
W. Data Buffer
Select a location in which to create the Data Buffer (device) to temporarily store the input data while the machine is rasterizing the TIFF data.

When "Hard Disk" is selected, do not turn off the power of the printer while the input data is being processed. The hard disk may be damaged if the printer power is turned off while the machine is processing the input data.
Settings
Memory
Hard Disk
Default: Memory
Operations
If "Memory" is selected, the machine creates the Data Buffer in the memory of the machine.
If "Hard Disk" is selected, the machine creates the Data Buffer on the hard disk of the machine. You may be able to print a TIFF or CALS file if its printing has failed to print due to an error caused by the restrictions on the data stacking sequence or data size. However, some data may take longer to print if "Hard Disk" is not selected.
Condition
If the "diskbuffer" or "memorybuffer" printing option is specified, this setting is ignored.
For restrictions on the data stacking sequence and data size, see Printable TIFF Files, Printable CALS Files, and Printable JPEG Files.
X. Synchro Cut
Specify settings for print image sizes so that a custom size print image can be printed at the minimum size.
Setting
On
Off
Default: On
Operations
A custom size print image is not printed at the minimum size if "Off" is specified.
A custom size print image is printed at the minimum size if "On" is specified.
Conditions
Whether or not a print image is a regular or custom size image is checked. If it is a custom size image, the custom size paper input location that matches the width of the image is selected, and the image is printed with its vertical length matching the cut length of the custom size paper input location.
If values for the vertical and horizontal sizes of custom size paper are changed to meet the print image size, the values will not be reflected in "Custom Size: Paper Input Location 1" and "Custom Size: Paper Input Location 2" of the "Emulation (EM)" tab under "Printer Settings".
If values for the vertical and horizontal sizes of custom size paper, are changed to meet the print image size, the values will be displayed as "Custom Size" in the system configuration field of the Settings List (RTIFF).
When an image is rotated and if the entire area of the rotated image is not within a range of ±10 mm of the size of regular size paper, the image is treated as a custom size image.
In the size of a regular print image is checked, no tolerance range is considered.
To find a custom size paper input location, checking the size of a print image refers to a tolerance range.
If "Off" is specified for "U. Auto Paper Select" and the printing option "autopaper" is not specified, the configuration for this item is disabled.
If either the "tray" or "paper" printing options is specified and the "autopaper" printing option is not specified, the configuration for this item is disabled.
If "freecut" or "nofreecut" is specified by a printing option "autopaper" or if a printing option "freesize" is specified, the configuration for this item is disabled.
If it turns out that a print image is a regular size image or if a printable paper input location is not available, the configuration for this item is disabled.
A paper input location will be identified as follows:
The size of a print image size is identified.
In a custom size image is printed, a paper input location for the image will be identified from short-width custom size paper input locations.
If the long edge of an image matches the width of a custom size paper input location, the image is printed on the paper from this paper input location.
If the short edge of an image matches the width of a custom size paper input location, the image is printed on the paper from this paper input location.
If no custom size paper input location is identified for an image you want to print, the configuration for this item is disabled. If this is the case, the paper input location setting will be the same as that specified by "U. Auto Paper Select".
If an image is printed on the paper from a custom size paper input location, the size of the custom size paper input location is not specified in the "Custom Size: Paper Input Location 1" and "Custom Size: Paper Input Location 2" of the "Emulation (EM)" tab under "Printer Settings".
If the size of an image size less than the minimum cut length of a custom size paper input location, the size of the printed image the same as the minimum cut length.
Z. Rotation
Specify how to rotate images in the print data on which post-processing is specified in reference to the pixel orientation. The position of an area on which post-processing is applied changes in regard to the orientation of the image after it has been rotated.
Settings
None
90 degrees clockwise
180 degrees
90 degrees counterclockwise
Default: None
When "Left" is selected for post-processing:
None
90 Degrees Clockwise
180 degrees
90 Degrees Counterclockwise
Position of post-processing
Pixel orientation
Operations
If "None" is selected, post-processing is applied to the image data assuming that the image orientation is the same as the pixel orientation.
If "90 Degrees Clockwise" is selected, post-processing is applied to the image data assuming that the image orientation is rotated by 90 degrees from the pixel orientation.
If "180 degrees" is selected, post-processing is applied to the image data assuming that the image orientation is rotated by 180 degrees from the pixel orientation.
If "90 Degrees Counterclockwise" is selected, post-processing is applied to the image data assuming that the image orientation is rotated by 270 degrees from the pixel orientation.
If the "orientation" printing option is specified, the "Z. Rotation" setting is ignored.
b. Auto Reduce
Reduces images larger than the paper to match the paper.
Settings
Off, Reduce to A0, Reduce to A1, Reduce to A2, Reduce to A3, Reduce to A4, Reduce to A5, Reduce to A6, Reduce to B1 JIS, Reduce to B2 JIS, Reduce to B3 JIS, Reduce to B4 JIS, Reduce to B5 JIS, Reduce to B6 JIS, Reduce to 36 x 48, Reduce to 34 x 44, Reduce to 30 x 42, Reduce to 24 x 36, Reduce to 22 x 34, Reduce to 21 x 30, Reduce to 18 x 24, Reduce to AC, Reduce to 15 x 20, Reduce to 12 x 18, Reduce to DL, Reduce to 9 x 12, Reduce to LG, Reduce to 81/2 x 13, Reduce to LT, Reduce to HL, Reduce to Postcard Size
Default: Off
Operations
If an image size is larger than the paper size, the image is reduced to match the paper for printing.
If an image size is smaller than the paper size, the image is printed in its original dimensions.
An image size is determined based on the setting for "d. Ratio Exempted from Auto Reduce".
If "Off" is selected, Auto Reduce is not applied.
Whether or not to automatically reduce an image size is determined according to the settings for "T. Auto Reduce/Enlarge to Scanned Image Size", "8. Reproduction Ratio", "J. Reduce/Enlarge Ratio: Horizontal", or "K. Reduce/Enlarge Ratio: Vertical" or the value specified for the "tifffit", "mag", "xmag", or "ymag" printing option.
If "b. Auto Reduce" is specified, selecting "On" for "P. Auto Reduce/Enlarge to Printable Area" or specifying "fit" in the printing option is ignored.
If the "autoreduce" printing option is specified, the setting for "b. Auto Reduce" is ignored.
c. Margin Adjustment for Auto Reduce
Specify an adjustment value to be applied to the paper size specified in "b. Auto Reduce" or by the "autoreduce" printing option within the range of ± 100 mm in increments of 1 mm.
Default: 0 mm
Operations
The paper size specified in "b. Auto Reduce" is adjusted when printing.
The adjusted size only affects the calculation of the reduction ratio, and does not affect the reduction judgment size.
An image may be enlarged in some cases, if the values calculated from the paper size and the value specified in this setting are larger than the image size.
Paper size - adjust value [mm]
Paper size + adjust value [mm]
Paper size
If a value greater than the short-edge length of the paper selected in "b. Auto Reduce" is specified, this setting is ignored.
If "Off" is selected for "b. Auto Reduce", and the "autoreduce" printing option is not specified, the setting is ignored.
If a margin correction value is specified in the "autoreduce" printing option, the setting for "c. Margin Adjustment for Auto Reduce" is ignored.
d. Ratio Exempted from Auto Reduce
Specify an adjustment value to be applied to the "reduction judgment size" specified in "b. Auto Reduce" or by using the "autoreduce" printing option within the range of ± 50% in increments of 1%.
Default: 5%
Operations
The adjusted paper size only affects the reduction judgment size, and does not affect the calculated reduction ratio.
Specify an adjustment value to be applied to the reduction judgment size.
The "Reduction judgment size" is the size derived by multiplying the paper size by the setting for "d. Ratio Exempted from Auto Reduce". An image is reduced only when the image does not match this size.
Paper size
Reduction judgment size
If "Off" is selected for "b. Auto Reduce" and the "autoreduce" printing option is not specified, this setting is ignored.
If an invalid ratio is specified in the "autoreduce" printing option, this setting is ignored.
e. Correct Fine Lines in Reduced Images
Specifies how to apply pixel adjustment to thin lines when printing reduced images. You can prevent thin lines on a printed image from disappearing.
Settings
Reduce Pixels
Correct Pixels for Horizontal Lines
Correct Pixels for Vertical Lines
Correct Horizontal & Vertical Line Pixels
Default: Correct Horizontal & Vertical Line Pixels
Operations
If "Reduce Pixels" is selected, an image is reduced in dimension by subtracting pixels.
If "Correct Pixels for Horizontal Lines" is selected, an image is reduced in dimension while applying pixel adjustment to the fine lines in the horizontal direction of the image.
If "Correct Pixels for Vertical Lines" is selected, an image is reduced in dimension while applying pixel adjustment to the fine lines in the horizontal direction of the image.
If "Correct Horizontal & Vertical Line Pixels" is selected, an image is reduced in dimension while applying pixel adjustment to the fine lines in both the vertical and horizontal directions of the image.
Conditions
If "Reduce Pixels" is specified, fine lines may disappear if an image is reduced in dimension.
If fine line correction by pixel correction is specified, a reducing/enlarging process changes, and the printed result may differ depending on the settings.
This setting has no effect on images printed in their original dimensions or enlarged.
Do not specify this setting when printing image TIFF data. It may produce unintended results.
If either of the "magprocess", "magprocessx", "magprocessy", or "magprocessxy" printing option is specified, the setting for "e. Correct Fine Lines in Reduced Images" is ignored.
If either of "Correct Pixels for Horizontal Lines", "Correct Pixels for Vertical Lines", or "Correct Horizontal & Vertical Line Pixels" is specified, images may not be reduced if the amount of available memory is insufficient.
f. Color / Black & White
Specify whether or not to print an image in color or in black and white.
Settings
Black & White
Color
Default: Color
Operations
If "Black & White" is selected, images are printed in black and white.
If "Color" is selected, images are printed in color.
Condition
If the "colormode" or "monomode" print option is specified, this setting is ignored.
g. Print Quality
Specify print quality levels.
Settings
Speed Priority (Drawing)
Speed Priority
Standard
Quality Priority
Default: Speed Priority (Drawing)
Operations
If "Speed Priority" is specified, the print speed is given priority when printing.
If "Standard" is specified, the settings to balance the image quality and print speed are applied when printing.
If "Quality Priority" is specified, the print quality is given priority when printing.
If "Speed Priority (Drawing)" is specified, printing speed is given priority and printing is performed using the settings appropriate to CAD or tables that contain fine lines.
Condition
If the "printquality" printing option is specified, this setting is ignored.
The default setting for "g. Print Quality" is [Speed Priority] when you specify for Paper Type a paper type other than plain paper, recycled paper, inkjet plain, thin paper, or coated (CAD).
h. Paper Orientation Priority
You can specify the paper orientation with this option.
Settings
Image Orientation
Landscape (Long Edge Feed)
Portrait (Short Edge Feed)
Default: Image Orientation
Operations
Select short edge feed if the image is vertical oriented, select long edge feed if the image is horizontal oriented to prioritize them.
Long edge feed paper input location is prioritized.
Short edge feed paper input location is prioritized.
Conditions
If "Off" is specified in "U. Auto Paper Select" on the RTIFF Menu and "autopaper" printing option is not specified, this setting is ignored.
If "tray" or "paper" printing option is specified and "autopaper" printing option is not specified, this setting is ignored.
If "speedpriority", "lefpriority", or "sefpriority" value is specified in "autopaper" printing option, this setting is ignored.
i. Input Without Paper for Auto Select Paper Input
You can specify if a paper input location that has run out of paper is included as the paper select target.
Settings
Include
Do not Include
Default: Include
Operations
When "Include" is selected, paper search is applied to a paper input location that has run out of paper.
When "Do not Include" is selected, paper search is not applied to a paper input location that has run out of paper.
Conditions
If "emptytray" or "noemptytray" printing option is specified, this setting is ignored.