Access Control
The administrator can limit devices or protocols that can be connected to the machine to avoid unintended access.
Also, the administrator can select a security level at which to enable or disable a protocol and to configure the port status.
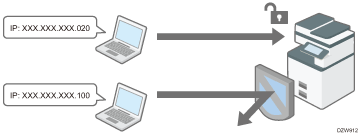
Limiting the IP addresses from which devices can access the machine (Access Control)
For example, when specifying the range of IP address from "192.168.15.1" to "192.168.15.99", the machine cannot be accessed from IP addresses in the range from 192.168.15.100 to 255.
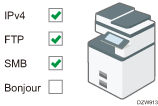
Disabling unused protocols
The protocol setting can be changed on the control panel, in Web Image Monitor, or by using other setting methods. The protocols that can be configured vary depending on the method. Confirm the protocol to configure in Protocol Setting Method List and follow the instruction.
Specifying the security level
You can select from among four security levels combining different protocols, ports, and encryption algorithms. Confirm the description of each level in Security Level Setting List.
You can customize the security setting based on the selected level setting to suit your condition.
Limiting the IP Addresses from which Devices Can Access the Machine
Specify the range of the IP address that can access the machine by using Web Image Monitor.

You can limit access from the following protocols.
LPR, RCP/RSH, FTP, Bonjour, SMB, WSD (Device), WSD (Printer), WSD (Scanner)/DSM, IPP, DIPRINT, RHPP, snmp, telnet, NBT
The machine also limits access from Web Image Monitor.
 Log in to the machine as the Network Administrator from Web Image Monitor.
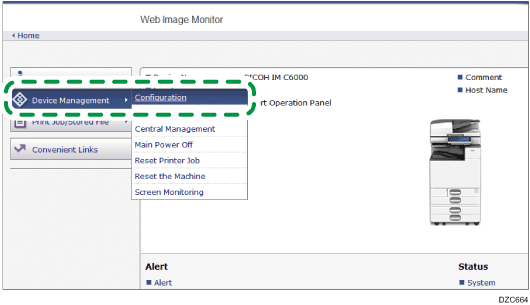
 Click [Configuration] from the [Device Management] menu.
 Click [Access Control] in "Security".
 In "Access Control", click [Active] and specify the range of IP addresses that have access to the machine.
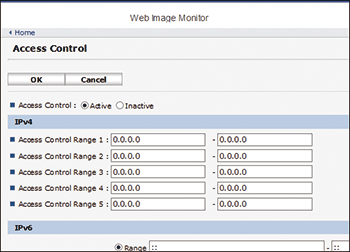
To specify an IPv4 address, enter a range that has access to the machine in "Access Control Range".
To specify an IPv6 address, select "Range" or "Mask" in "Access Control Range", and then enter a range that has access to the machine.
 Click [OK].
 After completing the configuration, click [OK] and exit the Web browser.
Protocol Setting Method List
You can view the protocol setting methods in the following list:
1: Control Panel 2: Web Image Monitor 3: telnet 4: Device Manager NX 5: Remote Communication Gate S
Protocol/Port | Setting method | Function that cannot be used when Protocol/Port is disabled |
|---|---|---|
IPv4 - | 1, 2, 3 | All applications that operate over IPv4 (IPv4 cannot be disabled from Web Image Monitor when using IPv4 transmission.) |
IPv6 - | 1, 2, 3 | All applications that operate over IPv6 |
IPsec - | 1, 2, 3 | Encrypted transmission using IPsec |
FTP TCP:21 | 2, 3, 4, 5 | Transmissions that require FTP (You can restrict only the personal information from being displayed by settings on the control panel.) |
telnet TCP:23 | 2, 4 | Transmissions that require telnet |
SMTP TCP:25 (variable) | 1, 2, 4, 5 | E-mail notification function that requires SMTP reception |
HTTP TCP:80 | 2, 3 | Transmissions that require HTTP Print using IPP on port 80 |
HTTPS TCP:443 | 2, 3 | Transmissions that require HTTP (You can make settings to require SSL transmission only and to reject non-SSL transmission using the control panel or Web Image Monitor.) |
SMB TCP:139 TCP:445 | 1, 2, 3, 4, 5 | Transmissions that require SMB |
NBT UDP:137/UDP:138 | 3 | SMB print via TCP/IP NetBIOS designated functions on the WINS server |
SNMPv1-v2 UDP:161 | 2, 3, 4, 5 | Transmissions that require SNMPv1/v2 (Using the control panel, Web Image Monitor, or telnet, you can specify SNMPv1/v2 to prohibit configuration and make it read-only.) |
SNMPv3 UDP:161 | 2, 3, 4, 5 | Transmissions that require SNMPv3 (You can make settings to require SNMPv3 encrypted transmission only and to reject non-SNMPv3 encrypted transmission using the control panel, Web Image Monitor, or telnet.) |
RSH/RCP TCP:514 | 2, 3, 4, 5 | Transmissions that require RSH Network TWAIN (You can prohibit only personal information from being displayed by the settings on the control panel.) |
LPR TCP:515 | 2, 3, 4, 5 | Transmissions that require LPR (You can restrict only personal information from being displayed by the settings on the control panel.) |
IPP TCP:631 | 2, 3, 4, 5 | Transmissions that require LPR |
IP-Fax TCP:1720 (H.323) UDP:1719 (Gatekeeper) TCP/UDP:5060 (SIP) TCP:5000 (H.245) UPD:5004, 5005 (Voice) TCP/UDP:49152 (T.38) | 1, 2, 4, 5 | IP-Fax using H.323, SIP, or T.38 |
SSDP UDP:1900 | 2, 3 | Device search using UPnP from Windows |
Bonjour UDP:5353 | 2, 3 | Transmissions that require Bonjour |
@Remote TCP:7443 TCP:7444 | 1, 3 | RICOH @Remote |
DIPRINT TCP:9100 | 2, 3, 4, 5 | Transmissions that require DIPRINT |
RFU TCP:10021 | 1, 3 | Remote updating of firmware |
WSD (Device) TCP:53000 (variable) | 2, 3 | Transmissions that require WSD (Device)
|
WSD (Printer) TCP:53001 (variable) | 2, 3 | Transmissions that require WSD (Printer) |
WSD (Scanner)/DS M TCP:53002 (variable) | 2, 3 | Transmissions that require WSD (Scanner) Scanner management that requires DSM |
RHPP TCP:59100 | 2, 3 | Print with RHPP |
LLMNR UDP:5355 | 2, 3 | Name resolution requests using LLMNR |

For details about the setting procedure on the control panel or from Web Image Monitor, see the following instructions:
For details about the telnet command, see "Device Monitoring (TELNET)" on our website.
For details about the settings in Device Manager NX or Remote Communication Gate S, see the user's manual of each tool.
Disabling Unused Protocols Using the Control Panel (Settings Screen Type: Standard)
 Log in to the machine as the machine administrator on the control panel.
 On the Home screen, press [Settings].
 On the Settings screen, press [System Settings].
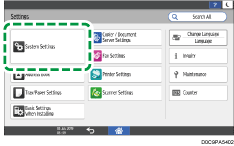
 Press [Network/Interface]
 [Effective Protocol].
 From the list next to unused protocols, select [Inactive].
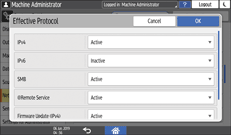
 Press [OK].
 Press [Home] (
 ), and then log out of the machine.
Disabling Unused Protocols from the Control Panel (Settings Screen Type: Classic)
Configure protocols on [System Settings] [Interface Settings] tab.
 Log in to the machine as the machine administrator on the control panel.
 On the Home screen, press [Settings].
 On the Settings screen, press [Machine Features Settings].
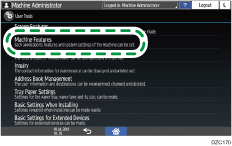
 Press [System Settings]
 [Interface Settings] tab
  [Effective Protocol] to display the setting screen of each protocol.
 Disable unused protocols.
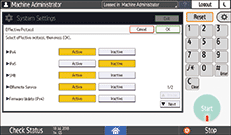
 Press [OK].
 After completing the configuration, press Home (
 ).
).
Disabling Unused Protocols from Web Image Monitor
Configure protocols on [Settings] the "Security" category.
 Log in to the machine as the Machine Administrator from Web Image Monitor.
 Click [Configuration] from the [Device Management] menu.

 Click [Network Security] in "Security".
 Specify protocols to disable or port numbers to close.
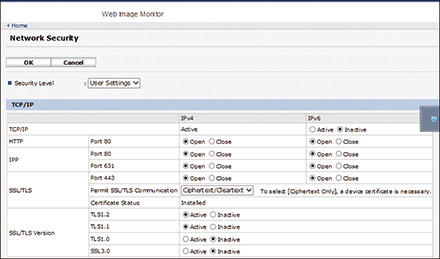
Select the security level from the pull-down menu of "Security Level". You can change the security level of multiple items at the same time. For details about the items changed by the setting of the security level, see "Specifying Security Levels" in this section.
 Click [OK].
 After completing the configuration, click [OK] and exit the Web browser.
Security Level Setting List
You can configure security level settings using the control panel or Web Image Monitor. You can select the following security levels:
Level 0
Users can use all features without restriction. Select this when you have no information that needs to be protected from external threats.
Level 1
Level 1 is suitable for a connection in an office.
FIPS140
FIPS140 provides a security strength intermediate between "Level 1" and "Level 2".
You can only use codes recommended by the U.S. government as its coding/authentication algorithm. Settings other than the algorithm are the same as "Level 2".
Level 2
Level 2 is the maximum security that is available in the machine. Select it to protect extremely important information.
For details about the security level settings, see the following list: You can change the setting for a particular function according to the use condition of the machine.
Function | Level 0 | Level 1 | FIPS 140 | Level 2 |
|---|---|---|---|---|
TCP/IP*2 |
|
|
|
|
HTTP > Port 80 | Open | Open | Open | Open |
IPP > Port 80 | Open | Open | Open | Open |
IPP > Port 631 | Open | Open | Closed | Closed |
SSL/TLS > Port 443 | Open | Open*3 | Open*3 | Open*3 |
SSL/TLS > Permit SSL/TLS Communication | Ciphertext Priority | Ciphertext Priority | Ciphertext Only | Ciphertext Only |
SSL/TLS Version > TLS1.2 |
|
|
|
|
SSL/TLS Version > TLS1.1 |
|
|
|
|
SSL/TLS Version > TLS1.0 |
| - | - | - |
SSL/TLS Version > SSL3.0 |
| - | - | - |
SSL/TLS > Encryption Strength Setting > AES | 128bit/ 256bit | 128bit/ 256bit | 128bit/ 256bit | 128bit/ 256bit |
SSL/TLS > Encryption Strength Setting > 3DES | 168bit | - | - | - |
SSL/TLS > Encryption Strength Setting > RC4 | - | - | - | - |
SSL/TLS > Key Exchange | RSA | RSA | RSA | RSA |
SSL/TLS > Digest | SHA1 | SHA1 | SHA1 | SHA1 |
DIPRINT |
|
| - | - |
LPR |
|
| - | - |
FTP |
|
|
|
|
RSH/RCP |
|
| - | - |
TELNET |
| - | - | - |
Bonjour |
|
| - | - |
SSDP |
|
| - | - |
SMB |
|
| - | - |
NetBIOS over TCP/IPv4 |
|
| - | - |
WSD (Device) |
|
|
|
|
WSD (Printer) |
|
|
|
|
WSD (Scanner) |
|
|
|
|
WSD (Encrypted Communication of Device) | - | - |
|
|
RHPP |
|
| - | - |
*1 The same settings are applied to IPv4 and IPv6.
*2 TCP/IP setting is not controlled by the security level. Specify manually whether to enable or disable this setting.
*3 IPP-SSL Communication is enabled under Windows 8.1 or later.
*4 This is enabled under Windows 8.1 or later.
Function | Level 0 | Level 1 | FIPS 140 | Level 2 |
|---|---|---|---|---|
SNMP |
|
|
|
|
Permit Settings by SNMPv1 and v2 |
| - | - | - |
SNMPv1 and v2 functions |
|
| - | - |
SNMPv3 function |
|
|
|
|
Permit SNMPv3 Communication | Ciphertext/Cleartext | Ciphertext/Cleartext | Ciphertext Only | Ciphertext Only |
Function | Level 0 | Level 1 | FIPS 140 | Level 2 |
|---|---|---|---|---|
S/MIME > Encryption Algorithm | 3DES-168bit | 3DES-168bit | DES-168bit | AES-256bit |
S/MIME > Digest Algorithm | SHA1 | SHA1 | SHA1 | SHA-256bit |
SNMPv3 > Authentication Algorithm | MD5 | SHA1 | SHA1 | SHA1 |
SNMPv3 > Encryption Algorithm | DES | DES | AES-128 | AES-128 |
Kerberos Authentication > Encryption Algorithm | AES256-CTSHMACSHA1-96/AES128-CTSHMACSHA1-96/DES3-CBC-SHA1/RC4-HMAC/DES-CBC-MD5 | AES256-CTSHMACSHA1-96/AES128-CTS-HMAC-SHA1-96/DES3-CBC-SHA1/RC4-HMAC | AES256-CTSHMACSHA1-96/AES128-CTSHMACSHA1-96/DES3-CBC-SHA1 | AES256-CTSHMACSHA1-96/AES128-CTSHMAC-SHA1-96 |
Driver Encryption Key > Encryption Strength Setting | Simple Encryption | DES | AES | AES |
Specifying the Security Level Using the Control Panel (Settings Screen Type: Standard)
 Log in to the machine as the network administrator on the control panel.
 On the Home screen, press [Settings].
 On the Settings screen, press [System Settings].

 Press [Settings for Administrator]
 [Security]
 [Network Security Level].
 From the list next to Network Security Level, select a security level.
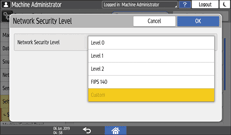
Select a security level from among Level 0, Level 1, Level 2, and FIPS140.
For the security levels, see the section below:
If you have customized the security level using Web Image Monitor, [Custom] is selected. You cannot enable [Custom] from the control panel. To customize the security level, use Web Image Monitor.
 Press [OK].
 Press [Home] (
 ), and then log out of the machine.
Specifying the Security Level Using the Control Panel (Settings Screen Type: Classic)
 Log in to the machine as the Network Administrator from the control panel.
 On the Home screen, press [Settings].
 On the Settings screen, press [Machine Features Settings].

 Press [System Settings]
 [Administrator Tools] tab
  [Network Security Level].
 Specify the security level.
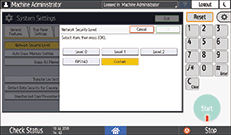
Select a security level from among Level 0, Level 1, Level 2, and FIPS140.
If you have customized the security level using Web Image Monitor, [Custom] is selected. You cannot enable [Custom] from the control panel. To customize the security level, use Web Image Monitor.
 Press [OK].
 After completing the configuration, press Home (
 ).
).
Specifying the Security Level Using Web Image Monitor
 Log in to the machine as the Network Administrator from Web Image Monitor.
 Click [Configuration] from the [Device Management] menu.

 Click [Network Security] in "Security".
 Select a security level in "Security Level".
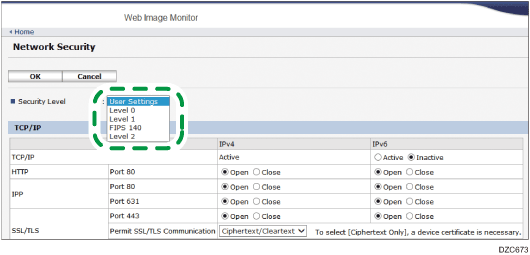
 Specify the settings as necessary.
Specify each item according to the network condition or security policy.
When the settings are changed, the security level is changed to [User Setting] automatically. [Custom] is displayed on the control panel.
 Click [OK].
 After completing the configuration, click [OK] and exit the Web browser.
