Special Notes When Using External Options
Precautions for Using the Finisher
The stapler may eject unfolded staples. Be careful not to prick your fingers.
Do not hit the finisher (for instance, do not hit the surface of the finisher repeatedly to arrange stacks of paper neatly).
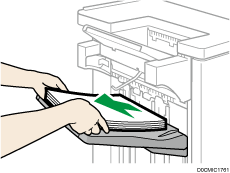
Remove printouts from the finisher by lifting them straightforwardly from the left side. If you remove printouts at an angle or towards the front, the shift tray may rise and catch them.
Finisher SR4150/Booklet Finisher SR4160
Finisher Shift Tray
When moving Finisher SR4150 or Booklet Finisher SR4160, do not hold the guide covers. Otherwise, the covers might be damaged. the front, the shift tray may rise and catch them.
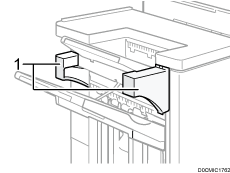
Guide covers
Removing Prints from Finisher SR4140 during Printing
This section describes how to suspend a large copy or print job when using Finisher SR4140.
Depending on the image you are copying or printing, prints might not stack properly. If this happens, suspend the job, remove the prints and then restart the job.
 Press the [Suspend / Resume] key.
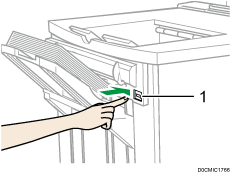
[Suspend / Resume] key
 Remove the stack of paper from the finisher shift tray.
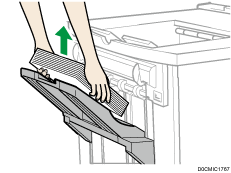
 Press the [Suspend / Resume] key to restart the print.

You can suspend copying or printing only when the finisher shift tray is selected as the output tray.
Removing Prints from Finisher SR4150/Booklet Finisher SR4160 during Printing
This section describes how to suspend a large copy or print job when using Finisher SR4150 or Booklet Finisher SR4160.
Depending on the image you are copying or printing, prints might not stack properly. If this happens, suspend the job, remove the prints and then restart the job.
 Press the [Suspend / Resume] key near the paper outlet port.
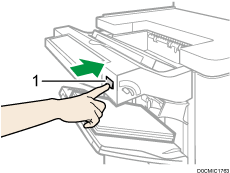
[Suspend / Resume] key
 Remove the stack of paper from the finisher shift tray.
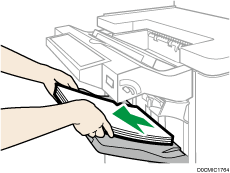
 Press the [Suspend / Resume] key to restart the print.

You can suspend copying or printing only when the finisher shift tray is selected as the output tray.
When Using the Z-fold Function with Multi-Folding Unit FD4020
To use the Z-fold function, you must attach the Z-fold support tray.
Finisher SR4140
Finisher upper tray
 Remove the output paper.
 Attach the Z-fold support tray to the finisher upper tray.
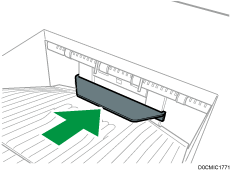
Finisher shift tray
 Press the [Suspend / Resume] key.
 Remove the stack of paper from the finisher shift tray.
 Attach the Z-fold support tray.
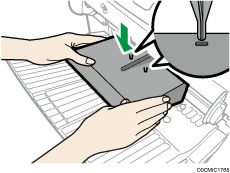
Attach the Z-fold support tray by inserting the two protrusions on its underside into the holes on the finisher shift tray.
 Press the [Suspend / Resume] key.
Finisher SR4150/ Booklet Finisher SR4160
Finisher upper tray
 Remove the output paper.
 Attach the Z-fold support tray 2 to the finisher upper tray.
The back of the Z-fold support tray 2 is embossed with "2".
Z-fold support tray 2
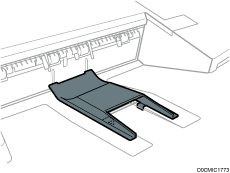
Finisher shift tray
 Remove the stack of paper from the finisher shift tray.
 Attach the Z-fold support tray 3.
The back of the Z-fold support tray 3 is embossed with "3".
Z-fold support tray 3
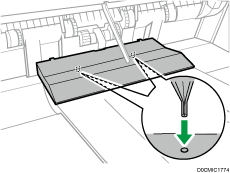
Attach the Z-fold support tray 3 by inserting the two protrusions on its underside into the holes on the finisher shift tray.
Multi-Folding Unit FD4020
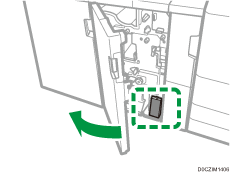
 Open the front cover of the folding unit and take out the Z-fold support tray for folding unit (located at the bottom of the folding unit).
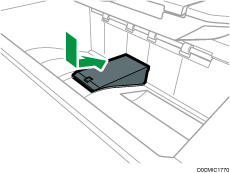
 Attach the Z-fold support tray for folding unit in the slope of the folding unit tray so that it is flush against the end fence.
 Close the front cover of folding unit.
When you have finished using the Z-fold support tray for folding unit, open the front cover of the folding unit and re-attach the tray to its stowage hook.
