Installing the Printer Driver for Network Connection (Windows)
When the machine and the computer are connected to the same network, the installer searches for the machine to install the printer driver. If the installer cannot find the machine, specify the IP address or machine name to install the printer driver.

Manage Printers permission is required to install the driver. Log on as an Administrators group member.

If the "User Account Control" dialog box appears during the driver installation procedure, click [Yes] or [Continue].
If the "Windows Security" dialog box appears during the driver installation procedure, click [Install this driver software anyway].
Installing the PCL 6 Printer Driver from the CD-ROM
 Set the CD-ROM in the computer.
If the installer does not start automatically, double-click [Setup.exe] in the root directory of the CD-ROM.
 Select a language, and then click [OK].
 Click [Install from Disk].
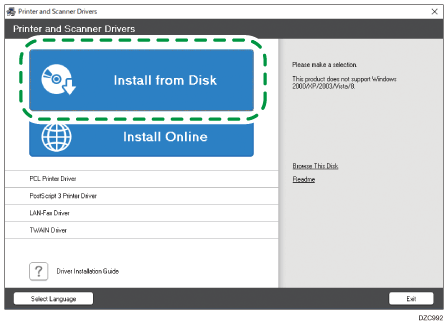
 Click [Network Printer(s)].
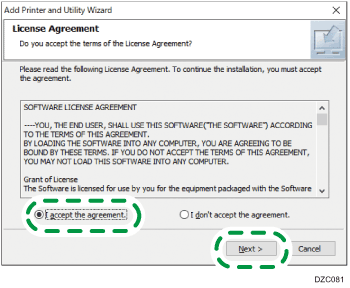
 On the "License Agreement" screen, select [I accept the agreement], and then click [Next].
 Confirm the "Confirm Network Connection" screen, and then click [Next].
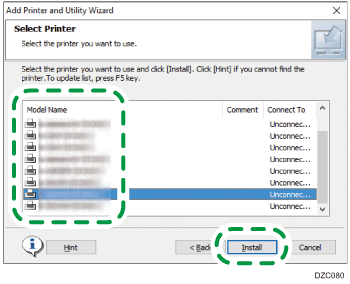
The search detects devices connected to the network.
 Select this machine from among the devices, and then click [Install].
 If the "Set Port" screen is displayed, select the setting method of the port.
This screen is displayed when the computer cannot access the machine.
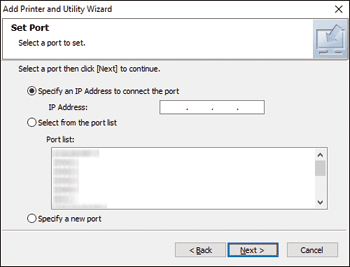
Specify the port to use for the connection between the computer and machine using one of the following methods:
To specify the IP address
Enter the IP address of the machine, and then click [Next].
Proceed to Step 9.
To select from the port list
Select the port to use for the connection between the computer and machine, and then click [Next].
Proceed to Step 9.
To create a new port
Select [Specify a new port], and then click [Next].
On the "Add Printer and Utility Wizard" screen, select [Standard TCP/IP Port] and click [Next].
On the "Add Standard TCP/IP Printer Port Wizard" screen, click [Next].
On the "Add port" screen, enter the printer name or IP address of the machine, and then click [Next].
The port name is automatically entered. You can change the port name.
When the "Additional port information required" screen is displayed, select [RICOH Network Printer C model], and then click [Next].
Click [Finish].
 Specify the name of the printer to install, and whether to use it as the default printer.
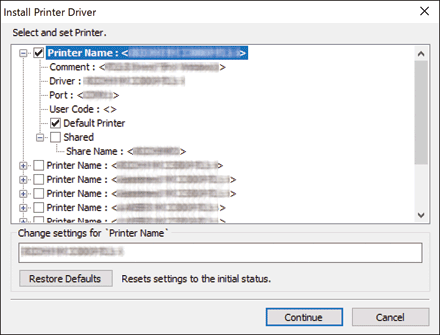
 Click [Continue].
Printer driver installation starts.
 Click [Finish].
When you are prompted to restart your computer, restart it by following the instructions that appear.
Installing the PostScript 3 Printer Driver from the CD-ROM
 Set the CD-ROM in the computer.
If the installer does not start automatically, double-click [Setup.exe] in the root directory of the CD-ROM.
 Select a language, and then click [OK].
 Click [PostScript 3 Printer Driver].
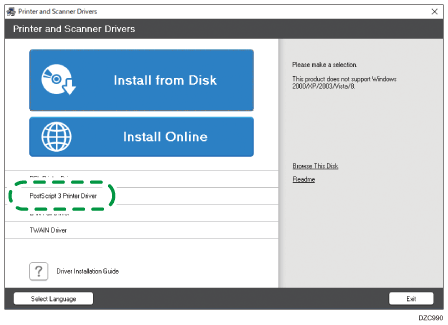
 On the "License Agreement" screen, select [I accept the agreement], and then click [Next].

 Click [Next].
 Select a method to connect a port.

Specify the port to use for the connection between the computer and machine using one of the following methods:
To specify the IP address
Enter the IP address of the machine, and then click [Next].
To select from the port list
Select the port to use for the connection between the computer and machine, and then click [Next].
To create a new port
Select [Specify a new port], and then click [Next].
On the "Add Printer and Utility Wizard" screen, select [Standard TCP/IP Port] and click [Next].
On the "Add Standard TCP/IP Printer Port Wizard" screen, click [Next].
On the "Add port" screen, enter the printer name or IP address of the machine, and then click [Next].
The port name is automatically entered. You can change the port name.
When the "Additional port information required" screen is displayed, select [RICOH Network Printer C model], and then click [Next].
Click [Finish].
 Select the [Printer Name] of the machine to open the menu tree, and then specify the setting items.

 Click [Continue].
Printer driver installation starts.
 On the "Install Printer Driver" screen, click [Open Printer Properties].
 Specify the option configuration or authentication settings in each tab, and then click [OK].
 On the "Install Printer Driver" screen, click [Next].
 Click [Finish].
When you are prompted to restart your computer, restart it by following the instructions that appear.
Installing the PCL 6/PostScript 3 Printer Driver from the Downloaded File
 Unzip the downloaded file, and double-click [RV_SETUP.exe].
 On the "End User License Agreement" screen, click [Agree and Go to Next].
 Select [Network], and then click [Next].
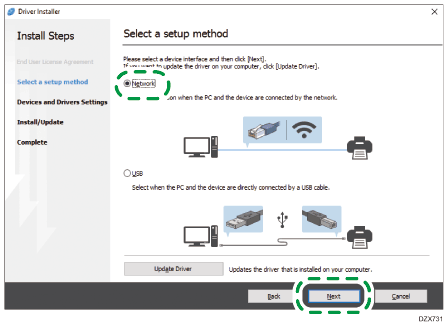
The search detects devices connected to the network.
If the error screen is displayed, see If the Machine Cannot Be Found.
 Select this machine from among the detected devices, and then click [Next].
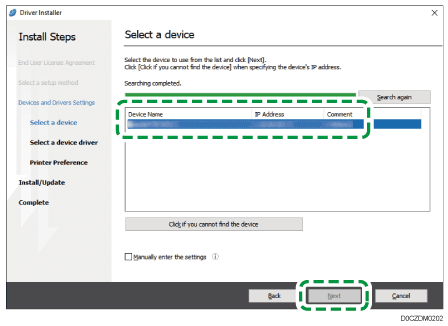
Printer driver installation starts.
 When the installation is complete, click [Finish].
Installing the Printer Driver for Windows
 Download the driver, and then unzip the file.
 Display the "Devices and Printers" screen.
Windows 10 (version 1703 or later)
On the [Start] menu, click [Windows System]
 [Control Panel].
Click [View devices and printers].
Windows 10 (earlier than version 1703)
Right-click [Start], and then click [Control Panel].
Click [View devices and printers].
Windows 8.1
On the Charm Bar, click [Set]
 [Control Panel].
Click [View devices and printers].
Windows 7
On the [Start] menu, click [Devices and Printers].
 Click [Add a printer].
 Click [The printer that I want isn't listed].
 Select [Add a local printer or network printer with manual settings], and then click [Next].
 Select [Standard TCP/IP Port] on [Create a new port:], and then click [Next].
 Enter the IP address of this machine in [Host Name or IP address].
 Clear the [Query the printer and automatically select the driver to use] check box, and then click [Next].
Searching for the TCP/IP port starts.
 When the "Additional port information required" screen is displayed, select [RICOH Network Printer C model], and then click [Next].
 Click [Have Disk...]
  [Browse...] to specify the driver (INF file), and then click [OK].
The driver is stored in the [DISK1] folder in the folder that was created when unzipping the downloaded file.
 Select a printer driver to install, and then click [Next].
 Enter the printer name as necessary, and then click [Next].
Printer driver installation starts.
 Specify the printer as a shared printer as necessary, and then click [Next]
  [Finish].
If the Machine Cannot Be Found
The "Network Connection Error" screen is displayed.
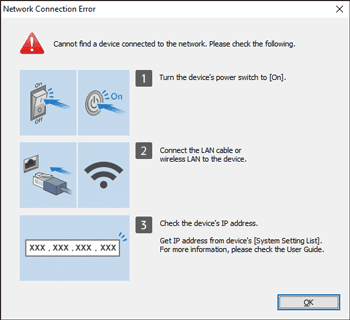
Confirm and perform  to
to  , and then click [OK]. If the machine still cannot be found, specify the IP address or machine name to install the printer driver.
 Click [Click if you cannot find the device].
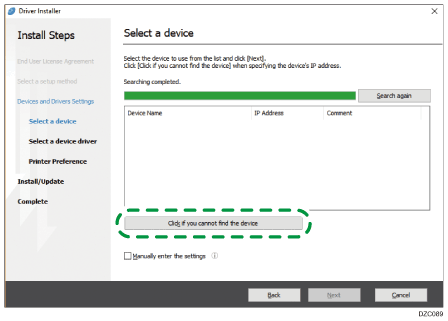
 Select [Specify device IP address] or [Specify device name], and then click [Next].
When specify the machine IP address
Enter the IP address of the machine and click [Search].
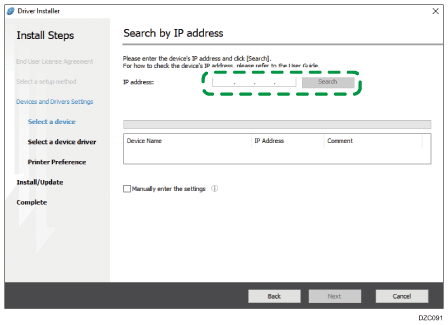
When the machine is detected, click [Next].
Printer driver installation starts.
When specify the machine name
Select the machine to use, and then click [Next].
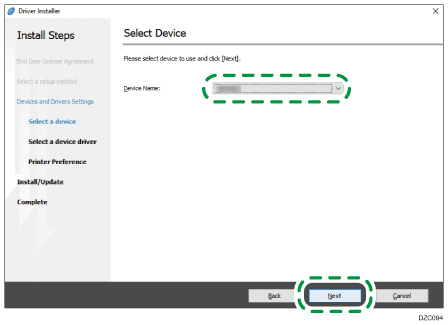
On the "Printer Preference" screen, select one of the port names from among "Port Name", and then click [Next].
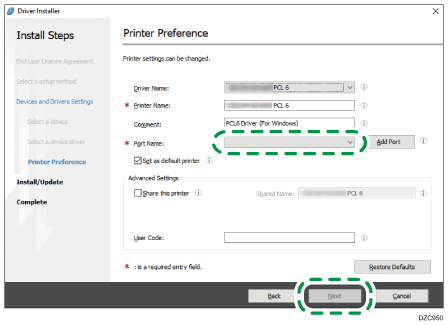
Printer driver installation starts.
For details about the procedure for specifying the IP address after installing the printer driver, see the following section:
When You Cannot Print a Document even if the Printer Driver is Installed
 When the installation is complete, click [Finish].
