Machine
This section describes the settings in [Machine] under [System Settings].
Print Action/Image Quality Adjustment
Setting Items | Description |
|---|---|
Interleave Print Priority | "Interleave" is to suspend printing of the Copier function with the Printer function or of the Fax function with the Copier function. You can specify the priority of printing.
|
Function Reset Timer | Specify the length of time the machine waits before changing modes when using the multi-access function such as Copier, Fax, or Printer. When you make many copies and have to change settings for each copy, specify a longer reset period, and you can prevent interruption from other functions. The Function Reset Timer setting is ignored if [Switch Every Specified No.] or [Job Order] is selected for [Interleave Print Priority].
|
ADF Original Table Elevation (Only when the one-pass duplex scanning ADF is installed) | Specify when to raise the ADF plate after placing originals on the ADF; when the original is set or when the Start key is pressed. When you place a large amount of original divided into several sets in the ADF, select when the Start key is pressed, and you can place the original easily.
|
ADF Original Double Feed Detection (Only when the one-pass duplex scanning ADF and the ADF double-feed detection kit are installed) | Specify whether to detect that stacked sheets of an original are fed for scanning on the ADF.
|
Allow Logout during Scanning | Specify whether to permit logout on the control panel during scanning the original in Copier function.
|
Shift Tray Setting After Paper Misfeed Recovery | Specify whether to enable the shift operation when the machine resumes printing after the removal of jammed paper. This function is available if the shift tray is attached.
|
Power/Energy Saving
Setting Items | Description |
|---|---|
Energy Saving Recovery for Business Application | Specify whether to enable low-energy recovery from Sleep mode. If [On (Energy Saving)] is selected, it can save more energy for the functions, such as Address Book or Browser that do not use the Printer or Scanner function. It takes longer than usual to start printing or scanning.
|
Energy Saver Mode to Disable Print Server | Specify whether to enable or disable Energy Saver mode when using the USB device server. While the machine is in Energy Saver mode, you cannot print via the USB device server.
|
Ready State After Printing | Specify the state to which the machine returns after printing documents during Sleep mode.
|
Main Power On by Remote Operation | Specify whether to turn on the main power of the machine using the Wake-On-LAN on the computer on a network.
|
Shift to Main Power-Off When Network Disconnected
| Specify whether to switch to Off mode if all Ethernet connections, USB2.0 connections, and fax traffic are disconnected for more than two hours.
|
Control Panel Startup Mode | Specify which one takes priority, the time until the Home screen appears or the power consumption. When you specify [Normal], the machine uses less energy but take longer time to display the screen than [Quick].
|
Recovery by Wireless Connect | Specify whether to recover from Sleep mode automatically when the machine is accessed from the mobile device.
|
Silent
Setting Items | Description |
|---|---|
ADF Operation: Copier/Document Server (Only when the ADF is installed) | Specify which setting has priority, quietness or productivity, when the ADF scans documents using the Copy or Document Server function.
|
Bypass Tray Operation (On IM 5000/6000 series only) | Specify which setting has priority, quietness or productivity, when the paper is fed from the bypass tray.
|
External Device
Setting Items | Description |
|---|---|
Register/Change USB Device List | Register Product ID and Vendor ID information for an IC card reader device as a set to the device list to limit the usage of USB devices. The "Product ID" and "Vendor ID" information for a USB device have been assigned by the manufacturer to identify the individual device. "Vendor ID" input settings are between 0x0001 and 0xFFFE and "Product ID" input settings are between 0 and 0xFFFF. Up to ten pairs of "Product ID" and "Vendor ID" information can be registered. |
Control Panel SD Card Slot | Specify whether to enable the SD card slot on the side of the control panel.
|
Control Panel USB Memory Slot | Specify whether to enable the USB slot on the side of the control panel.
|
Allow Media Slots Use | Specify [Prohibit] for "Store to Memory Storage Device" to prohibit the scanned data from being saved in an external media. Specify [Prohibit] for "Print from Memory Storage Device" to prohibit documents saved in an external media from being printed.
|
External Keyboard | Specify the key layout of the external keyboard.
|
@Remote Service
Setting Items | Description |
|---|---|
Service Test Call | Make a test call to the RICOH @Remote center server (RICOH Gateway). This function is available when the RICOH @Remote is used. |
Notify Machine Status | Send notification of the machine's status to the RICOH @Remote center server (RICOH Gateway). This function is available when the RICOH @Remote is used. |
Auto Discovery | Specify whether to collect the status information of the device not that does not support RICOH @Remote on a network and to send it to the RICOH @Remote server together with the information of the machine. When you specify the transmission active, specify the timing and SNMP Communication Name.
|
Staple
These setting items are displayed when an optional finisher is installed on the machine.
Setting Items | Description |
|---|---|
Erase Margin for Stapleless Stapler (Only when Internal Finisher SR3300 or Finisher SR3260 is installed) | To prevent the stapleless staple comes off easily, erase the image around the position to be stapled. Enable this function only when you cannot adjust the position by specifying the margin and erasing the image around the position to be stapled is acceptable.
|
Stapling Method for Stapleless Stapler (Only when Internal Finisher SR3300 or Finisher SR3260 is installed) | Specify the stapling method for stapleless stapler. You can select either [Single] for faster but less retention or [Double] for better retention capable.
|
Auto Switch Staple/Stapleless Stapler (Only when Finisher SR3260 is installed) | A stapleless stapler can staple up to five sheets. This function specifies how to staple the printed paper of more than six sheets when stapleless stapler is specified. You can select either stapleless staple for each five sheets or staple up to 50 sheets with staples.
|
Fold/Booklet
These setting items are displayed when the optional internal multi-folding unit is installed on the machine.
Setting Items | Description |
|---|---|
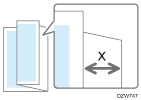
Z-fold Position | Adjust the folding position (X) of Z-fold. 
The width of a folded paper can be 17 to 25 mm longer according to the paper size.
The width of a folded paper can be 0.68 to 1.00 inch longer according to the paper size.
|
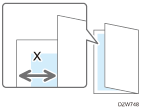
Half Fold Position | Adjust the folding position of Half Fold (X) for each paper size. 
The folding position can be shifted inward or outward by up to 10 mm.
The folding position can be shifted inward or outward by up to 0.40 inch.
|
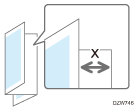
Letter Fold-out Position 1 | Adjust the folding position of Letter Fold-out (X) for each paper size. 
The folding position can be shifted outward by up to 10 mm.
The folding position can be shifted outward by up to 0.40 inch.
|
Letter Fold-out Position 2 | Adjust the outer width (X) of Letter Fold-out. 
For example, the outer width can be shortened or lengthened by up to 4 mm from the default setting value when A3 or A4 size paper is used.
|
Letter Fold-out Position 2 (Continued) |
For example, the outer width can be shortened or lengthened by up to 0.16 inch from the default setting value when A3 or A4 size paper is used.
|
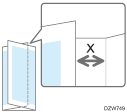
Letter Fold-in Position 1 | Adjust the folding position of Letter Fold-in (X) for each paper size when. 
The folding position can be shifted inward or outward by up to 3 mm from the default setting position.
The folding position can be shifted inward or outward by up to 0.12 inch from the default setting position.
|
Letter Fold-in Position 2 | Adjust the outer width (X) of Letter Fold-in. 
For example, the outer width can be shortened or lengthened by up to 4 mm from the default setting value when A3 or A4 size paper is used.
|
Letter Fold-in Position 2 (Continued) |
For example, the outer width can be shortened or lengthened by up to 0.16 inch from the default setting value when A3 or A4 size paper is used.
|
Others
Setting Items | Description |
|---|---|
Central Management |
|
Central Management (Continued) |
|
Support Settings | Specify whether to display Help according to the displayed screen. When [Help Functions] is set to [On], the [?] button is displayed at the top right on the screen. When you press the [?] button for the first time, the guidance screen appears to let you select whether to display online or offline help.
|
Compatible ID | Specify whether to enable or disable Compatible ID. When this machine is connected to the computer via USB or network, specify [Inactive] to avoid a printer driver is automatically installed by plug and play.
|
Fixed USB Port | This is a setting item to specify when you use the same machines as this machine. When you use the machine as a printer using the USB connection, you do not need to re-install the printer driver. To use this function, specify [Level 1].
|
Stop Key to Suspend Print Job | Specify the job range to stop when you press [Stop].
|
Register/Change/Delete Remote Machine
| You can link this machine with other fax devices at maximum of six. Specify their IP addresses and host names of the linked devices. |

 (mainly Europe)
 (mainly North America)
