Placing an Original to Scan
Place an original to scan in the auto document feeder (ADF) and specify the scan settings such as the side to scan and the original orientation. You can switch one-sided/two-sided scanning while scanning a multi-page original, or scan an original comprising different sizes in a batch.

 (mainly Asia)
You need to attach the optional ADF to the machine according to the function.
Specifying the Original Orientation of a One-sided Original
To display the scanned pages in the correct vertical orientation on the computer, specify the correct original orientation on the control panel according to the orientation of the original placed on the machine.
 Press [Scanner] on the Home screen.
 Press [Send Settings] on the scanner screen.

 Place the original on the scanner.
 Press [Original Orientation], and select the orientation of the original placed in the exposure glass or ADF.
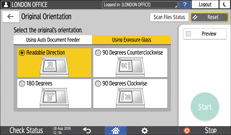
Referring to the figure displayed on the screen, specify the correct original orientation.
To read the scan data of a color original in TIFF or JPEG format, place the original as shown below.
Orientation to place the original
The setting to specify in [Original Orientation]
When placing the original on the exposure glass
When placing the original in the ADF

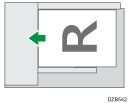
90 Degrees Counterclockwise

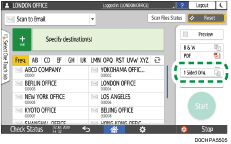
You can also select Original Settings from the scanner screen. Press an item on the screen to select it.
Placing Two-sided Originals
 Press [Scanner] on the Home screen.
 Press [Send Settings] on the scanner screen.

 Place the original on the scanner.
 Press [Original Settings] and then select [2 Sided Open Rt/Lft] or [2 Sided Open to Top].
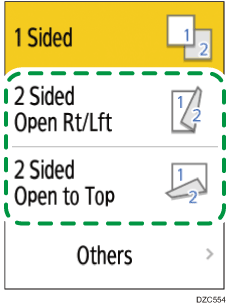
If the last page of the original is blank, you can specify to skip scanning the last page and end scanning. Press [Others], specify the page opening orientation, and then select the [Scan 1 Side of Last Page] check box.
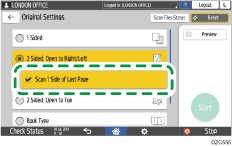
When scanning an original with many pages in a batch while specifying [Divide], which divides a multi-page original into multiple files, the [Scan 1 Side of Last Page] setting is valid on the last page of each file.
Scanning an Original and Dividing the Scanned Data into Multiple Files
 Press [Original Orientation], and select the orientation of the original placed in the ADF.

Referring to the figure displayed on the screen, specify the correct original orientation.
To read the scan data of a color original in TIFF or JPEG format, place the original as shown below.
Orientation to place the original
The setting to specify in [Original Orientation]
When placing the original on the exposure glass
When placing the original in the ADF


90 Degrees Counterclockwise

You can also select Original Settings from the scanner screen. Press an item on the screen to select it.

Placing an Original with One-sided and Two-sided Sheets
You can place an original with one-sided and two-sided sheets on the machine and switch the scan side setting while scanning.
 Press [Scanner] on the Home screen.
 Place the original on the scanner.
 Press [Send Settings] on the scanner screen.

 Select [Batch] or [SADF].

 Press [Original Settings] and select one-sided or two-sided scanning.

 Configure the scan settings according to the purpose of the scanned data.
Scanning an Original with Suitable Quality and Density
Specifying the File Type or File Name When Scanning a Document
 To send the scanned document to an e-mail address, press [Sender] and then specify the sender.
 Specify the destination on the scanner screen, and press [Start].
 After scanning the first stack of the original, press [Original Settings] and then select the method (one-sided or two-sided) to scan the next stack.

When specifying [Change 1, 2 Sided]
When two-sided scanning is specified, the machine scans the front and back sides of the original as a set. To scan an original as a front side after scanning the front side of the last original on the exposure glass, press [Change 1, 2 Sided] to select [1 Sided].
 Now place the next stack on the machine and then press [Start] when [Batch] is specified.
When SADF is specified, the machine starts scanning the next stack as soon as you place the proceeding original in the ADF.

You can also select Original Settings from the scanner screen. Press an item on the screen to select it.

Placing an Original with Different Size Pages
The machine detects the original size automatically per sheet when an original with different size pages is placed in the ADF.
Specify the operation mode of Mixed Sizes
When the One-pass duplex scanning ADF is attached to the machine, check the settings before scanning the original.
Before loading an original with multiple pages of different widths, set [Mixed Sizes Mode] to [Different Width Originals]. ([Scanner Settings]
 [Size/Reduce/Enlarge]
 [Mixed Sizes Mode])
When loading an original with multiple pages of the same width, you can perform scanning even if you have not specified [Mixed Sizes Mode]; however, setting this to [Same Width Originals] increases the scan speed. ([Scanner Settings]
 [Size/Reduce/Enlarge]
 [Mixed Sizes Mode])
 Press [Settings] on the Home screen.
 Press [Scanner Settings].
 Press [Scan]
 [Size/Reduce/Enlarge]
 [Mixed Sizes Mode].
 Select [Same Width Originals] or [Different Width Originals].
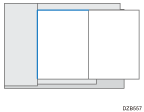
When placing an original with pages of the same width
When placing an original with pages of different width
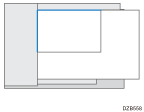
The machine scans the original while automatically detecting the vertical and horizontal lengths per sheet. It takes longer to scan in this setting.
 Press [OK].
 Press [Home] (
 ) after specifying the settings.
Place the original, and scan it

Be sure to specify [Auto Detect: Mixed Sizes] in [Scan Size] when scanning an original with different size pages. A paper jam will occur if you do not specify the setting.
 (mainly Europe and Asia)
[Auto Detect: Mixed Sizes] in [Scan Size] can be selected for paper sizes larger than B5 or 81/2 × 11.
 (mainly North America)
[Auto Detect: Mixed Sizes] in [Scan Size] can be selected for paper sizes larger than A4 or 71/2 ×101/2.

The machine scans the original in the mixed width mode regardless of this setting when [Scan Ratio], [Erase Center], or [Erase Border] is specified.
 Press [Scanner] on the Home screen.
 Place the original in the Auto Document Feeder (ADF).
When placing an original with pages of the same width

When placing an original with pages of different width
The original you are placing has pages of a different width and length.

 Press [Send Settings] on the scanner screen.

 Press [Scan Size] and select [Auto Detect: Mixed Sizes].
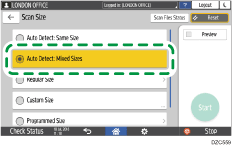
 Specify the scan settings according to the purpose of the scanned data.
Scanning an Original with Suitable Quality and Density
Specifying the File Type or File Name When Scanning a Document
 To send the scanned document to an e-mail address, press [Sender] and then specify the sender.
 Specify the destination on the scanner screen, and press [Start].
