Preventing Unwanted Faxes
When you do not want to receive unnecessary faxes, you can use the following two methods to specify the behavior of the fax feature for incoming faxes. You can enable both of these features at the same time.
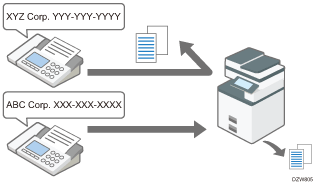
Registering a sender whose faxes you want or do not want to receive
When receiving unwanted faxes such as advertisements repeatedly, register the sender in the list to deny reception.
If you only accept fax transmissions from a specific sender, register the sender to the list. The machine only receives fax transmissions from registered senders.
You can specify whether you receive or do not receive faxes.
You can register up to 250 senders whose faxes you receive or do not receive.
Not receiving faxes from an unknown sender
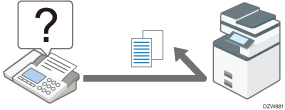
If you do not want to receive a fax transmission from a sender whose name or fax number is unknown, you can configure the machine to reject all fax transmissions from the sender.
Not Receiving Faxes from a Special Sender
After taking a note of the sender information, change the machine settings so that you do not receive faxes, and register the conditions for it.

If a sender is already in the list so that you receive faxes from the sender, delete the sender information from the [Register Special Sender] screen in advance. After you change the machine setting so that you do not receive faxes from the sender, the machine will not receive faxes from the sender.
 Press [Fax] on the Home screen.
 Press [Job Status] on the fax screen.
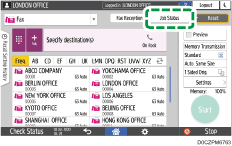
 Press [Reception Result] to browse the sender information on the operation panel, or press [Print Records] and check the information in the Records.
Browsing the sender information on the operation panel
Press [Reception Result] and select [Display All] or [Display Specified Period].
Check the "Sender" field.
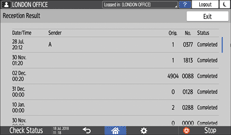
Take a note of the sender name, paying attention to the capitalization of the alphabetic characters used for the name.
Viewing the Report for the Sender Information
Press [Print Records], and then select the transmission result to print.
Check the "Sender" column under "RX".
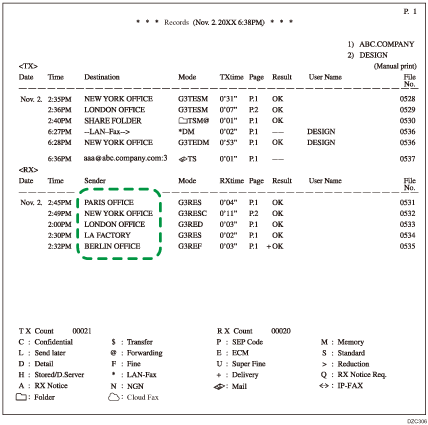
 After checking the information, press [Settings] on the Home screen.
 Press [Fax Settings] on the Settings screen.
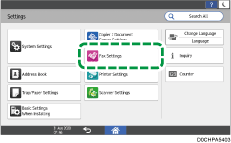
 Press [Reception Settings]
 [Register Special Sender]
 [Authorized Reception] display the screen for programming Special Senders.
 Press [On] in [Authorized Reception] and then press [Reject] under "The Sender Specified in Authorized Reception per Sender".
 Press [OK].
 Press [Register/Change/Delete] to display the screen for programming the sender.
 Press [Register].
 Program the name or fax number of the sender to not receive faxes.
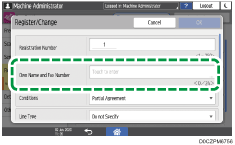
Be sure to enter the information correctly on the note you have taken in Step 3.
 Specify the condition to match the programmed string.
Full Agreement: The machine does not receive faxes when the information received from the sender matches the registered information completely.
Partial Agreement: The machine does not receive faxes when the sender information matches the registered information partially.
 To add the line type to the condition, select a line type.
If a line type is selected, the machine does not receive faxes when both the programmed string and the line type match.
 Press [On] in [Authorized Reception per Sender].
 Press [OK].
 Press [Home] (
 ) after specifying the settings.
Registering Senders to Reject from Reception Result Screen
From the senders list on the Reception Result screen, select the senders from which you do not want to receive faxes and register them one by one. Once registered, you will never receive faxes from a sender whose name matches the registered name.

It is necessary to set "Sender Specified in Authorized Reception per Sender" in [Fax Settings]
 [Reception Settings]
 [Register Special Sender]
 [Authorized Reception] to [Reject] in advance.
When the machine is configured to receive faxes only from special senders, the faxes from these senders will be rejected after completing the configuration described in this section. Be sure to delete these senders from [Fax Settings]
 [Reception Settings]
 [Register Special Sender]
 [Register/Change/Delete] before starting the configuration.
 Press [Fax] on the Home screen.
 Press [Job Status] on the fax screen.

 Press [Reception Result] and select [Display All] or [Display Specified Period].
 Press [Authorized Reception Setting].
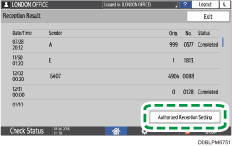
 Check the "Sender" field, select the sender to reject, and then press [OK].

You can also specify the condition to match the specified string for the sender name.
Receiving Faxes from a Special Sender
After taking a note of the sender information, change the machine setting so that you receive faxes from the sender, and register the conditions for it.

If the sender is already in the list so that you do not receive faxes from the sender, delete the sender information from the [Register Special Sender] screen in advance. After you change the machine setting so that you receive faxes, the machine will receive faxes from the sender.
 Press [Fax] on the Home screen.
 Press [Job Status] on the fax screen.

 Press [Reception Result] to browse the sender information on the operation panel, or press Records to check the information in the reception report.
Browsing the sender information on the operation panel
Press [Reception Result] and select [Display All] or [Display Specified Period].
Check the "Sender" field.

Take a note of the sender name, paying attention to the capitalization of the alphabetic characters used for the name.
Viewing the Report for the Sender Information
Press [Print Records], and then select the transmission result to print.
Check the "Sender" column under "RX".

 After checking the information, press [Settings] on the Home screen.
 Press [Fax Settings] on the Settings screen.

 Press [Reception Settings]
 [Register Special Sender]
 [Authorized Reception] to display the screen for programming Special Senders.
 Press [On] in [Authorized Reception] and then press [Receive] under "Sender Specified in Authorized Reception per Sender".
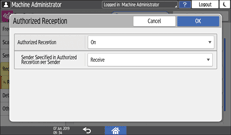
 Press [OK].
 Press [Register/Change/Delete] to display the screen for programming the sender.
 Press [Register].
 Program the name or fax number of the sender to receive faxes.

Be sure to enter the information correctly on the note you have taken in Step 3.
 Specify the condition to match the programmed string.
Full Agreement: The machine receives faxes when the sender information matches the registered information completely.
Partial Agreement: The machine receives faxes when the sender information matches the registered information partially.
 To add the line type to the condition, select a line type.
If a line type is selected, the machine receives faxes when both the programmed string and the line type match.
 Press [On] in [Authorized Reception per Sender].
 Press [OK].
 Press [Home] (
 ) after specifying the settings.
Preventing Reception of Faxes from Senders Whose Name and Fax Number Field Are Not Provided
You can configure the machine so that you do not receive faxes from an unknown sender whose name, fax number, and other information are not provided.
 Press [Settings] on the Home screen.
 Press [Fax Settings] on the Settings screen.

 Press [Reception Settings]
 [Register Special Sender] to display the screen for programming Special Senders.
 Press [Deny] in [Receive Fax (Caller ID Blocked)].
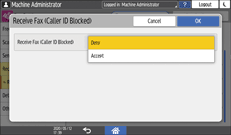
 Press [OK].
 Press [Home] (
 ) after specifying the settings.
