How to Use Document Server
You can store data in the document server on the hard disk of the machine.
Utilizing Document Server
Storing documents
You can store the data scanned on the document server screen or sent from the computer by the printer driver.
You can also store documents from [Copier (Classic)], [Scanner (Classic)], and [Fax (Classic)].
Confirming documents
The documents are stored in folders in the document server. Select a stored document to display its contents on the preview screen.
Using the stored documents
You can print the stored documents as necessary. You can download stored documents to the computer with the Web Image Monitor.


To download documents that have been stored to your computer using the document server screen or the printer driver, you must install the file format converter on the machine in advance.
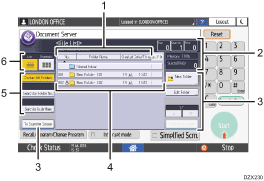
"Folder List" Screen of Document Server
The documents in the document server are classified by folders. On the Home screen, press [Document Server] to display the folder list.

Sort keys
Press to sort the folders by [No.], [Folder Name], or [Created Date/Time]. Press the same sort key again to switch between ascending and descending order.
Status of the document server
You can confirm the number of scanned pages, output quantity, and free memory space.
Operation keys
Press to create a new folder, edit folders, or display the document scanning or printing screen.
Folders in the document server
Press a folder to display the documents in the folder.
 is displayed for folders protected by a password.
Search keys
Press to search for a folder.
Display selector
Press to switch between the list and thumbnail displays.
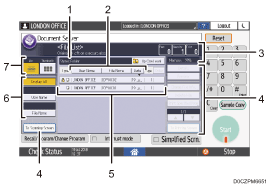
"File List" Screen of Document Server
Press a folder on the "Folder list" screen to confirm the documents stored in the folder.

Name of the folder containing the currently displayed documents
Press [Up One Level] to return to the "Folder list" screen.
Sort keys
Press to sort the documents by [User Name], [File Name], or [Date]. Press the same sort key again to switch between ascending and descending order.
Status of the document server
You can confirm the number of scanned pages, output quantity, and free memory space.
Operation keys
Press to preview or edit a document, or display the document scanning or printing screen.
Documents in the folder
Select a document to print or display. The icons have the meanings below.
Icon
Meaning

Document scanned on the document server screen

Document stored using the fax function

Document sent by the printer driver

Document protected by a password
Search keys
Press to search for a document.
Display selector
Press to switch between the list and thumbnail displays.
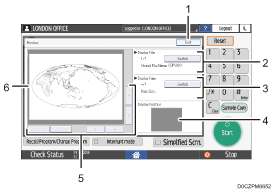
"Preview" Screen of Document Server
Select a document on the "File List" and press [Preview] to confirm the contents of the document on the screen.

[Exit]
Press to close the "Preview" screen and return to the "File List" screen.
Name of the displayed document
When two or more documents are selected on the "File List" screen before pressing [Preview], press [Switch] to display a different document preview from among the selected documents.
Information about the currently displayed page
You can confirm page number, paper size, and other information about the currently displayed page. Press [Switch] to switch the page.
Display position
While enlarging the preview, you can confirm the position of the currently displayed area in the whole document.
Enlarge/reduce keys
Press to enlarge or reduce the preview. While enlarging the preview, press [
 ], [
], [ ], [
], [ ], or [
 ] to change the displayed area in the direction of the arrows.
Preview of a document
To enlarge the preview, tap twice at the center of the area you want to enlarge.
To change the displayed area in the enlarged preview, slide your finger on the displayed document.

A document larger than A3 size cannot be displayed on the preview screen.
When Preview is selected in another function, you may not be able to use the preview screen function.
