Scanning a Photo, Name Card, Check, and Other Small Sized Original
Place a small sized original on the exposure glass and then specify the size to scan.
Attach the small size paper unit on the one-pass duplex scanning ADF to place and scan a small sized original such as a check or receipt.
Scanning the Original on the Exposure Glass
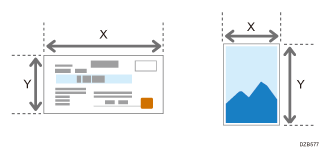
![]() Using a ruler, measure the vertical and horizontal sizes of the original.
Using a ruler, measure the vertical and horizontal sizes of the original.

![]() Press [Scanner] on the Home screen.
Press [Scanner] on the Home screen.
![]() Press [Send Settings] on the scanner screen.
Press [Send Settings] on the scanner screen.
![]() Press [Scan Size]
Press [Scan Size] [Custom Size].
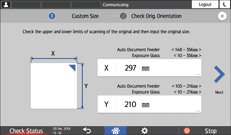
![]() Enter the values of X and Y that you measured in Step 1 and proceed to the next screen.
Enter the values of X and Y that you measured in Step 1 and proceed to the next screen.

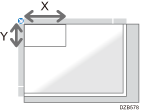
![]() While maintaining the same X-Y orientation as shown, place the original on the machine and press [OK].
While maintaining the same X-Y orientation as shown, place the original on the machine and press [OK].

![]() Press
Press  three times to return to the [Send Settings] screen.
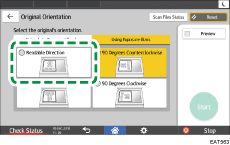
![]() Press [Original Orientation] and select [Readable Direction].
Press [Original Orientation] and select [Readable Direction].

![]() Specify the scan settings according to the purpose of the scanned data.
Specify the scan settings according to the purpose of the scanned data.
Scanning an Original with Suitable Quality and Density
Specifying the File Type or File Name When Scanning a Document
![]() To send the scanned document to an e-mail address, press [Sender] and then specify the sender.
To send the scanned document to an e-mail address, press [Sender] and then specify the sender.
![]() Specify the destination and then press [Start] on the scanner screen.
Specify the destination and then press [Start] on the scanner screen.
