Viewing the Transmission Result of an Outgoing LAN-Fax
You can confirm the result of a LAN-Fax transmission by e-mail, report, or using Web Image Monitor.
E-mail Transmission Results
You can receive this type of notification when transmission of a document from the machine to the destination device is completed normally.
LAN-Fax Result Notification E-mail
You can receive this type of notification in one of the following cases:
When transmitting a document from your computer to the machine and printing it at the same time
When a transmission failure occurs while transmitting a document from your computer to the machine
LAN-Fax Result Report/Communication Result Report
You can check if transmitting a document from your computer to the machine has been completed normally in the LAN-Fax Result Report. Also, check the Communication Result Report to see if the fax has been transmitted normally from the machine to the destination device.
![]()
Configure the machine to enable sending of e-mails in advance.
Errors occurring when the machine is used as a LAN-Fax will not be displayed on the computer. Check for errors by using Web Image Monitor. See Web Image Monitor Help.
![]()
When executing [Send] or [Send & Print] with LAN-Fax Driver, and when the E-mail TX Result Report has not arrived, the Communication Result Report is printed.
Receiving a Notification E-mail on a Computer
To receive notifications by e-mail, configure the settings in the driver before sending a LAN-Fax.
![]() Display the “Devices and Printers” screen.
Display the “Devices and Printers” screen.
Windows 10 (version 1703 or later), Windows Server 2019
On the [Start] menu, click [Windows System]
 [Control Panel].
Click [View devices and printers].
Windows 10 (earlier than version 1703), Windows Server 2016
Right-click [Start], and then click [Control Panel].
Click [View devices and printers].
Windows 8.1, Windows Server 2012/2012 R2
On the Charm Bar, click [Set]
 [Control Panel].
Click [View devices and printers].
Windows 7, Windows Server 2008 R2
On the [Start] menu, click [Devices and Printers].
Windows Server 2008
On the [Start] menu, click [Control Panel].
Click [Printer] on [Hardware and Sound].
![]() Right-click the LAN-Fax icon, and then click [Printing preferences].
Right-click the LAN-Fax icon, and then click [Printing preferences].
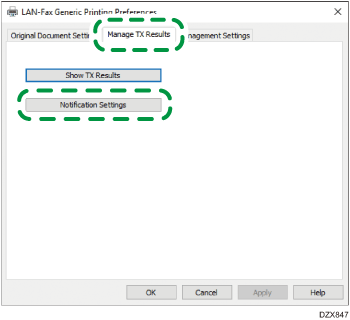
![]() Select the [Manage TX Results] tab, and click [Notification Settings].
Select the [Manage TX Results] tab, and click [Notification Settings].
![]() Select [Always Notify] or [Notify When Errors Occur].
Select [Always Notify] or [Notify When Errors Occur].
![]() Select the [By Email] check box under "Notification Method" and specify the destination.
Select the [By Email] check box under "Notification Method" and specify the destination.
To enter a destination e-mail address manually, select [Specify Destination Email Address] and enter the e-mail address.
To select a destination in the address book of the machine, select [Use Email Address Registered in Device] and enter the registration number.
![]() Click [OK]
Click [OK] [OK].
[OK].
![]()
If you have selected the [By Pop-up Message] check box under "Notification Method" in Step 5, the fax transmission result will be indicated in the notification area of your computer.
Always Printing the LAN-Fax Result Report (Settings Screen Type: Standard)
Specify to print the LAN-Fax result report in [Report Auto Print Settings] under [Fax Settings].
![]() Press [Settings] on the Home screen.
Press [Settings] on the Home screen.
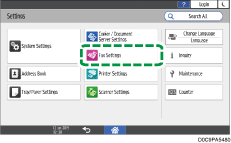
![]() Press [Fax Settings] on the Settings screen.
Press [Fax Settings] on the Settings screen.
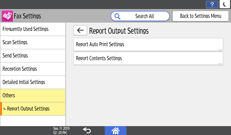
![]() Press [Others]
Press [Others] [Report Output Settings]
 [Report Auto Print Settings] to display the configuration screen.
![]() Select [Print] in [LAN-Fax Result Report].
Select [Print] in [LAN-Fax Result Report].
![]() Press [OK].
Press [OK].
![]() Press [Home] (
Press [Home] ( ) after specifying the settings.
Always Printing the LAN-Fax Result Report (Settings Screen Type: Classic)
Specify to print the LAN-Fax result report in [Parameter Setting] under [Fax Settings].
![]() Press [Settings] on the Home screen.
Press [Settings] on the Home screen.
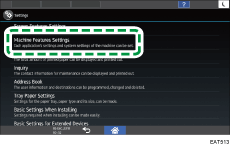
![]() Press [Machine Features Settings] on the Settings screen.
Press [Machine Features Settings] on the Settings screen.
![]() Press [Fax Settings]
Press [Fax Settings] [Initial Settings] tab
  [Parameter Setting] to display the switch operation screen.
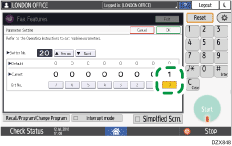
![]() Select bit number [0] under switch number [20], and change the current value to "1".
Select bit number [0] under switch number [20], and change the current value to "1".
![]() Press [OK].
Press [OK].
![]() Press [Home] (
Press [Home] ( ) after specifying the settings.
Confirming the Transmission Result in Web Image Monitor
![]() Access Web Image Monitor.
Access Web Image Monitor.
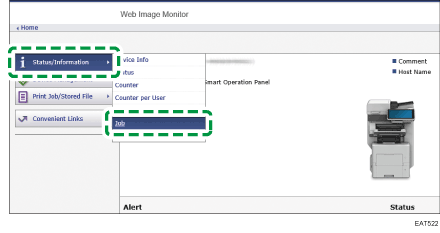
![]() From the [Status/Information] menu, click [Job].
From the [Status/Information] menu, click [Job].
![]() Click [LAN-Fax] under [Fax History].
Click [LAN-Fax] under [Fax History].
![]() Confirm the transmission history.
Confirm the transmission history.
You can view up to 1,000 of the latest total results of the transmission and reception history.
Click the [Details] button to view the details.

![]() Click [Logout] and then close the Web browser.
Click [Logout] and then close the Web browser.
