Setting an Original to Send by Fax on the Scanner
Set a fax original in the Auto Document Feeder (ADF) or on the exposure glass, and specify the scan settings such as 2-sided scanning and the original orientation.
When you are using the ADF to scan an original, the machine emits a beeping sound and displays a message to notify the user if the first page of the scanned original is mostly blank. This feature allows can prevent you from setting the original facing down by mistake.
If the original you want to scan includes a page of a book or a sheet in a size that cannot be set in the ADF, first, scan the page or sheet using the exposure glass, next, scan the rest of the original using the ADF, and then send them all together.
![]()
The blank sheet-detecting function is ineffective for second and subsequent pages.
The message that appears when the machine detects a blank page differs depending on the number of pages to be scanned and transmission mode.
Setting an Original in the Orientation Suitable for Its Size
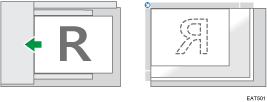
Set an original that is larger than A5 or B5 such as A4 or 81/2×14 in horizontal orientation (![]() ).
).

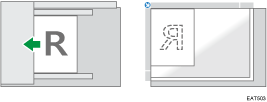
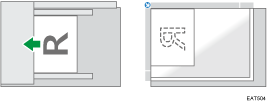
Set an original that is smaller than A4 or 81/2×11 (LT) such as A5 or 51/2 × 81/2 in vertical orientation (![]() ).
).
![]()
When sending a fax, the image output at the other end depends on the size and orientation of paper used in the receiver's machine. If the receiver does not use paper of the same size and orientation as that of the original, the fax image may be reduced in size, trimmed at both edges, or divided across two or more sheets. When sending an important original, ask the receiver about the size and orientation of the paper in their machine.
During immediate transmission, the machine cannot scan an original.
An original of irregular (i.e. custom) size originals are scanned as regular size originals, so the receiver may find extra blank margins or edges of images missing. When sending a custom size or part of a large original, you can specify the scan area precisely. If you specify a scan area, only that area is scanned regardless of the actual size of the original. For details about specifying the scan area, see Specifying the Scan Size.
You can send the first page from the exposure glass then the remaining pages from the ADF. You cannot change from the ADF to the exposure glass.
Specifying the Scan Size
If you are scanning an original of a size that cannot be automatically detected, or scanning only a part from an original, specify the scan size.
![]() Press [Settings] on the fax screen.
Press [Settings] on the fax screen.
![]() Press [Scan Size] and then configure the [Auto Detect] or scan size settings.
Press [Scan Size] and then configure the [Auto Detect] or scan size settings.
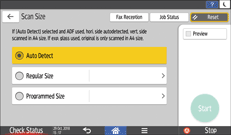
Auto Detect
 (mainly Europe and Asia)
ADF
Automatically detects the height (horizontal length) of the original and scans it in A4 size width (vertical length).
Exposure glass
Scans all pages in A4 size.
 (mainly North America)
ADF
Automatically detects the height (horizontal length) of the original and scans it in 81/2×11 (LT) size width (vertical length).
Exposure glass
Scans all pages in 81/2×11 (LT) size.
Regular Size
Scans all pages in the specified standard size, regardless of the actual size of the original pages.
Programmed Size
Scans all pages in the preset size, regardless of the actual size of the original pages. It is useful to register the custom sizes you frequently use.
Specifying the scan size setting is complete.
![]()
When scanning an original that exceeds 356 mm (14 inches) in width, set the original in the ADF, and specify [Programmed Size] in [Scan Size].
Use Memory Transmission when sending an original that is larger than 356 mm (14 inches) in width. When you are using immediate transmission, a transmission may fail depending on the resolution and destination settings.
If the size of the paper specified for printing received pages at the destination is smaller than that of the original, the page will be scaled to fit the paper, such as when sending an 81/2×11 (LT) size original to a fax machine capable of printing on A5 size or smaller.
The dimensions of the sent image and the image printed at the destination may vary slightly.
Setting 2-sided Originals
To scan both sides of the original automatically, set the original in the Auto Document Feeder (ADF) and specify 2-sided scanning. Specify the page opening orientation and the orientation the original is set so that the pages received at the destination have the proper vertical orientation. Both sides of the original cannot be automatically scanned when using Immediate Transmission.
![]() Press [Settings] on the fax screen.
Press [Settings] on the fax screen.
![]() Specify the page opening orientation and the orientation the original is set.
Specify the page opening orientation and the orientation the original is set.
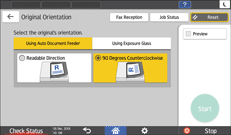
Set the original in the orientation that matches its opening orientation, and specify the original orientation and page opening orientation.
Original | Setting | ||
|---|---|---|---|
Orientation in the ADF | Opening orientation | Original Orientation | Page opening orientation (Original Settings) |
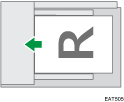 | 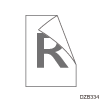 | 90 Degrees Counterclockwise | 2 Sided: Open to Right/Left |
 |  | 90 Degrees Counterclockwise | 2 Sided: Open to Top |
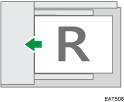 | 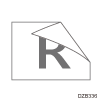 | Readable Direction | 2 Sided: Open to Right/Left |
 |  | Readable Direction | 2 Sided: Open to Top |
Press [Original Orientation], and select the orientation of the original set in the ADF.
Press [Original Settings], and select the opening orientation.
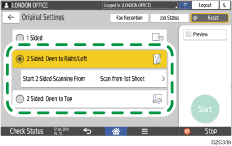
When scanning a cover sheet or front cover of a book, select [Scan from 2nd Sheet] in [Start 2 Sided Scanning From] to scan only one side of the first sheet.
Specifying the scan settings for a two-sided original is complete.
