Entering the ID Code to Print Received Fax Document
To prevent the output of received faxes when the machine is unattended, configure the machine to store the received faxes in the memory without printing and allow only specific users to print them.
You can specify the sender from which to store received documents and the period to store received documents in the memory.
Always Storing Received Documents in the Memory (Memory Lock Reception)
The machine stores the received documents in the memory regardless of the day of the week or time of the day. Enter the four digit Memory Lock ID to print a document.

You can specify to store only the documents received from a special sender such as an important customer or client.
When the machine receives a document by Memory Lock Reception, the Fax indicator lights up and "Memory Lock File" is displayed in the Fax RX File Widget on the Home screen.
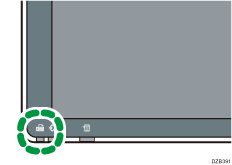
When a document also exists in Personal Box, "Confident. RX File" is displayed in the widget instead of "Memory Lock File".
![]()
Documents received by SEP Code Reception are automatically printed even if this function is switched on.
You cannot use multi-copy printing with this function.
Storing Only Documents Received During the Specified Period (Standby to Print)
The machine stores the received document in the memory on a specified day of the week or during a specified period during the day. Enter the four-digit Memory Lock ID to print the document.

Specify the time period in [ID Required Print] under [Output Mode Switch Timer].
Changing the Fax Reception Behavior Based on the Time or Day of the Week
You cannot print documents outside the period specified for ID Required Print. The documents remain stored in the memory as Standby to Print files.
Configuring Memory Lock Reception (Settings Screen Type: Standard)
Program the Memory Lock ID in the [Detailed Initial Settings] and then enable Memory Lock Reception in the [Reception Settings].
![]() Press [Settings] on the Home screen.
Press [Settings] on the Home screen.
![]() Press [Fax Settings] on the Settings screen.
Press [Fax Settings] on the Settings screen.
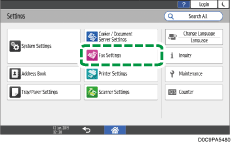
![]() Press [Detailed Initial Settings]
Press [Detailed Initial Settings] [Register Memory Lock ID] to display the screen for programming Memory Lock ID.
![]() Select [Register], and then enter an ID.
Select [Register], and then enter an ID.
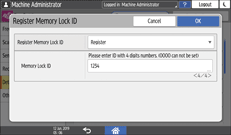
![]() Press [OK].
Press [OK].
![]() Configure Memory Lock Reception.
Configure Memory Lock Reception.
When receiving documents from only Special Senders by Memory Lock Reception
Specify [Memory Lock Reception per Sender] in [Fax Settings] [Reception Settings]
 [Register Special Sender]
 [Register/Change/Delete].
Specifying the Action to Perform When Receiving a Fax from Different Senders
When receiving documents from all senders by Memory Lock Reception
Press [Fax Settings]
 [Reception Settings]
 [Reception File Settings]
 [Action on Receiving File] to display the configuration screen.
Select [On] in [Memory Lock Reception].
Press [OK].
![]() Press [Home] (
Press [Home] ( ) after specifying the settings.
Configuring Memory Lock Reception (Settings Screen Type: Classic)
Program the Memory Lock ID in the [Initial Settings] tab and then enable Memory Lock Reception in the [Reception Settings] tab.
![]() Press [Settings] on the Home screen.
Press [Settings] on the Home screen.
![]() Press [Machine Features Settings] on the Settings screen.
Press [Machine Features Settings] on the Settings screen.
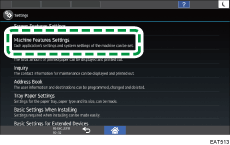
![]() Press [Fax Settings]
Press [Fax Settings] [Initial Settings] tab
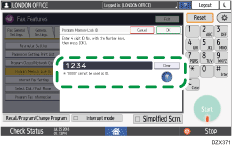
  [Program Memory Lock ID] to display the screen for programming Memory Lock ID.
![]() Enter an ID and then press [OK].
Enter an ID and then press [OK].
![]() Configure Memory Lock Reception.
Configure Memory Lock Reception.
When receiving documents from only Special Senders by Memory Lock Reception
Specify [Memory Lock RX per Sender] in [Fax Settings] [Reception Settings] tab
  [Program Special Sender].
Specifying the Action to Perform When Receiving a Fax from Different Senders
When receiving documents from all senders by Memory Lock Reception
Press [Fax Settings]
 [Reception Settings] tab
  [Reception File Settings] to display the Reception File Settings screen.
Press [Memory Lock Reception] and select [On].
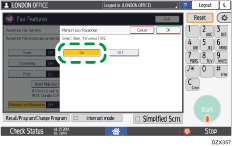
Press [Exit].
![]() Press [Home] (
Press [Home] ( ) after specifying the settings.
Printing Memory Lock Reception Documents
Enter the Memory Lock ID in [Fax Reception] [Print Memory Lock] on the fax screen to print the file.
![]() Press [Fax] on the Home screen.
Press [Fax] on the Home screen.
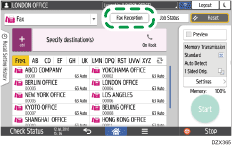
![]() Press [Fax Reception] on the fax screen.
Press [Fax Reception] on the fax screen.
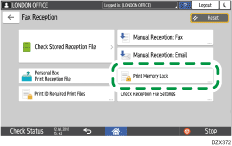
![]() Press [Print Memory Lock].
Press [Print Memory Lock].
![]() Enter the Memory Lock ID and press [Print].
Enter the Memory Lock ID and press [Print].
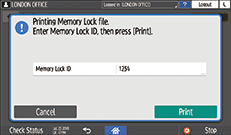
All documents received by Memory Lock Reception are printed. After printing, the documents are erased from the memory.
Printing Standby to Print Documents
Enter the Print ID in [Fax Reception] [Print ID Required Print Files] on the fax screen to print the file.
![]() Press [Fax] on the Home screen.
Press [Fax] on the Home screen.
![]() Press [Fax Reception] on the fax screen.
Press [Fax Reception] on the fax screen.

![]() Press [Print ID Required Print Files].
Press [Print ID Required Print Files].
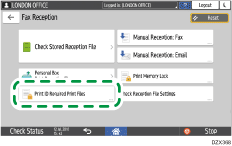
![]() Enter the Print ID and press [Print].
Enter the Print ID and press [Print].
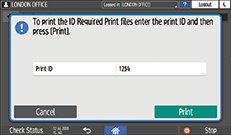
All Standby to Print documents are printed. After printing, the documents are erased from the memory.
![]()
Only one copy of the document received by Memory Lock Reception is printed even when two or more copies are specified in [Reception File Print Quantity].
