Specifying the Printing Method of the Received Fax Document
There are two types of functions that allow you to print documents received by fax more efficiently while maintaining legibility: those functions that are applied automatically and those that you can specify manually.
The machine performs one of the following functions to print the received document in the most suitable size and orientation:
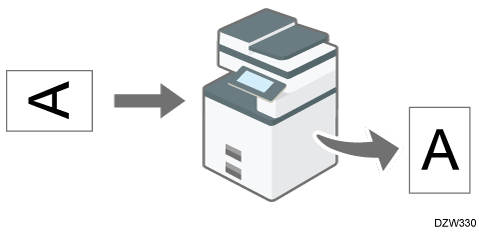
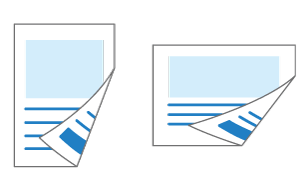
Rotating the image when printing (Image Rotation)
When receiving a fax that matches the size of the paper loaded in the paper tray but differs in the its orientation, the machine rotates the image 90 degrees clockwise automatically and prints it.
When a paper tray is specified in [Paper Tray] under [Fax Settings], the machine prints the received fax on the paper fed from the specified tray.
Selecting paper according to the size of the received document
The machine selects the paper tray loaded with the paper of same size as the received document and prints it automatically.
The machine can receive documents in only three sizes in length in the vertical direction by fax: 210 mm (8.27 inches, A4 ), 257 mm (10.12 inches, B4 JIS ), and 297 mm (11.69 inches, A3 ). Any documents that are shorter than 210 mm in vertical length are received asdocuments with a vertical length of 210 mm. The document is received with the same horizontal length as that of the original.
You can specify the order to select paper trays when paper of the same size is loaded in more than one tray in [Tray/Paper Settings]
[Paper Tray Priority]
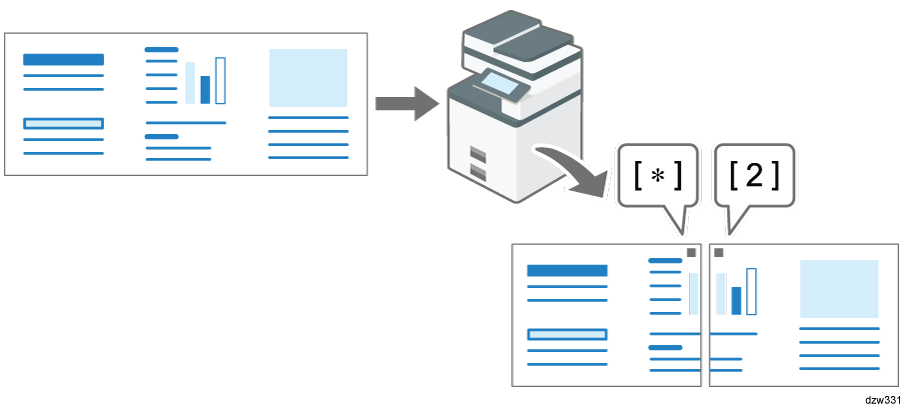
Printing a page across multiple sheets of paper or reducing it to fit on a single sheet
When a document that is larger in width than the paper loaded in any of the trays is received, the machine divides the received page and prints it across multiple sheets of paper or reduces and prints it to fit on a single sheet.
When the difference in the widths of the paper and received page is greater than 20 mm (0.8 inches)
The page is divided and printed across multiple sheets. Registration marks (*) are printed in the position where the page was divided, and an area approximately 10 mm (0.4 inches) around the dividing line is printed repeatedly on both sheets.When the difference in the widths of the paper and received page is smaller than 20 mm
The page is reduced to fit on a single sheet of paper.
You can change the settings below. Contact your service representative. The settings enclosed in parentheses are the factory defaults.
Reduced print (On)
Printing separation marks (On)
Overlapping print (On)
Overlapping width: select from 4, 10 or 15 mm (10 mm)
Recommended size for series print: specify in steps of 5 mm between 5 to 155 mm (when the original length is 20 mm longer than the paper size)
If there is no paper in the machine that matches the size of a received document, the machine will choose a paper size based on the paper available.
If you have not set the same size paper in the paper tray, incoming fax documents are printed on the nearest size available.
For example, if your machine does not have A5 (81/2 × 51/2) loaded and you receive an A5 (81/2 × 51/2) size document, the document is printed on A4 (81/2 × 11). If your machine does not have A4 (81/2 × 11) loaded and you receive an A4 (81/2 × 11) size document, the document is printed on two sheets of A5 (81/2 × 51/2).
Actions when receiving B4 JIS, 11 × 17, or 81/2 × 14 size documents differ according to the value in [Paper Size: Fax]. For details, see Printing Received Documents from the Bypass Tray.
If you select [Do not Print on the Paper in the Bypass Tray] in [Paper Size: Fax], the machine does not choose paper loaded in the bypass tray and does not print the document on B4 JIS, 11 × 17, or 81/2 × 14 size paper.

The document is split over two sheets of paper depending on the paper size. See Print Functions Performed Automatically.
Widths that this machine can receive are A4, B4 JIS, 81/2 × 11 and A3. Any documents narrower than A4 or 81/2 × 11 are received at A4 or 81/2 × 11 width. The length of documents depends on the document.
The paper size used to print a received document may be different from the size of the sent original.
By specifying the method to print received documents in advance, you can print received documents in a variety of ways.
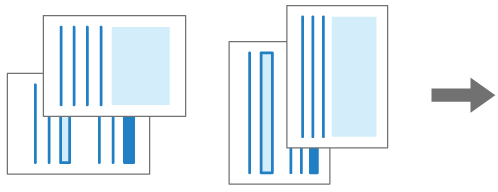
Printing a multi-page document on both sides of the output paper
When receiving a multi-page document comprising pages of the same size, the machine prints the document on both sides of the paper if paper of the same size is loaded in the machine.
For details about the setting, see Printing on Both Sides of Paper When Receiving a Document Comprising Multiple Pages.
The pages are printed for binding on the left edge and the images on the front and back sides of the paper are printed as follows:
Orientation of the received document
Duplex printing result
Images are printed in the same orientation on the front and back sides of the paper.
Images are printed in reverse orientation on the front and back sides of the paper.
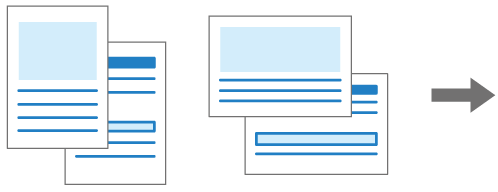
Combining and printing a multi-page document of A5 or 81/2 × 51/2 size onto a single page
When receiving two or more pages of the same size (A5
A document of A5
paper
A document of 81/2 × 51/2
For details about the setting, see Combining and Printing Pages on One Side of Paper When Receiving a Document Comprising Multiple Pages.
Printing multiple copies for a document
The machine prints the specified number of a received document. If you specify the number of copies you need in advance, you do not have to make copies later.
For details about the setting, see Printing More than One Copy for a Received Document.
Printing only on paper of the same size as the received document
The machine prints the received document only when paper of the same size as the document is available in any of the trays (Just size printing). "Add paper." is displayed when paper of the optimal size is not loaded in any of the source trays. Load the appropriate size paper into the source tray.
For details about the setting, see Printing Only When Paper of the Same Size as the Received Document Is Available.
Printing on paper loaded on the bypass tray
Normally, the machine does not print received documents on paper fed from the bypass tray, so if documents are received that should be printed on A3 or B4 JIS size paper, which cannot be loaded in a paper tray, they will be split up and printed on separate sheets of smaller paper. You can print these documents on A3 or B4 JIS size paper by loading A3 or B4 JIS size paper in the bypass tray and then setting the machine to print them from the bypass tray. You can also set the machine to print just the documents received from specified senders on the paper loaded in the bypass tray.
For details about the setting, see Printing Received Documents from the Bypass Tray and Specifying the Action to Perform When Receiving a Fax from Different Senders.
On the bypass tray, you can load paper that cannot be loaded in any of the paper source trays.
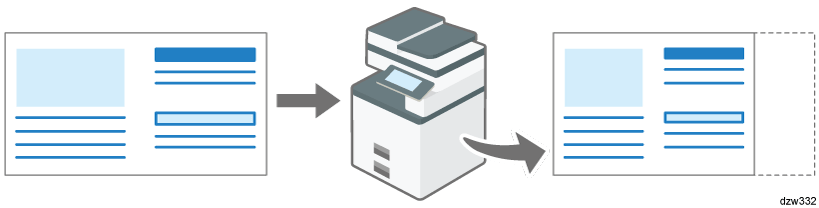
Printing the received document slightly smaller
If there is a description on the edge of the paper in a drawing, the description on the edge of the paper may not be printed when printing the received document. To prevent this from happening, you can set the received document to print a little smaller.
For details about the setting, see Printing the Received Document Slightly Smaller.
Documents are printed on both sides of the paper when duplex printing is enabled in [Fax Settings] [Reception Settings] [Reception File Print Settings] and all following conditions are fulfilled:
The received documents consists of pages in the same size
The paper of the same size as the received document is loaded in one of the paper source trays
All pages of the document have been successfully received into the memory of the machine
Press [Settings] on the Home screen.

Press [Fax Settings] on the Settings screen.

Press [Reception Settings]
[Reception File Print Settings] [2 Sided Print].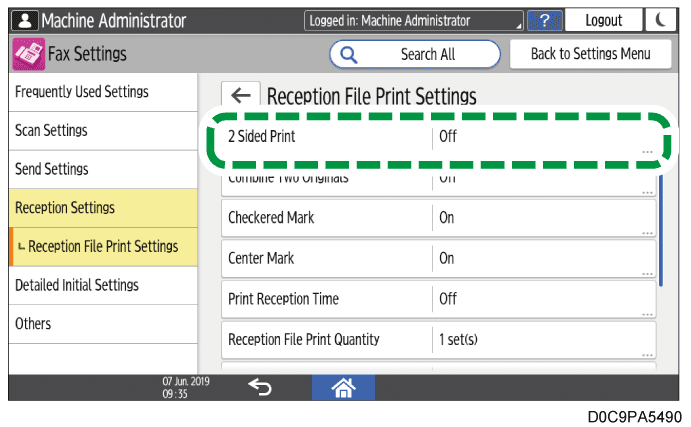
Select [On].
Press [OK].
Press [Home] (
 ) after specifying the settings.
When you specify duplex printing, pages will also be printed on both sides of paper when printing transmission standby files or stored files.
Depending on the orientation of the received document, the vertical orientations on the front and back sides may be reversed.
Combine 2 Originals will be disabled when Duplex and Combine 2 Originals are specified at the same.
You can print on both sides of paper for documents received from a special sender only.
Specifying the Action to Perform When Receiving a Fax from Different Senders
Turn on [Combine Two Originals] in [Reception File Print Settings] in [Reception Settings] under [Fax Settings].
Press [Settings] on the Home screen.
Press [Fax Settings] on the Settings screen.
Press [Reception Settings]
[Reception File Print Settings] [Combine Two Originals].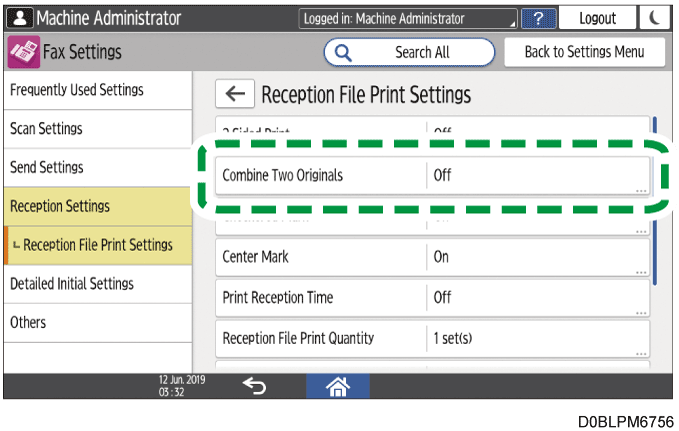
Select [On].
Press [OK].
Press [Home] (
) after specifying the settings.
Combine Two Originals will be disabled when Duplex and Combine Two Originals are specified at the same.
Configure this function in [Fax Settings] [Reception Settings] [Reception File Print Settings] [Reception File Print Quantity].
Press [Settings] on the Home screen.
Press [Fax Settings] on the Settings screen.
Press [Reception Settings]
[Reception File Print Settings] [Reception File Print Quantity].Specify the number of copies to print, and then press [OK].
Press [Home] (
) after specifying the settings.
You can print more than one copy for documents received from a special sender only.
Specifying the Action to Perform When Receiving a Fax from Different Senders
Turn on [Just Size Printing] in [Reception File Print Settings] in [Reception Settings] under [Fax Settings].
Press [Settings] on the Home screen.
Press [Fax Settings] on the Settings screen.
Press [Reception Settings]
[Reception File Print Settings] [Just Size Printing].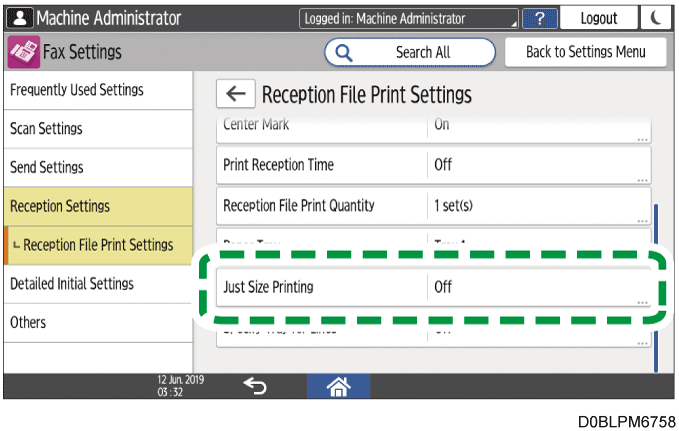
Select [On].
Press [OK] twice.
After completing the procedure, press [Home] (
).
Specify whether to print received documents from the bypass tray
Press [Settings] on the Home screen.
Press [Tray/Paper Settings].
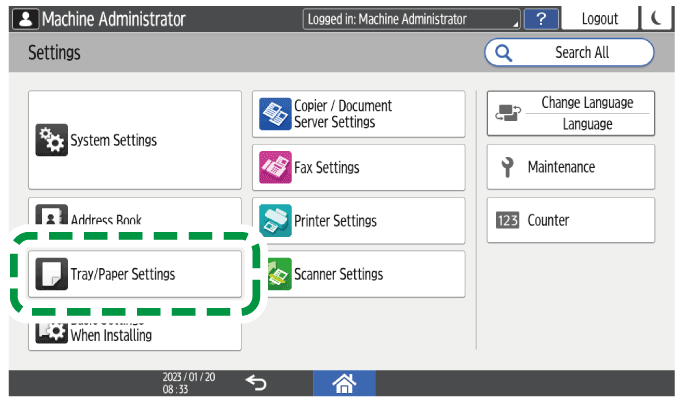
Press [Paper Size/Paper Type]
[Bypass Tray] [Paper Size: Fax].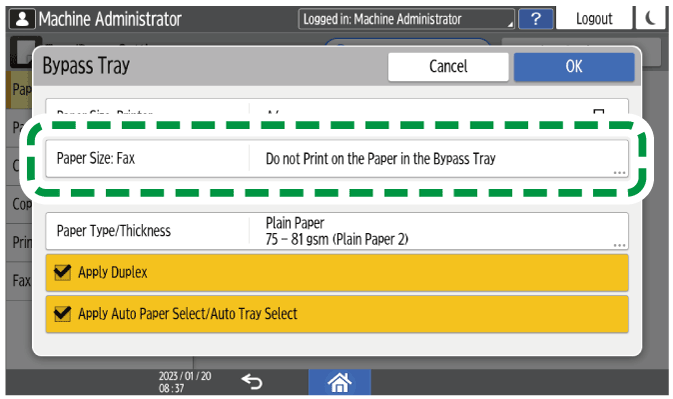
Specify whether to print received documents from the bypass tray.
Do not Print on the Paper in the Bypass Tray: Received documents are not printed from the bypass tray.
Do not Set the Paper Size: Displays a screen for specifying whether to use the bypass tray or paper tray for printing when a received document is received.
B4 JIS: Prints received documents from the bypass tray. Specify when B4 JIS paper is loaded in the bypass tray.
11 x 17: Prints received documents from the bypass tray. Specify when 11 × 17 paper is loaded in the bypass tray.
8½ x 14: Prints received documents from the bypass tray. Specify when 81/2 × 14 paper is loaded in the bypass tray.
Press [OK].
Press [Home] (
) after specifying the settings.
Printing the received document
Depending on the [Paper Size: Fax] setting, the size of the paper loaded in the bypass tray, and the original size of the received document, the operation required at reception differs.
[Paper Size: Fax] setting
Size of paper loaded in the bypass tray
Original size of received document
Operation when a fax is received
Do not Print on the Paper in the Bypass Tray
-
-
Operation is not required. Always prints using the paper in the paper tray.
If the size of paper loaded in the paper tray is different from the size of the original of the received document, then the received documents are divided and printed according to the size of the paper loaded in the paper tray.Do not Set the Paper Size
-
-
When you receive a B4 JIS, 11 × 17, or 81/2 × 14 size document, a screen appears asking you to select whether to print from the bypass tray or the paper tray.
To print the documents in their actual size, load paper in the bypass tray that is the same size as that displayed on the screen, and then press [Bypass Tray].
Press [Paper Tray] to divide and print according to the size of the paper loaded in the paper tray.If you load a size that is different from the size displayed on the screen, then after printing is completed, the screen asking you to select whether to print from the bypass tray or the paper tray appears again. If this happens, load paper of the same size as the size displayed on the screen in the bypass tray, and then press [Bypass Tray].
B4 JIS
11 x 17
8½ x 14
Same size as specified in [Paper Size: Fax]
Same size as specified in [Paper Size: Fax]
No operation is required. Automatically prints using the paper in the bypass tray.
B4 JIS
11 x 17
8½ x 14
Same size as specified in [Paper Size: Fax]
Different from the size specified in [Paper Size: Fax]
A screen appears asking you to select whether to print from the bypass tray or the paper tray. Select the tray to use for printing.
If you load a size that is different from the size displayed on the screen, then after printing is completed, the screen asking you to select whether to print from the bypass tray or the paper tray appears again. If this happens, load paper of the same size as the size displayed on the screen in the bypass tray, and then press [Bypass Tray].
B4 JIS
11 x 17
8½ x 14
Different from the size specified in [Paper Size: Fax]
Same size as specified in [Paper Size: Fax]
Prints using the paper in the bypass tray automatically.
A size mismatch error message appears after printing is completed. Load paper of the same size as the size displayed on the screen in the bypass tray, and then press [Bypass Tray].
B4 JIS
11 x 17
8½ x 14
Different from the size specified in [Paper Size: Fax]
Different from the size specified in [Paper Size: Fax]
A screen appears asking you to select whether to print from the bypass tray or the paper tray. Select the tray to use for printing.
If you load a size that is different from the size displayed on the screen, then after printing is completed, the screen asking you to select whether to print from the bypass tray or the paper tray appears again. If this happens, load paper of the same size as the size displayed on the screen in the bypass tray, and then press [Bypass Tray].
When [Bypass Tray] is selected in [Reception Settings]
[Register Special Sender] [Register/Change/Delete] [Paper Tray per Sender], the [Register Special Sender] settings are given priority.
Confirm and take note of the destination name and fax number before configuring the settings in [Register Special Sender] of [Reception Settings] under [Fax Settings].
Press [Fax] on the Home screen.
Press [Job Status/Stop] on the fax screen.
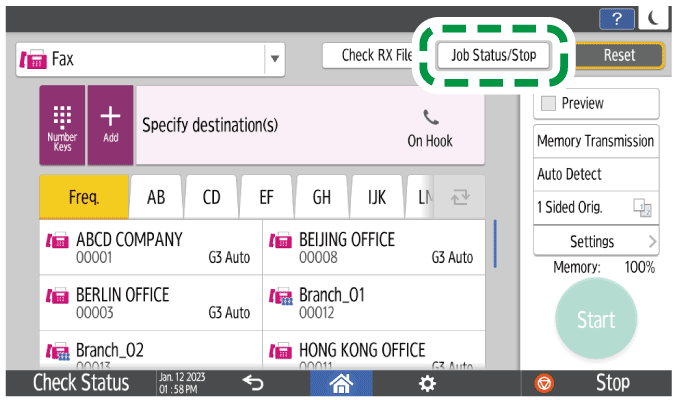
Press [Reception Result] to browse the sender information on the operation panel, or press Records to check the information in the reception report.
Browsing the sender information on the operation panel
Press [Reception Result] and select [Display All] or [Display Specified Period].
Check the "Sender" field.

Take a note of the sender name, paying attention to the capitalization of the alphabetic characters used for the name.
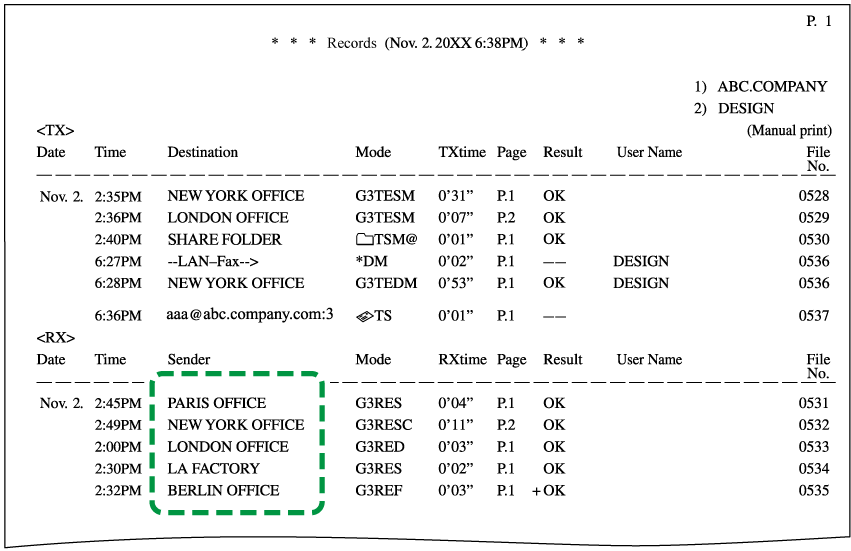
Viewing the Report for the Sender Information
Press [Print Records], and then select the transmission result to print.
Check the "Sender" column under "RX".
After checking the information, press [Settings] on the Home screen.
Press [Fax Settings] on the Settings screen.
Press [Reception Settings]
[Register Special Sender] [Register/Change/Delete].Press [Register].
Specify the name or fax number of the sender to print the fax received from that sender on the paper loaded on the bypass tray.
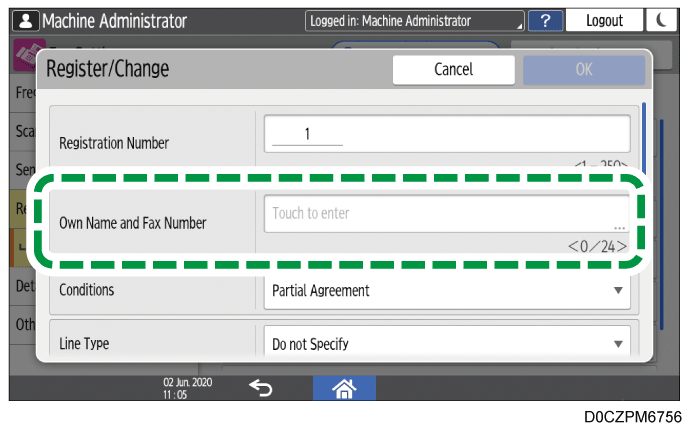
Be sure to enter the information correctly on the note you have taken in Step 3.Specify the condition to match the programmed string.
Full Agreement: The machine prints received faxes on paper loaded on the bypass tray when the information received from the sender matches the registered information completely.
Partial Agreement: The machine prints received faxes on paper loaded on the bypass tray when the information received from the sender matches the registered information partially.
Select [Bypass Tray] in [Paper Tray per Sender].
Press [OK] twice.
Press [Close].
Set [Special Reception Function] to [On] on the [Register Special Sender] screen.
Press [OK].
Press [Bypass Tray Paper Size] to specify the size.
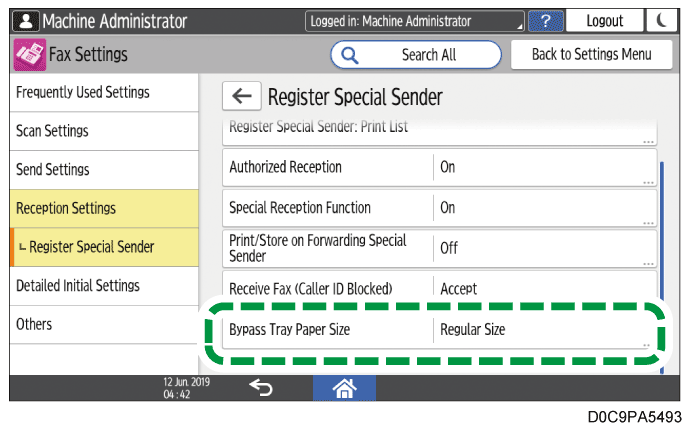
Press [OK].
Press [Home] (
) after specifying the settings.
Check the maximum number of sheets that can be loaded, the size that can be detected automatically, and the custom size that can be used on the bypass tray before loading paper on the tray.
Recommended Paper Sizes and TypesWhen printing on paper that is smaller than A4, the printing page may be divided or cropped at the edges.
When using this function, the Rotate by 180 Degrees function that is available when specifying Image Rotation or Duplex becomes disabled.
Turn on [Print with Margin] in [Reception File Print Settings] in [Reception Settings] under [Fax Settings].
Press [Settings] on the Home screen.
Press [Fax Settings] on the Settings screen.
Press [Reception Settings]
[Reception File Print Settings] [Print with Margin].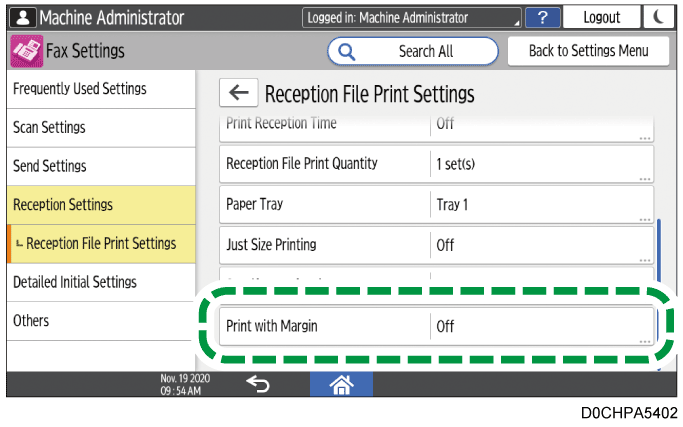
Select [On].
Press [OK].
After completing the procedure, press [Home] (
).