Scan Size
Select the size of the original to be scanned.
[Auto Detect]
Scans original sizes using the automatic size detect function.
[Mixed Original Sizes]
Select [Mixed Original Sizes] to scan a batch of originals that have different lengths.
Originals are scanned by the ADF and the length of each is automatically detected.
 (mainly Europe)
[Mixed Original Sizes] can be selected for paper sizes larger than B5 or 81/2 × 11.
 (mainly North America)
[Mixed Original Sizes] can be selected for paper sizes larger than A4 or 51/2 × 81/2.
Regular size
Select a size to scan originals at a specified size regardless of the actual size of the originals you have placed.
You can specify the following sizes:
A3![]() , A4
, A4![]() , A4
, A4![]() , A5
, A5![]() , A5
, A5![]() , B4 JIS
, B4 JIS![]() , B5 JIS
, B5 JIS![]() , B5 JIS
, B5 JIS![]() , 11 × 17
, 11 × 17![]() , 81/2 × 14
, 81/2 × 14![]() , 81/2 × 132/5
, 81/2 × 132/5![]() , 81/2 × 13
, 81/2 × 13![]() , 81/2 × 11
, 81/2 × 11![]() , 81/2 × 11
, 81/2 × 11![]() , 51/2 × 81/2
, 51/2 × 81/2![]() , 51/2 × 81/2
, 51/2 × 81/2![]()
[Partial Scan]
Select [Partial Scan] to scan an original partially.
You can specify the dimensions of an area to be scanned in mm or inches.
[Custom Size]
Select [Custom Size] to scan originals that are not standard sizes.
You can specify the length and width of your originals in mm or inches.

Selecting both [Mixed Original Sizes] and [Erase Center / Border] reduces the scanning speed.
When you use the one-pass duplex scanning ADF, selecting [Mixed Original Sizes] reduces the scanning speed.
Scan sizes registered in [Program / Edit / Delete Scan Size] of the [Scan Settings] tab under [Scanner Features] are also displayed under regular sizes.
If the size of an original placed in the ADF cannot be detected automatically, the original might be scanned at a different size.
Relationship of original of mixed sizes and scan size
Scanning methods for originals mixed with different sizes (such as A3 & A4 or B4 & B5) differ depending on the settings you make for the scan size and whether you use the exposure glass or the ADF.
If you select [Mixed Original Sizes], the machine detects the length of each original and scans them.
If a regular size is selected, the machine scans originals at the selected size regardless of the actual size of originals. If an original is smaller than the selected size, the machine applies margins to the scan area.
If [Auto Detect] is selected for scanning originals from the exposure glass, the machine detects the size of individual originals and scans accordingly.

When scanning originals of different length at the same time, place them correctly by referring to the chart below. The paper guides cannot be adjusted to small size originals, which may cause slightly tilted scanning.
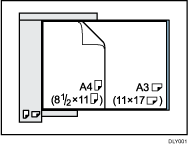
If you do not select [Mixed Original Sizes] and place originals of different sizes in the ADF, paper jams might occur or parts of the originals might not be scanned.
If only [Auto Detect] is selected for scanning the original with the ADF, the machine scans all originals in the size of the largest original among them.
Scanning the entire area of a custom size original
This section explains how to specify a custom size for scanning the entire area of an original. If you want to scan the entire area of a custom size original, select [Custom Size] as the scan size.
To display the custom size setting screen, on the initial scanner screen, press [Scan Settings] > [Scan Size] > [Custom Size].
The following table explains how to measure custom size originals and how to specify the scan settings on the custom size setting screen.
How to measure sizes
Orientation and placement of original | Measuring method for scanning the entire area of a custom size original |
|---|---|
In the | 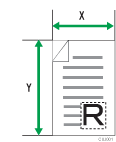 |
In the | 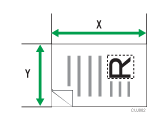 |
Scan settings on the custom size setting screen
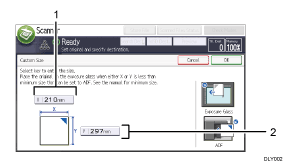
Original Size (X)
Specify the length of the original.
Enter the actual length in [X] then press [
 ].
].Original Size (Y)
Specify the width of the original.
Enter the actual width in [Y] then press [
 ].
].

For X and Y, you can specify 10 mm (0.4 inches) or larger.
Scanning part of a custom size original
If you want to scan only a part of a custom size original, select [Partial Scan] as the scan size.
To display the partial scan setting screen, on the initial scanner screen, press [Scan Settings] [Scan Size]
 [Partial Scan].
To scan part of an original, measure Original Size (X1 and Y1), Start Position (X2 and Y2), and Scan Area (X3 and Y3) on the front side of the original, and then enter those values on the partial scan setting screen.
Measuring methods differ depending on where the original is placed and the orientation it is placed in. For details about how to measure Original Size (X1 and Y1), Start Position (X2 and Y2), and Scan Area (X3 and Y3) correctly, see "How to measure sizes".
How to measure sizes
Orientation and placement of original | Measuring method for scanning the "R" section |
|---|---|
In the | 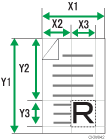 |
In the | 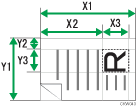 |
In the | 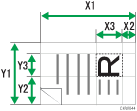 |
Scan settings on the partial scan setting screen
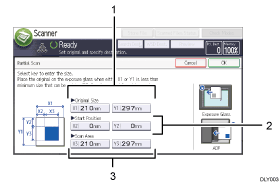
Original Size (X1 and Y1)
Specify the original's entire size.
Enter the actual values in [X1] and [Y1] while referring to "How to measure sizes", and then press [
 ].
].Start Position (X2 and Y2)
Specify the scanning start position.
Enter the actual values in [X2] and [Y2] while referring to "How to measure sizes", and then press [
 ].
].Scan Area (X3 and Y3)
Specify sizes of the area you want to scan.
Enter the actual values in [X3] and [Y3] while referring to "How to measure sizes", and then press [
 ].
].

 or
or  orientation on the exposure glass or in the ADF
 or
or  orientation on the exposure glass or in the ADF