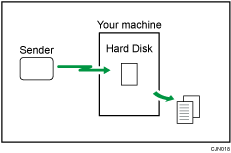
Confirming/Printing/Deleting Received and Stored Documents
You can print documents that are received and stored on the hard disk. You can also delete unwanted documents.
Make the settings for received and stored documents in [Reception File Settings] in the Fax Settings menu before using this function.
Configuring the Machine to Store Received Documents
If you have selected to store received documents and specified an e-mail address for notification of receipt, fax reception notification can be sent to that e-mail address.
If the security functions are enabled on the machine, received and stored documents can be viewed, printed, and deleted only by a user specified as the administrator. Only the specified user can view the received documents stored on the machine and deliver them to other users.
To assign a user to manage stored faxes, see Restricting the Users Who Can Access the Stored Reception Files.

You cannot use received and stored documents with the Document Server function.
You can view and print received and stored documents using Web Image Monitor.
Viewing/Printing/Deleting the Stored Documents from Web Image Monitor
Control panel operations such as printing or deleting received documents can be restricted to the user specified in [Stored Reception File User Setting]. To do this, select "On" for the User Parameters (switch 10, bit 0) in Parameter Settings. After you do this, [Print / Delete Stored Reception File] will no longer be displayed on the screen, and received documents stored on the machine cannot be accessed using the control panel.
Received and stored documents are managed separately from the documents sent and stored on the hard disk. You cannot send received and stored documents.
Received confidential documents are stored in Personal Boxes.
Confirming Received and Stored Documents
 Press [TX/RX Status / Print].
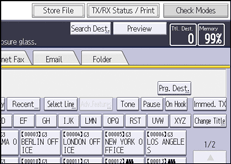
 Select [Print / Delete Stored Reception File].
 Select the document you want to confirm.
Press the Thumbnails key to switch the screen to thumbnail display.
 Press [Preview].
 Check the preview.
Press [Zoom Out] or [Zoom In] to reduce or enlarge the preview image. You can also double-tap to reduce or enlarge the preview image.
Press [
 ] [
] [ ] [
] [ ] [
] [ ] to scroll the preview image. You can also tap to scroll the preview image.
Press [Switch] under [Display File] to display another selected file.
Press [Switch] under [Display Page] to change the displayed page.
 Press [Exit] three times.
If the size (length) of a received and stored document is larger than A4 or 81/2 × 14, the document is displayed in the preview as a single image, but it will be split and printed over several sheets.
Printing Received and Stored Documents
Press [TX/RX Status / Print].
Select [Print / Delete Stored Reception File].
Select a file to be printed, and then press [Print].
You can specify and print multiple documents.
To delete the document after printing, press [Delete File after Printing].
To perform two-sided printing, press [Print on 2 Sides].
Press [Start].
Press [Exit] twice.
Deleting Received and Stored Documents
Press [TX/RX Status / Print].
Select [Print / Delete Stored Reception File].
Select a file to be deleted, and then press [Delete].
You can specify and delete multiple documents.
Press [Yes].
Press [Exit] twice.
You cannot delete a document while another person is printing it using Web Image Monitor.