Scanning a Photo, Name Card, Check, and Other Small Sized Original
Place a small sized original on the exposure glass and then specify the size to scan.
Attach the small size paper unit on the one-pass duplex scanning ADF to place and scan a small sized original such as a check or receipt.
Scanning the Original on the Exposure Glass
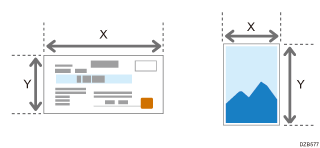
 Using a ruler, measure the vertical and horizontal sizes of the original.

 Press [Scanner] on the Home screen.
 Press [Send Settings] on the scanner screen.
 Press [Scan Size]
 [Custom Size].
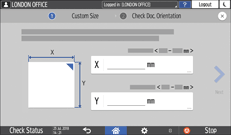
 Enter the values of X and Y that you measured in Step 1 and proceed to the next screen.

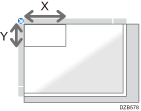
 While maintaining the same X-Y orientation as shown, place the original on the machine and press [OK].

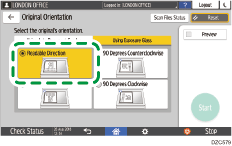
 Press [Original Orientation] and select [Readable Direction].

 Specify the scan settings according to the purpose of the scanned data.
Scanning an Original with Suitable Quality and Density
Specifying the File Type or File Name When Scanning a Document
 To send the scanned document to an e-mail address, press [Sender] and then specify the sender.
 Specify the destination and then press [Start] on the scanner screen.
Placing the Original on the Small Size Paper Unit
Up to 50 checks, receipts, and bills can be scanned all together.

The optional small size paper unit is required to use this function.

 Attach the small size paper unit to the machine, and place the original to scan on the unit.
 Measure the original size using the scale on the small size paper unit.
 Press [Scanner] on the Home screen.
 On the screen for specifying the vertical and horizontal sizes of a custom size original, enter the values of X and Y that you measured.

 Press [Send Settings] on the scanner screen and specify the scan settings according to the purpose of the scanned data.
Scanning an Original with Suitable Quality and Density
Specifying the File Type or File Name When Scanning a Document
 To send the scanned document to an e-mail address, press [Sender] and then specify the sender.
 Specify the destination and then press [Start] on the scanner screen.
