Using the ID Card Scan & Copy to Scan Both Sides of an ID Card into a Single Page
Using the "ID Card Scan & Copy" app, you can scan the front and back sides of a driver's license, ID card or other card and arrange the scanned images vertically on a single sheet of 81/2 × 11 or A4 size paper automatically.
Installing the "ID Card Scan & Copy" App
![]() Press [Application Site] on the Home screen.
Press [Application Site] on the Home screen.
![]() Press [ID Card Scan & Copy].
Press [ID Card Scan & Copy].
![]() Press [Install].
Press [Install].
![]() Press [Close] after installation is complete.
Press [Close] after installation is complete.
Registering Destinations in the App
The machine administrator can register up to five e-mail addresses or folders to which you often send data.
![]() Press [ID Card Scan and Copy] on the Home screen.
Press [ID Card Scan and Copy] on the Home screen.
![]() Press [Menu] (
Press [Menu] ( )
) ![]() [Settings]
[Settings]![]() [Destination Settings] on the [ID Card Scan and Copy] screen to display the [Destination Settings] screen.
[Destination Settings] on the [ID Card Scan and Copy] screen to display the [Destination Settings] screen.
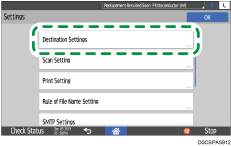
![]() Press [Program] of the destination to register.
Press [Program] of the destination to register.
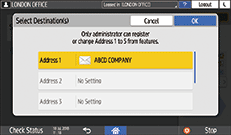
![]() Select the type of the destination to register.
Select the type of the destination to register.
Enter manually or select from the address book of the machine.

Email Address (Address Book): Select an e-mail address from the addresses registered in the address book.
Email Address (Manual): Manually enter an e-mail address to register.
Folder (Address Book): Select a folder from the folders registered in the address book. Select a folder destination from the address book and enter the login password of an account that has the access permission of the folder.
Folder (Manual)
Enter the folder path manually and specify the send settings to register a folder. Follow the instructions on the screen to specify the required information. Check the information that is required for registering a folder destination.
![]() Press [OK] three times.
Press [OK] three times.
Scanning an ID Card
![]() Press [ID Card Scan and Copy] on the Home screen.
Press [ID Card Scan and Copy] on the Home screen.
![]() Press [Add/Edit] of the destination, specify the destination to send the scanned data, and then press [OK].
Press [Add/Edit] of the destination, specify the destination to send the scanned data, and then press [OK].
![]() [Change Settings] and change the scan settings as required.
[Change Settings] and change the scan settings as required.
To send the scanned data to an email address, specify the sender.
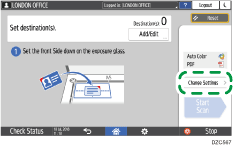
![]() Place the ID card on the exposure glass with the front side facing down and press [Start Scan].
Place the ID card on the exposure glass with the front side facing down and press [Start Scan].
![]() Follow the instruction displayed on the screen to scan the back side and then send the scanned data.
Follow the instruction displayed on the screen to scan the back side and then send the scanned data.