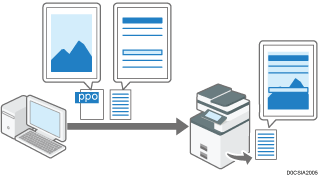
Overlaying Data When Printing a Document
You can superimpose overlay data saved in advance and print it on a document that was created using an application.
![]()
The overlay printing function is available on the Windows PCL 6 printer driver. You cannot use the function on macOS.
You can use the PCL 6 printer driver to print a document with overlay data (*.ppo) superimposed on it if you save the overlay data and register settings on the driver beforehand.
For example, you can format printouts by adding your company logo or by overlaying images, such as preferred backgrounds or frames, on a document.
Overlay data can be overlaid on each page of a document or just on the first page.

Creating Overlay Data
Use the printer driver to save overlay data (*.ppo) on your computer.
![]() Open a document to use for overlay data on the computer, and display the setting screen of the printer driver from the print menu in the application.
Open a document to use for overlay data on the computer, and display the setting screen of the printer driver from the print menu in the application.
![]() Click [Modify] in [Job Type:] on the [Basic] tab.
Click [Modify] in [Job Type:] on the [Basic] tab.
![]() In [Job Type:], select [Save as Overlay Data].
In [Job Type:], select [Save as Overlay Data].
![]() Specify a file name and location to save the overlay data.
Specify a file name and location to save the overlay data.
![]() Execute printing.
Execute printing.
The overlay data (*.ppo) is saved in the specified path.
Register Overlay Settings to Do Overlay Printing
Register overlay data (*.ppo) on the printer driver to print it overlaid on a document.
![]() Open a document to print on the computer, and display the setting screen of the printer driver from the print menu in the application.
Open a document to print on the computer, and display the setting screen of the printer driver from the print menu in the application.
![]() On the [Text/Watermark] tab, select the [Add Overlay] check box.
On the [Text/Watermark] tab, select the [Add Overlay] check box.
![]() Click [Details...].
Click [Details...].
![]() In the [Edit] section on the [Overlay Details] screen, click [Browse...] to specify a path to which the overlay data (*.ppo) is to be saved, and then enter a name for the overlay data in [Name].
In the [Edit] section on the [Overlay Details] screen, click [Browse...] to specify a path to which the overlay data (*.ppo) is to be saved, and then enter a name for the overlay data in [Name].
Name: Enter a name for the image watermark.
Path/File Name: Specify the path to which the image file (*.bmp) is to be saved. Click [Browse...] to select a file.
![]() Click [Add].
Click [Add].
The added overlay data is listed in [Overlay Data], so that you can use the data again just by choosing it from the list.
![]() In the [Select Overlay Data] section on the [Overlay Details] screen, specify the following settings.
In the [Select Overlay Data] section on the [Overlay Details] screen, specify the following settings.
Apply Same Overlay Data to All Pages: Overlay data is applied to the whole document. Choose data from the [Overlay Data] list.
Select Overlay Data for Each Page: Specify the pages to which overlay data is to be applied. Choose data from the list for each page.
Bring to Front: Select this check box when overlaying data in front of the contents of a document.
![]() After completing the configuration, click [OK] to print.
After completing the configuration, click [OK] to print.
![]()
To delete settings for overlay printing, choose data from the [Overlay Data] list in the [Edit] section on the [Overlay Details] screen, and then click [Delete].
