Printing on Envelopes
Load envelopes in the bypass tray or tray 1 and change the Tray Paper Settings on the control panel.
Printing on Envelopes Loaded in the Bypass Tray
![]() Load envelopes in the bypass tray.
Load envelopes in the bypass tray.

Orientation: portrait
Flap: close
Printing surface: upper side
![]() On the Home screen, press [Settings].
On the Home screen, press [Settings].
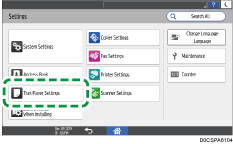
![]() On the Settings screen, press [Tray/Paper Settings].
On the Settings screen, press [Tray/Paper Settings].

![]() Press [Paper Size/Paper Type].
Press [Paper Size/Paper Type].
![]() Press [Bypass Tray]
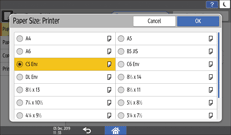
Press [Bypass Tray] [Paper Size: Printer], and then select the size of the envelopes.

If the size of the loaded envelope is not included in the list, select [Custom] and enter the value.
![]() Press [OK].
Press [OK].
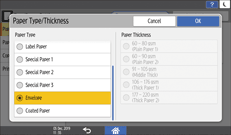
![]() Press [Paper Type/Thickness], and then select [Envelope] from [Paper Type].
Press [Paper Type/Thickness], and then select [Envelope] from [Paper Type].

![]() Press [OK] twice.
Press [OK] twice.
![]() After completing the configuration, press [Home] (
After completing the configuration, press [Home] ( ).
).
![]() Open a document to print on the computer, and display the setting screen of the printer driver from the print menu application.
Open a document to print on the computer, and display the setting screen of the printer driver from the print menu application.
![]() Specify the paper size and paper type.
Specify the paper size and paper type.
Windows
On the [Basic] tab, configure the following settings:
Document Size: Select the envelope size. If the envelope size is not included among the options, enter the value in [Custom Paper Size...].
Input Tray: [Bypass Tray]
Paper Type: [Envelope]
You can specify a custom paper size, which is commonly used as the option of the Document Sizes.
macOS
Configure the following settings:
Paper Size: Select the envelope size. If the envelope size is not included among the options, select [Manage Custom Sizes] and enter the value.
Printer Features
 Paper
Paper Paper Type: [Envelope]
Paper Feed
 All Pages From: [Bypass Tray]
![]() Execute printing.
Execute printing.
Printing on Envelopes Loaded in Tray 1
![]() Load envelopes in tray 1.
Load envelopes in tray 1.

Orientation: portrait
Flap: close
Printing surface: upper side
![]() On the Home screen, press [Settings].
On the Home screen, press [Settings].
![]() On the Settings screen, press [Tray/Paper Settings].
On the Settings screen, press [Tray/Paper Settings].

![]() Press [Paper Size/Paper Type].
Press [Paper Size/Paper Type].
![]() Press [Tray 1]
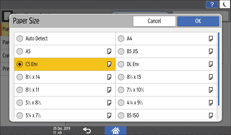
Press [Tray 1] [Paper Size], and then select the size of the envelopes.

If the size of the loaded envelope is not included in the list, select [Custom] and enter the value.
![]() Press [OK].
Press [OK].
![]() Press [Paper Type/Thickness], and then select [Envelope] from [Paper Type].
Press [Paper Type/Thickness], and then select [Envelope] from [Paper Type].

![]() Press [OK] twice.
Press [OK] twice.
![]() After completing the configuration, press [Home] (
After completing the configuration, press [Home] ( ).
).
![]() Open a document to print on the computer, and display the setting screen of the printer driver from the print menu application.
Open a document to print on the computer, and display the setting screen of the printer driver from the print menu application.
![]() Specify the paper size and paper type.
Specify the paper size and paper type.
Windows
On the [Basic] tab, configure the following settings:
Document Size: Select the envelope size. If the envelope size is not included among the options, enter the value in [Custom Paper Size...].
Input Tray: [Tray 1]
Paper Type: [Envelope]
You can specify a custom paper size, which is commonly used as the option of the Document Sizes.
macOS
Configure the following settings:
Paper Size: Select the envelope size. If the envelope size is not included among the options, select [Manage Custom Sizes] and enter the value.
Printer Features
 Paper
Paper Paper Type: [Envelope]
Paper Feed
 All Pages From: [Tray 1]
![]() Execute printing.
Execute printing.
