Loading Paper into the Paper Tray
The method of loading paper varies for each tray type.
![]()
- When replacing paper or removing jammed paper, make sure not to trap or injure your fingers.
- If the first layer paper tray is installed, do not pull out more than one tray at a time. Pressing down forcefully on the machine's upper surface might cause the machine topple over, possibly resulting in injury.
- Do not pull out paper trays while printing. Doing so can cause a paper jam.
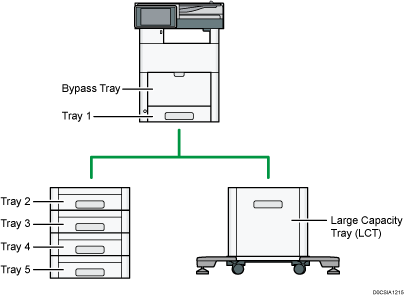
Before loading paper into a tray, check the paper size and type that can be loaded in the tray, and confirm the paper size that is automatically detected.
When loading paper of a size that is not automatically detected, specify the paper size in [Tray/Paper Settings] of [Settings].
Check the paper setting before printing. If the paper differs from the paper setting, a mismatch error will occur when you print.
Straighten curled or warped paper before loading.
If a paper tray is pushed vigorously when putting it back into place, the position of the tray's side fences may slip out of place.
When loading a low number of sheets, be sure not to squeeze the side fences in too tightly. If the side fences are squeezed too tightly against the paper, the edges may crease or the paper may misfeed.
When loading paper on a tray which has a few sheets of paper, multiple sheets of paper may be fed at once from the tray. Take out all sheets, fan the sheets, and then load them again.
You may hear the sound of rubbing paper. This is not a malfunction.
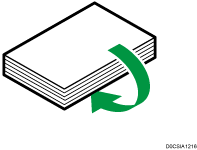
Skew is the phenomenon when images are printed slantwise. If the paper skews, take out the stack of paper, turn it over, and then load it again.
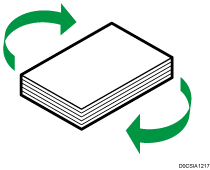
If the paper still skews, take out the stack of paper, turn it around, and then load it again.
Loading Paper into Tray 1
![]()
Slide the side fences until they are aligned with the sides of the paper. If there is space between the side fences and the paper, it may cause the image to be misaligned.
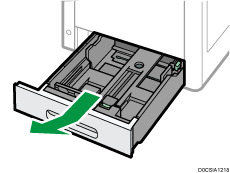
![]() Check that paper in the paper tray is not being used, and then pull the tray carefully out.
Check that paper in the paper tray is not being used, and then pull the tray carefully out.
![]() Remove paper if loaded.
Remove paper if loaded.
![]() While pressing down the release lever of the side fence, slide the side fences outward.
While pressing down the release lever of the side fence, slide the side fences outward.
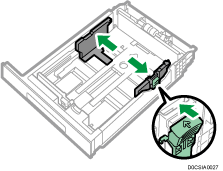
![]() While pinching the release lever of the end fence, slide the end fence outward.
While pinching the release lever of the end fence, slide the end fence outward.
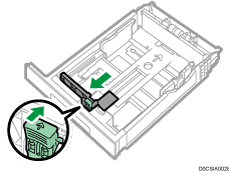
![]() Square the paper and load it print side up.
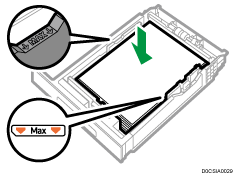
Square the paper and load it print side up.
Do not stack paper over the limit mark.
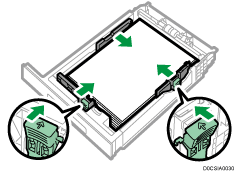
![]() Align the end and side fences gently against the paper you loaded.
Align the end and side fences gently against the paper you loaded.
Make sure that there is no space between the paper and the side fences or end fence.
To load large sizes of paper, pull out the tray while pressing the release lever near the end fence.
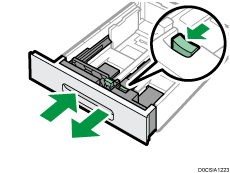
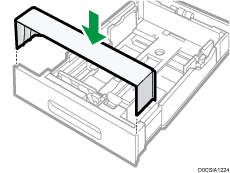
To protect the paper when the tray is extended, place the tray cover over the extended section of the paper tray.
![]() Carefully slide the paper tray fully in.
Carefully slide the paper tray fully in.
![]()
When loading envelopes or letterhead paper, confirm the orientation, face and back, or location of flaps.
Loading Paper into Tray 2 to 5
The paper size setting is changed in the same way for each paper tray.
In the following example procedure, the paper size setting for tray 2 is changed.
![]()
Slide the side fences until they are aligned with the sides of the paper. If there is space between the side fences and the paper, it may cause the image to be misaligned.
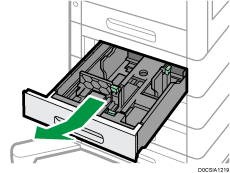
![]() Check that paper in the paper tray is not being used, and then pull the tray carefully out.
Check that paper in the paper tray is not being used, and then pull the tray carefully out.
![]() Remove paper if loaded.
Remove paper if loaded.
![]() While pressing down the release lever of the side fence, slide the side fences outward.
While pressing down the release lever of the side fence, slide the side fences outward.

![]() While pinching the release lever of the end fence, slide the end fence outward.
While pinching the release lever of the end fence, slide the end fence outward.

![]() Square the paper and load it print side up.
Square the paper and load it print side up.
Do not stack paper over the limit mark. If you load paper over the limit mark, the printed images may become slanted or a paper jam may occur.

![]() Align the back and side fences gently against the paper you loaded.
Align the back and side fences gently against the paper you loaded.

To load large sizes of paper, pull out the tray while pressing the release lever near the end fence.

To protect the paper when the tray is extended, place the tray cover over the extended section of the paper tray.

![]() Carefully slide the paper tray fully in.
Carefully slide the paper tray fully in.
![]()
When loading letterhead paper, confirm the orientation, face and back, or location of flaps.
Loading Paper into the Bypass Tray
Use the bypass tray to load paper of a size that cannot be loaded into Tray 1 to 5, such as label paper (adhesive labels).
The maximum number of sheets you can load into the bypass tray depends on the paper type.
Recommended Paper Sizes and Types
![]()
Do not stack paper over the limit mark. If you load paper over the limit mark, the print image may be slanted or the paper may be jammed.
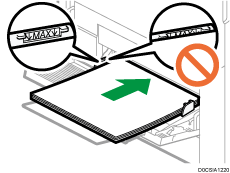
![]() Open the bypass tray.
Open the bypass tray.
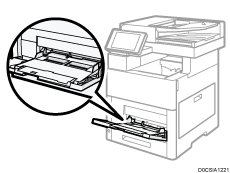
When loading paper larger than A4 or 81/2 × 11 size, pull out the extender.
![]() Load the paper with the print side up, and push it in lightly until you hear a beep.
Load the paper with the print side up, and push it in lightly until you hear a beep.
Fan sheets before loading so that multiple sheets of paper do not stick to each other and are not fed at once.
When loading envelopes or letterhead paper, confirm the orientation, face and back, or location of flaps.
![]() Align the paper guides to the paper size.
Align the paper guides to the paper size.
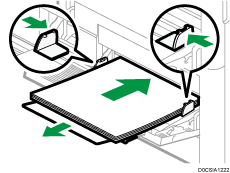
![]()
To load paper on the bypass tray, it is better to orient it in the direction of
 .
.You can change the beeper setting under [Touch/Notification Sound] in [Settings]
 [System Settings]
 [Sound].
Loading Paper into the Large Capacity Tray (LCT)
![]() Pull the tray out carefully until it stops.
Pull the tray out carefully until it stops.
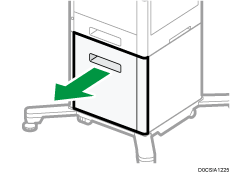
![]() Remove paper if loaded.
Remove paper if loaded.
![]() Align the fences to the paper size.
Align the fences to the paper size.
Press the lever on the top of each fence to take that fence out.
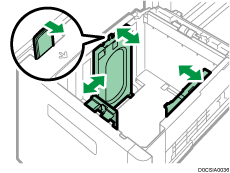
Fit the holes on the side of the fences to the A4 or LTR protrusions.
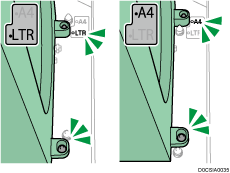
Attach the fences so they fit in their own lever's position.
![]() Load the paper with the print side up.
Load the paper with the print side up.
Do not stack over the limit mark.
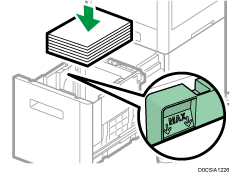
![]() Carefully slide the paper tray fully in.
Carefully slide the paper tray fully in.
Specifying the Paper Size That Is Not Automatically Detected
![]() Press [Settings] on the Home screen.
Press [Settings] on the Home screen.
![]() Press [Tray/Paper Settings].
Press [Tray/Paper Settings].
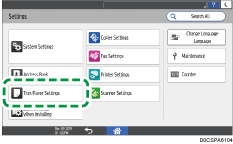
![]() Press [Paper Size/Paper Type]
Press [Paper Size/Paper Type] [Paper Size/Paper Type].
![]() Press the name of the tray on which the paper is loaded.
Press the name of the tray on which the paper is loaded.
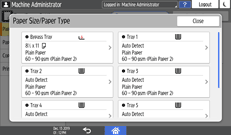
![]() Clear the [Apply Auto Paper Select/Auto Tray Select] check box, and then press [Paper Size].
Clear the [Apply Auto Paper Select/Auto Tray Select] check box, and then press [Paper Size].
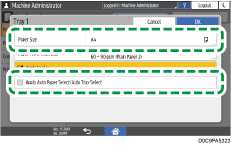
For the bypass tray, press [Paper Size: Printer].
![]() Select the size of the loaded paper from the list, and then press [OK]
Select the size of the loaded paper from the list, and then press [OK] [OK].
[OK].
![]() After completing the procedure, press [Home] (
After completing the procedure, press [Home] ( ).
).
Specifying Paper Type and Thickness Settings
If the print settings and the loaded paper that are used for a print job do not match, a mismatch error occurs.
Check and specify the paper settings before you start printing.
![]()
Before you change the settings, confirm the priority of the paper settings for printing (priority to the printer driver or to the control panel).
On the printer driver
Check the settings of paper tray and paper type on the printer driver and make sure the settings match the loaded paper.
On the control panel
![]() Press [Settings] on the Home screen.
Press [Settings] on the Home screen.
![]() Press [Tray/Paper Settings].
Press [Tray/Paper Settings].

![]() Press [Paper Size/Paper Type]
Press [Paper Size/Paper Type] [Paper Size/Paper Type].
![]() Press one tray to set.
Press one tray to set.

![]() Press [Paper Type/Thickness].
Press [Paper Type/Thickness].
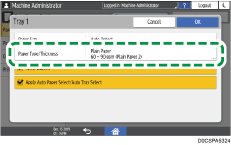
![]() Choose one paper type and paper thickness from the list shown, and then press [OK].
Choose one paper type and paper thickness from the list shown, and then press [OK].
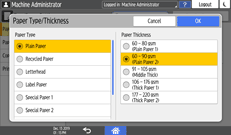
![]() Press [OK].
Press [OK].
![]() After completing the configuration, press [Home] (
After completing the configuration, press [Home] ( ).
).
