Installing the Printer Driver to Print Using the IPP Port
To print using the IPP port, install the printer driver from the [Devices and Printers] screen on the control panel.
![]() Display the [Devices and Printers] screen.
Display the [Devices and Printers] screen.
Windows 10 (version 1703 or later), Windows Server 2019
On the [Start] menu, click [Windows System]
 [Control Panel].
Click [View devices and printers].
Windows 10 (before version 1703), Windows Server 2016
Right-click [Start], and then click [Control Panel].
Click [View devices and printers].
Windows 8.1, Windows Server 2012/2012 R2
On the Charm Bar, click [Set]
 [Control Panel].
Click [View devices and printers].
Windows 7, Windows Server 2008 R2
On the [Start] menu, click [Devices and Printers].
Windows Server 2008
On the [Start] menu, click [Control Panel].
Click [Printer] on [Hardware and Sound].
![]() Click [Add a printer].
Click [Add a printer].
For Windows 7 and Windows Server 2008/2008 R2, click [Add a printer] and then [Add a network, wireless or Bluetooth printer].
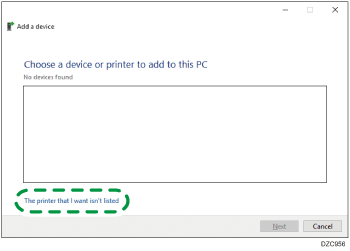
![]() Click [The printer that I want isn’t listed].
Click [The printer that I want isn’t listed].

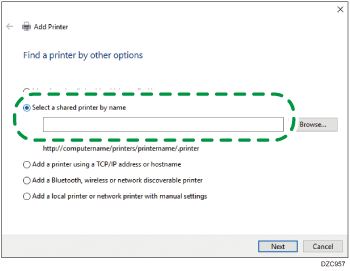
![]() Select [Select a shared printer by name], and then enter "http://(machine’s IP address)/printer" or "http://(machine’s IP address)/ipp".
Select [Select a shared printer by name], and then enter "http://(machine’s IP address)/printer" or "http://(machine’s IP address)/ipp".

![]() Click [Next].
Click [Next].
![]() Click [Have Disk...]
Click [Have Disk...]  [Browse...] to specify the driver (INF file), and then click [OK].
If the CD-ROM drive is D:\, the file is stored in the following folder:
Driver
OS
Folder
PCL 6
32-bit driver
D:\X86\DRIVERS\PCL6\X86\MUI\DISK1
64-bit driver
D:\X64\DRIVERS\PCL6\X64\MUI\DISK1
PostScript 3
32-bit driver
D:\X86\DRIVERS\PS\X86\MUI\DISK1
64-bit driver
D:\X64\DRIVERS\PS\X64\MUI\DISK1
The downloaded file is stored in the "DISK1" folder.
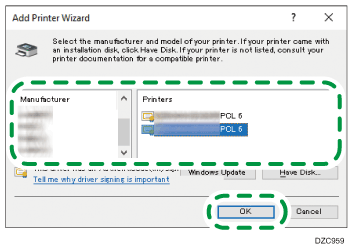
![]() Select a printer to install on the [Add Printer Wizard] screen, and then click [OK].
Select a printer to install on the [Add Printer Wizard] screen, and then click [OK].

![]() To specify the printer to use by default, select the check box of the printer, and then click [Finish].
To specify the printer to use by default, select the check box of the printer, and then click [Finish].
