Deleting the Driver (Windows)
To delete a driver installed on your computer, perform the following procedure from the Control Panel.
Deleting a Printer Driver
![]() Display the [Devices and Printers] screen.
Display the [Devices and Printers] screen.
Windows 10 (version 1703 or later), Windows Server 2019
On the [Start] menu, click [Windows System]
 [Control Panel].
Click [View devices and printers].
Windows 10 (before version 1703), Windows Server 2016
Right-click [Start], and then click [Control Panel].
Click [View devices and printers].
Windows 8.1, Windows Server 2012/2012 R2
On the Charm Bar, click [Set]
 [Control Panel].
Click [View devices and printers].
Windows 7, Windows Server 2008 R2
On the [Start] menu, click [Devices and Printers].
Windows Server 2008
On the [Start] menu, click [Control Panel].
Click [Printer] on [Hardware and Sound].
![]() Right-click the printer to be deleted, and then click [Remove Device] or [Remove].
Right-click the printer to be deleted, and then click [Remove Device] or [Remove].
When the confirmation dialog is displayed, click [Yes].
![]() Select a printer, and then click [Print server properties].
Select a printer, and then click [Print server properties].
For Windows Server 2008, right-click the area of the printer window, and then click [Running as Admin]
 [Server Properties].
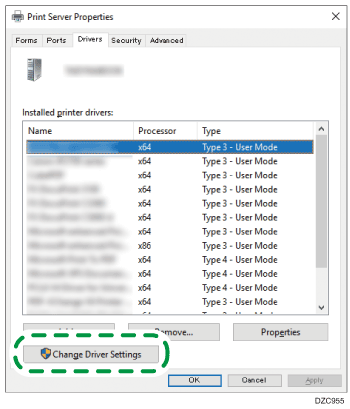
If [Change Driver Settings] is displayed on the [Print Server Properties] screen, click the button and proceed to the next step.

![]() Select the printer driver to be deleted on the [Drivers] tab, and then click [Remove...].
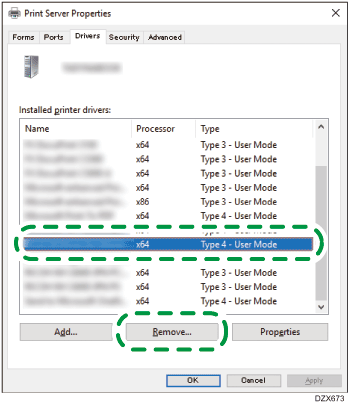
Select the printer driver to be deleted on the [Drivers] tab, and then click [Remove...].

![]() Select [Remove driver and driver package.], and then click [OK].
Select [Remove driver and driver package.], and then click [OK].
![]() When the confirmation dialog is displayed, click [Yes].
When the confirmation dialog is displayed, click [Yes].
![]() Click [Remove].
Click [Remove].
If the driver cannot be deleted, the other printer icon may be using the driver. First delete the printer icon that is using the driver, and then delete the driver.
![]() Click [OK] to close the property.
Click [OK] to close the property.
Deleting the TWAIN/WIA Driver
![]() Launch the uninstaller.
Launch the uninstaller.
Windows 10 (version 1703 or later), Windows Server 2019
On the [Start] menu, click [Windows System]
 [Control Panel].
Click [Uninstall a program].
Windows 10 (before version 1703), Windows Server 2016
Right-click [Start], and then click [Control Panel].
Click [Uninstall a program].
Windows 8.1, Windows Server 2012/2012 R2
On the Charm Bar, click [Set]
 [Control Panel].
Click [Programs and Features].
Windows 7, Windows Server 2008/2008 R2
On the [Start] menu, click [Control Panel].
Click [Uninstall a program].
![]() Select and right-click the TWAIN/WIA driver, and then click [Uninstall/Change] or [Uninstall].
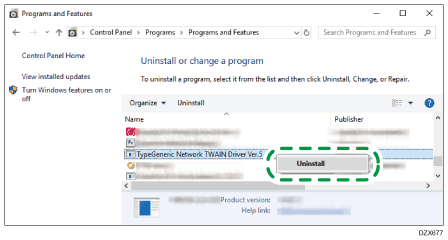
Select and right-click the TWAIN/WIA driver, and then click [Uninstall/Change] or [Uninstall].

![]() Follow the instructions on the screen to delete the driver.
Follow the instructions on the screen to delete the driver.
![]() Close the displayed screen.
Close the displayed screen.
Deleting a LAN-FAX Driver
![]() Display the [Devices and Printers] screen.
Display the [Devices and Printers] screen.
Windows 10 (version 1703 or later), Windows Server 2019
On the [Start] menu, click [Windows System]
 [Control Panel].
Click [View devices and printers].
Windows 10 (before version 1703), Windows Server 2016
Right-click [Start], and then click [Control Panel].
Click [View devices and printers].
Windows 8.1, Windows Server 2012/2012 R2
On the Charm Bar, click [Set]
 [Control Panel].
Click [View devices and printers].
Windows 7, Windows Server 2008 R2
On the [Start] menu, click [Devices and Printers].
Windows Server 2008
On the [Start] menu, click [Control Panel].
Click [Printer] on [Hardware and Sound].
![]() Right-click the printer to be deleted, and then click [Remove Device] or [Remove].
Right-click the printer to be deleted, and then click [Remove Device] or [Remove].
When the confirmation dialog is displayed, click [Yes].
![]() Select a printer, and then click [Print server properties].
Select a printer, and then click [Print server properties].
For Windows Server 2008, right-click the area of the printer window, and then click [Running as Admin]
 [Server Properties].
If [Change Driver Settings] is displayed on the [Print Server Properties] screen, click the button and proceed to the next step.

![]() Select the printer driver to be deleted on the [Drivers] tab, and then click [Remove...].
Select the printer driver to be deleted on the [Drivers] tab, and then click [Remove...].

![]() Select [Remove driver and driver package.], and then click [OK].
Select [Remove driver and driver package.], and then click [OK].
![]() When the confirmation dialog is displayed, click [Yes].
When the confirmation dialog is displayed, click [Yes].
![]() Click [Remove].
Click [Remove].
![]() Click [OK]
Click [OK]  [Close] to close the property.
