Sharing the Printer on Print Server
You can print from another computer on the network using the port on a print server. The machine does not need to be connected to the network when printing.

To use a Windows print server, specify the printer share settings on the print server, and then install the printer driver to the machine.
To use other print servers, see the operation manual for the print server.
 Log on to Windows of the server computer as an administrator, and install the printer driver.
 Display the [Devices and Printers] dialog box.
Windows 10 (version 1703 or later), Windows Server 2019
On the [Start] menu, click [Windows System]
 [Control Panel].
Click [View devices and printers].
Windows 10 (earlier than version 1703), Windows Server 2016
Right-click [Start], and then click [Control Panel].
Click [View devices and printers].
Windows 8.1, Windows Server 2012/2012 R2
On the Charm Bar, click [Set]
 [Control Panel].
Click [View devices and printers].
Windows 7, Windows Server 2008 R2
On the [Start] menu, click [Devices and Printers].
Windows Server 2008
On the [Start] menu, click [Control Panel].
Click [Printer] on [Hardware and Sound].
 Right-click the machine's icon, and then click [Printer properties].
For Windows Server 2008, right-click the printer's icon, and then click [Properties].
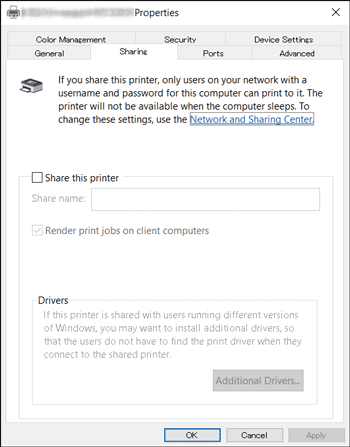
 Select the [Share this Printer] check box on the [Sharing] tab.

 To share the printer with the user who uses Windows of the other version, click [Additional Drivers].
When you select the [Shared] check box to install alternative driver, this procedure is not required.
 Click [OK] to close the Printer Properties screen.

The printer driver must be installed on the client computer.
