Scanning Documents into a Computer Application Using WSD
Use the WSD scanner on a computer to scan the original placed on the machine and save or print the scanned data as an image.
Connect the machine to the network in advance.

Connect the machine and computer in the same network segment as shown below.
The IP addresses of the machine and computer match except in the last number "ddd" in "aaa.bbb.ccc.ddd"
The machine is connected via the link local address when using IPv6
Registering the Machine as a WSD Scanner on the Computer
To use the WSD scanner, enable WSD in Web Image Monitor and register the machine on the computer in advance.
Enabling WSD in Web Image Monitor
 Log in to Web Image Monitor as the administrator.
 Click [Configuration] from the [Device Management] menu.
 Click [Initial Settings] in [Scanner].
 Specify [WSD] in [Use WSD or DSM].
 Select [Do not Prohibit] in [Prohibit WSD Scan Command] and then click [OK].
 Click [IPv4] under [Network].
 Specify the settings for [WSD (Device)] and [WSD (Scanner)].
When using IPv4 as the protocol, select [Active].
When using IPv6 as the protocol, select [Inactive].
 Click [OK], and then close the Web browser.
Register the machine on the computer
 Log in to the computer as a member of the Administrator group.
 Register the machine on the computer.
A profile (scan settings) is created automatically when the machine is registered.
Windows Server 2019
On the [Start] menu, click [Windows System]
 [Control Panel].
Click [View devices and printers].
Click [Add a printer].
Select the machine, and then click [Next].
Windows 8.1 or later, Windows Server 2012/2012 R2, Windows Server 2016
Click [Add a printer] in [Devices and Printers] in [Control Panel], select the machine, and then click [Next].
Windows Server 2008 R2
Click [Start]
 [Computer]
  [Network].
You cannot register the machine if Network Search is disabled in Windows. If a message appears at the top of the network screen and the devices connected to the network are not displayed, follow the instruction in the message to enable Network Search.
Right-click the icon of the machine and then click [Install].
Basic Procedure for Using the WSD Scanner
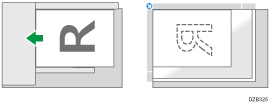
 Place the original on the scanner in an unreadable orientation.

 Display the [Windows Fax and Scan] screen on the computer.
Windows 10, Windows Server 2016
Click [Start]  [Windows Accessories]
  [Windows Fax and Scan].
Windows 8.1, Windows Server 2012/2012 R2
Click [Start] 

 [Windows Fax and Scan] on the charm bar.
Windows Server 2008 R2
Click [Start]  [All programs]
  [Windows Fax and Scan].
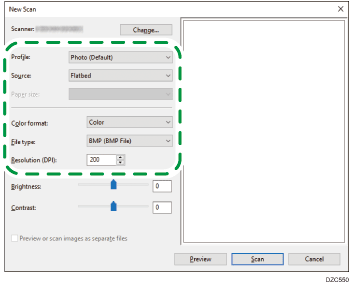
 Click [New Scan] on the tool bar of the [Windows Fax and Scan] screen.

If the machine model is not displayed in [Scanner:], click [Change] and select the machine.
 Change the scan settings as required.

Profile: Select a profile (scan settings).
Source: Select the location to place the original. Select [Flatbed] when placing the original on the exposure glass. Select [Feeder (Scan one side)] or [Feeder (Scan both sides)] when placing it in the ADF.
Paper size: Specify the original size when selecting [Feeder (Scan one side)] or [Feeder (Scan both sides)] in [Source]. An original placed on the exposure glass is scanned at the maximum size that can be scanned.
[Brightness] / [Contrast]: Cannot be used on the machine.
 Click [Scan].
Click [Scan] once to scan a single sheet of the original.
When selecting [Feeder (Scan both sides)] is selected in [Source], click the button once to scan both sides (two pages) of the original.
 Specify a name and save the scanned image, or send the image using fax, e-mail, or other means.

A profile is created automatically when a device is registered. Register the frequently used scan settings as a profile to apply the settings in a batch when scanning an original by selecting the profile.
Display the device list from the Control Panel in Windows.
Right-click the machine icon and select [Scan Profile...].
Add, edit, or delete a profile.
You can register multiple profiles. If multiple profiles are registered, the profile specified as default in the [Scan Profiles] dialog box is applied.
To specify a scan profile as the default profile, perform one of the following procedures:
In the [Scan Profiles] dialog box, click the scan profile, and then click [Set as Default].
After you create a new scan profile, in the [Add New Profile] dialog box, select the [Set this profile as default] check box.
You cannot scan another original while the machine is sending the scanned image.
Pages in a two-sided original are scanned as "Top to Top".
You cannot use the auto blank page detection function when using WSD.
If scanning takes too long, the computer might time out and display the error message "Automatic Scanning could not be completed" on the computer screen. If this happens, change the scan settings or scan the originals one side at a time.
In the profile settings, if you select [Feeder (Scan one side)] for [Source], only one side will be scanned per operation. If you select [Feeder (Scan both sides)] for [Source], two sides will be scanned per operation.
Transmission results of WSD scanning jobs do not appear in File Status.
