If a Message is Displayed and the Printer Driver Cannot Be Installed
The solution for the problem varies depending on the displayed message. For the displayed messages and their solutions, see the following sections:
When "There is a Job printing now." is Displayed
Delete the printing job following the procedures described below, and then install the printer driver again.

Administrator permission is required to stop the Print Spooler. Log on as an Administrators group member.
 Display the "Devices and Printers" screen.
Windows 10 (version 1703 or later), Windows Server 2019
On the [Start] menu, click [Windows System]
 [Control Panel].
Click [View devices and printers].
Windows 10 (earlier than version 1703), Windows Server 2016
Right-click [Start], and then click [Control Panel].
Click [View devices and printers].
Windows 8.1, Windows Server 2012/2012 R2
On the Charm Bar, click [Set]
 [Control Panel].
Click [View devices and printers].
Windows Server 2008 R2
On the [Start] menu, click [Devices and Printers].
 Right-click the printer on which a printing job is remaining, and then click [See what’s printing].
 Select the remaining job, and click [Document]
  [Cancel].
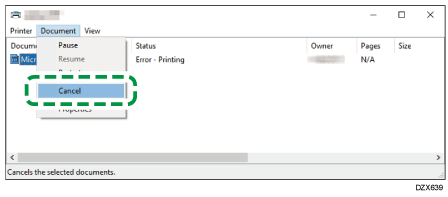
 On the screen confirming whether to cancel the job, click [Yes].
 Close the print job screen and the properties.
If the job was deleted in Step 4, the procedure is completed.
If the job was not deleted, proceed to the next step.
 Right-click [Start], and then click [Computer Management].
 Click [Services and Applications], and double-click [Services].
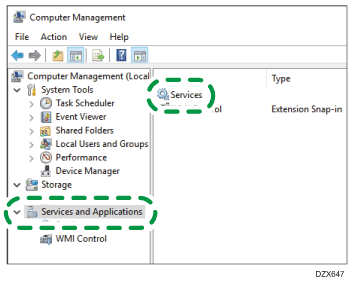
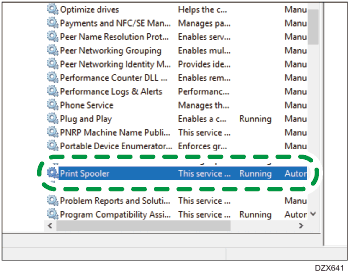
 On the "Services" or "Service (Local)" screen, double-click [Print Spooler].
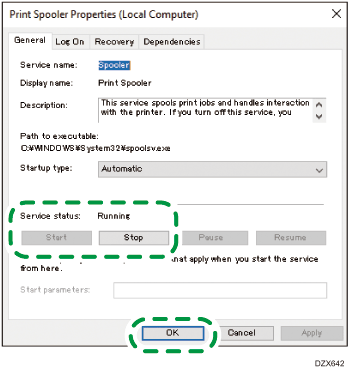
 Click [Stop], confirm that "Service status" has changed to "Stopped", and then click [OK].
Keep the "Service" or "Service (Local)" screen opened and proceed to the next step.
 While holding down the [Windows] key on the keyboard, press the [R] key.
 On the "Run" screen, enter [spool], and then click [OK].
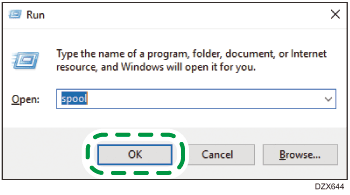
 Double-click the [PRINTERS] folder.
If "You don't currently have permission to access this folder." is displayed, click [Continue].
 Delete all files.
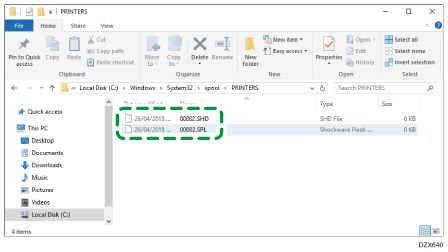
 Close the [PRINTERS] folder screen.
 Return to the "Service" or "Service (Local)" screen, and then double-click [Print Spooler].
 Click [Start], confirm that "Service status" has changed to "Running", and then click [OK].
 Close the all opened screens.
When "There is already a more recent version of this Driver installed on the system." is Displayed
If installing the driver using the provided CD-ROM fails, download the latest printer driver from the manufacturer's website, and install it.
When "Failed to add Language Monitor." is Displayed
This message is displayed when you are installing a printer driver that is not supported by the operating system of your computer. Download and install the printer driver that corresponds to the operating system and version from the manufacturer's website.
If the Displayed Message Does Not Match Any of Those Explained in This Section
Download the latest printer driver from the manufacturer's website, and install it from "Add printer".
Downloading the printer driver
 Download the latest driver from the manufacturer's website.
 Double-click the downloaded file.
If the "Security Warning" screen is displayed, click [OK].
If the "User Account Control" screen is displayed, click [Yes] or [Allow].
 Click [Cancel] to exit the installer.
Installing the printer driver on [Add a printer]
 Display the "Devices and Printers" screen.
Windows 10 (version 1703 or later), Windows Server 2019
On the [Start] menu, click [Windows System]
 [Control Panel].
Click [View devices and printers].
Windows 10 (earlier than version 1703), Windows Server 2016
Right-click [Start], and then click [Control Panel].
Click [View devices and printers].
Windows 8.1, Windows Server 2012/2012 R2
On the Charm Bar, click [Set]
 [Control Panel].
Click [View devices and printers].
Windows Server 2008 R2
On the [Start] menu, click [Devices and Printers].
 Click [Add a printer].
For Windows Server 2008 R2, click [Add a printer]
 [Add a network, wireless or Bluetooth printer].
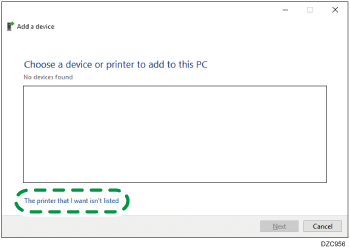
 Click [The printer that I want isn’t listed].
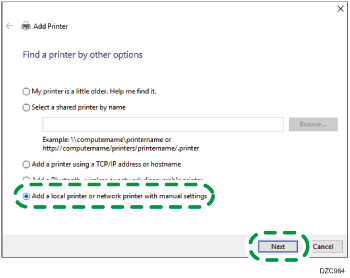
 Select [Add a local printer or network printer with manual settings], and then click [Next]
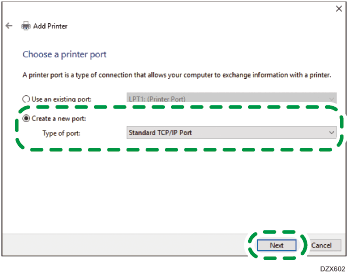
 Select [Standard TCP/IP Port] on [Create a new port:], and then click [Next].
 Enter the IP address of this machine in [Host Name or IP address].
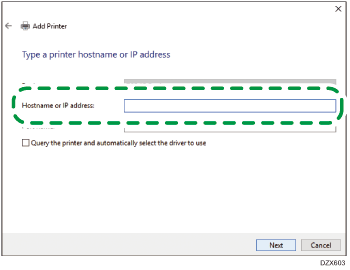
 Clear the "Query the printer and automatically select the driver to use" check box, and then click [Next].
Searching for the TCP/IP port starts.
If [Additional port information required] is displayed, confirm that the machine is turned on, or the specified IP address is correct, select [RICOH Network Printer C model] in [Device Type], and then click [Next].
 Click [Have Disk...]
  [Browse...] to specify the driver (INF file), and then click [OK].
The driver is stored in the [DISK1] folder in the folder that was created when unzipping the downloaded file.
 Select a printer driver to install, and then click [Next].
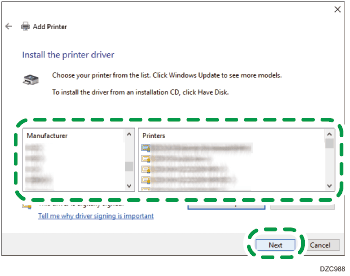
 Enter the printer name as necessary, and then click [Next].
Printer driver installation starts.
 Specify the printer as a shared printer as necessary, and then click [Next]
  [Finish].
