Installing the Printer Driver to Print Using the IPP Port
To print using the IPP port, install the printer driver from the "Devices and Printers" screen on the control panel.
 Display the "Devices and Printers" screen.
Windows 10 (version 1703 or later), Windows Server 2019
On the [Start] menu, click [Windows System]
 [Control Panel].
Click [View devices and printers].
Windows 10 (earlier than version 1703), Windows Server 2016
Right-click [Start], and then click [Control Panel].
Click [View devices and printers].
Windows 8.1, Windows Server 2012/2012 R2
On the Charm Bar, click [Set]
 [Control Panel].
Click [View devices and printers].
Windows Server 2008 R2
On the [Start] menu, click [Devices and Printers].
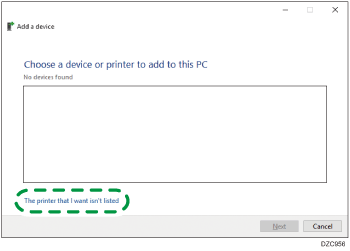
 Click [Add a printer].
For Windows Server 2008 R2, click [Add a printer] and then [Add a network, wireless or Bluetooth printer].
 Click [The printer that I want isn’t listed].

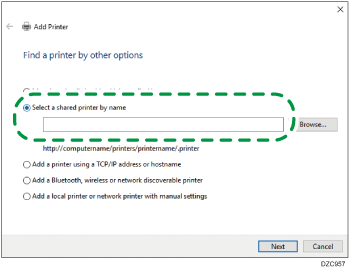
 Select [Select a shared printer by name], and then enter "http://(machine’s IP address)/printer" or "http://(machine’s IP address)/ipp".

 Click [Next].
 Click [Have Disk...]
  [Browse...] to specify the driver (INF file), and then click [OK].
If the CD-ROM drive is D:\, the file is stored in the following folder:
Driver
OS
Folder
PCL 6
32-bit driver
D:\Windows\X86\DRIVERS\PCL6\X86\MUI\DISK1
64-bit driver
D:\Windows\X64\DRIVERS\PCL6\X64\MUI\DISK1
PostScript 3
32-bit driver
D:\Windows\X86\DRIVERS\PS\X86\MUI\DISK1
64-bit driver
D:\Windows\X64\DRIVERS\PS\X64\MUI\DISK1
The downloaded file is stored in the "DISK1" folder.
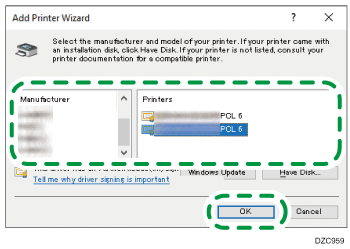
 Select a printer to install on the "Add Printer Wizard" screen, and then click [OK].

 To specify the printer to use by default, select the check box of the printer, and then click [Finish].
