Installing the Printer Driver by Using Device Software Manager Installer
Device Software Manager is a support utility for driver installation in Windows. Device Software Manager helps you to detect the latest driver via the internet automatically according to the computer you are using and install it with a simple procedure.

Manage Printers permission is required to install the drivers. Log on as an Administrators group member.
Device Software Manager supports Windows OS only. To install the printer driver on Mac OS, see the following sections:
Installing the Printer Driver for Network Connection (macOS)
Follow the instructions of the installer to connect the USB cable.
Installing Device Software Manager from the CD-ROM
 Set the CD-ROM in the computer.
If the installer does not start automatically, double-click [Setup.exe] in the Windows folder of the CD-ROM.
 Select a language, and then click [OK].
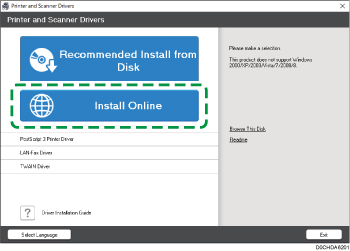
 Click [Install Online].
 Click [Accept Agreement and Install] on the "License Agreement" screen.
 On the "Quality Improvement Program" screen, select [I will participate in the Quality Improvement Program] or [I will not participate in the Quality Improvement Program], and then click [Next].
 On the "Driver Update Notification Setting" screen, specify whether to display the message about the driver update, and then click [Next].
The process of installing Device Software Manager starts.
 Select the connection between the machine and computer, and then click [Next].
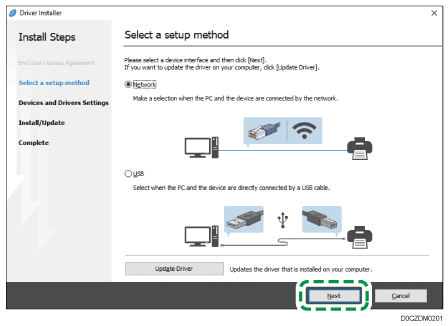
Network: Search for devices connected to the network.
USB: Following the instructions on the "Connection with device" screen, connect the machine and the computer with the USB cable to search for the machine.
 Select this machine from among the detected devices, and then click [Next].
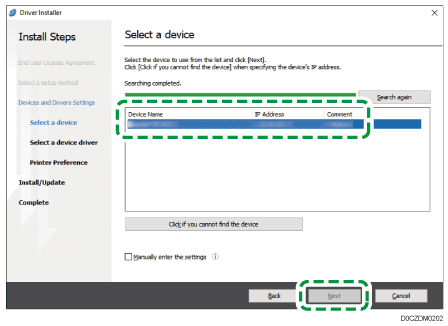
The installation of the driver starts.
If "Could not verify publisher" is displayed at the beginning of installation, continue the installation.
When you connect the machine and the computer with a USB cable, follow the instructions on the installer screen.
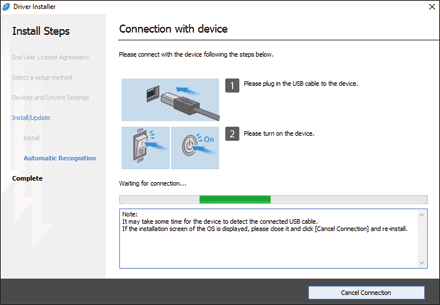
If the machine is not detected, click [Cancel Connection]. Even if the connection is canceled, the installation is complete. After the installer screen is closed, the machine is added automatically when it is connected to the computer with the USB cable.
 When the installation is complete, click [Finish].
When you are prompted to restart your computer, restart it by following the instructions that appear.

After completing the installation, Device Software Manager icon is created on the desktop screen.

You can update the installed printer driver with Device Software Manager.
If the "User Account Control" dialog box appears during the driver installation procedure, click [Yes] or [Continue].
If the "Windows Security" dialog box appears during the driver installation procedure, click [Install this driver software anyway].
Installing Device Software Manager from the Downloaded File
 Double-click the downloaded file.
 Select the [Run Driver Installer after installation] check box, and then click [Accept Agreement and Install].
 On the "Quality Improvement Program" screen, select [I will participate in the Quality Improvement Program] or [I will not participate in the Quality Improvement Program], and then click [Next].
 On the "Driver Update Notification Setting" screen, specify whether to display the message about the driver update, and then click [Next].
The process of installing Device Software Manager starts.
 On the "End User License Agreement" screen, click [Agree and Go to Next].
 Select the connection between the machine and computer, and then click [Next].
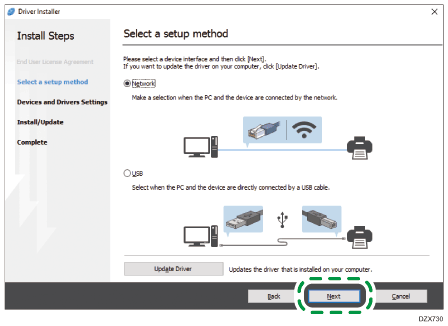
Network: Search for devices connected to the network.
USB: Following the instructions on the "Connection with device" screen, connect the machine and the computer with the USB cable to search for the machine.
 Select this machine from among the detected devices, and then click [Next].

The installation of the driver starts.
If "The publisher could not be verified" is displayed at the beginning of installation, continue the installation. There is no problem with the started installer that is downloaded from the manufacturer's website. Continue the installation.
When you connect the machine and the computer with a USB cable, follow the instructions on the installer screen.

If the machine is not detected, click [Cancel Connection]. Even if the connection is canceled, the installation is complete. After the installer screen is closed, the machine is added automatically when it is connected to the computer with the USB cable.
 When the installation is complete, click [Finish].

Double-click the Device Software Manager icon created on the Finder of the computer to update the printer driver.

