Operating the Machine from a Smart Device
RICOH Smart Device Connector is an application that allows you to use the machine to print data that is stored in a smart device, or to fax or e-mail data that is stored in a smart device. You can also send or copy data scanned on the machine to a smart device.
You can download data from RICOH e-Sharing Box or cloud-based data storage services, such as Google Drive and Dropbox, and then print it on the machine or send it by fax or e-mail from the machine.
You can register frequently used machine settings on a smart device.
To use RICOH Smart Device Connector, access the App Store or Google Play with your smart device, search for and download the "RICOH Smart Device Connector" application from the site.
Preparing the Printer for Use with RICOH Smart Device Connector
Before using the printer with RICOH Smart Device Connector, configure the printer accordingly.
Install a Device Certificate on the printer and configure SSL/TLS Encryption Mode. If an access point in the intranet is not available, configure the access point function that is built into the printer.
For details about installing a Device Certificate and configuring SSL/TLS Encryption Mode, see Web Image Monitor Help.
![]()
To specify the SSL/TLS Encryption Mode, configure [Permit SSL/TLS Communication] according to the communication type as follows:
When using a HTTP connection: Ciphertext/Cleartext
When using a HTTPS connection: Ciphertext Priority
To disable "TLS1.2", "TLS1.1", or "SSL3.0", log in to Web Image Monitor as a network administrator, click [Configuration] under [Device Management], and then select [Inactive] for the protocol to be disabled under [SSL/TLS]. Enter at least one of these protocols. However, do not enable only "SSL 3.0". Data leaks may occur.
Connecting the Machine and a Smart Device
To connect the machine and a smart device, you can use the methods as follows:
Connecting via Bluetooth Low Energy (BLE)
Hold your smart device close to the label on the control panel to establish a connection via BLE.
Settings screen type: Standard
Settings screen type: Classic
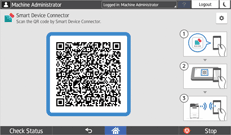
Scanning the QR code
Scan the QR code that appears on the machine's control panel. For details about how to display the QR code on the control panel, see the manuals for RICOH Smart Device Connector.

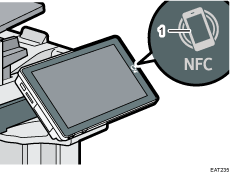
Touching the NFC tag
Touch the NFC tag on the machine with the device.

NFC tag
For details about RICOH Smart Device Connector, see the manuals for RICOH Smart Device Connector.
Searching for the machine on Bonjour
Search for the machine on Bonjour using RICOH Smart Device Connector.
For details, see the manuals for RICOH Smart Device Connector.
Specifying the machine's IP address and hostname
Specify the machine's IP address and hostname using RICOH Smart Device Connector.
For details, see the manuals for RICOH Smart Device Connector.
![]()
You can limit users who can access the machine using RICOH Smart Device Connector by enabling user authentication (Basic Authentication) and registering the user names and passwords.
The [Connector] icon is displayed in the Application list.
Adding a Frequently Used Application or Widget to the Home Screen
