Specifying Maximum Print Volume Use of Each User
You can specify print volume limits in the machine for each user registered in the address book. If the total print volume reaches the specified maximum, the print jobs are canceled.
Print Volume Use
How to count Print Volume Use
The print volume is calculated by multiplying the number of pages by a unit count.
The unit count can be specified according to the printing condition. For example, if two pages are printed with a unit count of 5, the print volume would be 10.
You can specify the unit count for each paper size.
How to check the print volume use counter
The way of checking by the administrator differs from the way by the users.
The administrator can check the print volume use counter from [Administrator Tools].
The users can check the print volume use counter on the pop-up screen displayed when logging in. The print volume use counter is displayed on top right of the screen during logging in.
Printing whose volume cannot be limited
Print volume are not limited in the following operations:
Printing from an operating system that does not support the current authentication method.
Printing of a file attached to an e-mail received in the machine
Printing of receiving faxes and LAN-Fax data
![]()
When specifying Print Volume Use, if the login user name or user code registered in the address book is changed while the user is logged in, printing is not possible.
Under Windows or LDAP authentication, do not register the same login user name or password for multiple users registered in the address book. The print volume limits are not applied to these users.
The maximum print volume use is not applied to output from Mac/Linux.
When User Code Authentication Is Enabled
Specify "Functions to Restrict" of "User Authentication Management" to restrict all functions. The user code authentication is not applied to the functions that are not restricted. Users before logging in can print regardless of the print volume limits.
Do not select PC Control in the Printer function of "Functions to Restrict" of "User Authentication Management". Print volume limit setting is not applied to users whose user codes are registered automatically by the printer driver.
When User Code Authentication is enabled, the maximum print volume and total print volume are not displayed on the screen, and users cannot check the total print volume by themselves. The administrator needs to inform users about their total print volume.
No log data about print use limits is recorded in the Job log or Access log.
![]()
To check "Functions to Restrict" of "User Authentication Management", press [Administrator Tools] tab,
 [User Authentication Management]
 [User Code Authentication].
Limiting Print Volume
The following settings are necessary to limit print volume.
[Machine action when limit is reached]: Specify whether to continue printing when print volume reaches its maximum.
[Print Volume Use Limitation: Unit Count Setting]: Specify the functions to restrict print volume and specify the count unit.
[Print Volum. Use Limit.: Default Limit Value]: Specify the default value of the maximum print volume.
![]() Log in to the machine as the machine administrator on the control panel.
Log in to the machine as the machine administrator on the control panel.
![]() On the Home screen, press [Settings].
On the Home screen, press [Settings].
![]() Press [Machine Features Settings].
Press [Machine Features Settings].
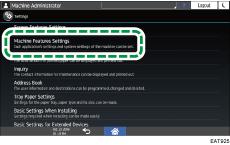
![]() Press [System Settings]
Press [System Settings] [Administrator Tools] tab
  [Machine action when limit is reached].
![]() Select the machine action when total print volume reaches the maximum.
Select the machine action when total print volume reaches the maximum.
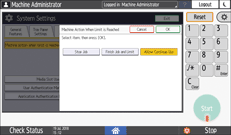
Stop Job: Both the current job and waiting jobs are canceled.
Finish Job and Limit: The current job is completed but waiting jobs are canceled.
Allow Continue Use: Specifies no limitation for print volumes.
![]() Press [OK].
Press [OK].
The configuration of "Machine action when limit is reached" is completed. Proceed to the configuration to restrict print volume and to specify the count unit.
![]() Press [Print Volume Use Limitation: Unit Count Setting].
Press [Print Volume Use Limitation: Unit Count Setting].
![]() Select the functions to restrict, and then enter count units.
Select the functions to restrict, and then enter count units.
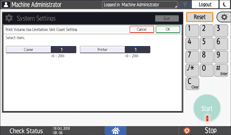
For example, if you specify "0" for the printer condition, no volume limit is applied to jobs matching that condition.
![]() Press [OK].
Press [OK].
The configuration of "Print Volume Use Limitation: Unit Count Setting" is completed. Proceed to the configuration of the default maximum use count.
![]() Press [Print Volum. Use Limit.: Default Limit Value].
Press [Print Volum. Use Limit.: Default Limit Value].
![]() Enter a count unit as the maximum print volume, and then press [#].
Enter a count unit as the maximum print volume, and then press [#].
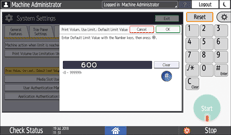
![]() Press [OK].
Press [OK].
The configuration of "Print Volum. Use Limit.:Default Limit Value" is completed.
![]() After completing the configuration, press [Home] (
After completing the configuration, press [Home] ( ).
).
Specifying the Maximum Use Count per User
Specify whether to restrict the print volume of the users registered in the address book, and specify the maximum print volume per user.
![]() Log in to the machine as the user administrator on the control panel.
Log in to the machine as the user administrator on the control panel.
![]() On the Home screen, press [Address Book].
On the Home screen, press [Address Book].
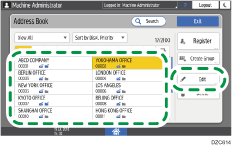
![]() On the Address Book screen, select a user to restrict print volume use, and then press [Edit].
On the Address Book screen, select a user to restrict print volume use, and then press [Edit].
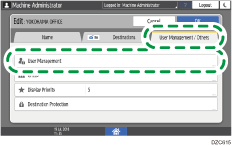
![]() Press [User Management] of the [User Management / Others] tab.
Press [User Management] of the [User Management / Others] tab.
![]() Press [Print Vol. Use Limitation].
Press [Print Vol. Use Limitation].
![]() Specify Print Volume Use Limitation and Maximum Unit Count, and then press [OK].
Specify Print Volume Use Limitation and Maximum Unit Count, and then press [OK].
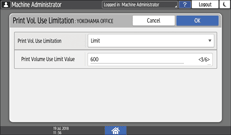
Enter the maximum print volume of the selected user in Maximum Unit Count.
![]() After completing the configuration, press [Home] (
After completing the configuration, press [Home] ( ).
).
Resetting Print Volume Use Counter Regularly
Specify the frequency to reset the print volume use counter on [Volume Use Counter: Scheduled/Specified Reset Settings].
![]() Log in to the machine as the machine administrator on the control panel.
Log in to the machine as the machine administrator on the control panel.
![]() On the Home screen, press [Settings].
On the Home screen, press [Settings].
![]() Press [Machine Features Settings].
Press [Machine Features Settings].

![]() Press [System Settings]
Press [System Settings] [Administrator Tools] tab
  [Volume Use Counter: Scheduled/Specified Reset Settings].
![]() Select the frequency to reset the print volume use counter.
Select the frequency to reset the print volume use counter.
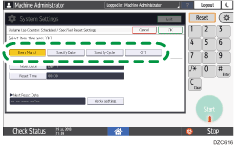
Every Month: Resets the print volume at the specified time and date each month.
Specify Date: Resets the print volume at the specified time and date only once.
Specify Cycle: Resets after the specified interval from a reference date, then reset thereafter at the same interval.
Off: The print volume use counter is not reset regularly. Reset the print volume use counter manually as necessary.
![]() Specify the date and time to reset, and then press [Apply Settings].
Specify the date and time to reset, and then press [Apply Settings].
![]() Press [OK].
Press [OK].
![]() After completing the configuration, press [Home] (
After completing the configuration, press [Home] ( ).
).
