Printing on Custom-sized Paper Loaded on the Bypass Tray
You can specify an irregular size paper as a "custom size" to print a document.
You can also register a custom paper size that is commonly used.
Registering a Custom Size That Is Commonly Used (Windows)
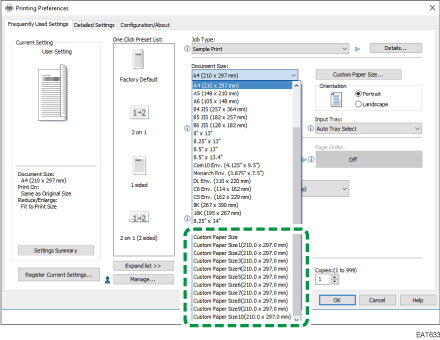
After registering the custom size in the printer driver, you can select the registered custom size from "Document Size:" on the Print Settings screen. You need not enter the paper size each time.
![]()
In OS X and macOS, you need not register the custom size in advance, as you can specify and register it on the Printer Settings screen.
![]() On [Devices and Printers], right-click the icon of the printer to use, and then click [Printer properties].
On [Devices and Printers], right-click the icon of the printer to use, and then click [Printer properties].
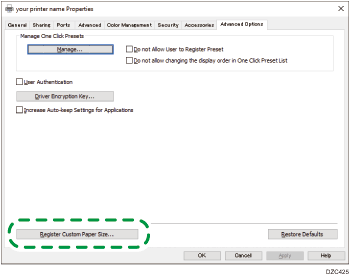
![]() Click the [Advanced Options] tab, and then click [Register Custom Paper Size...].
Click the [Advanced Options] tab, and then click [Register Custom Paper Size...].
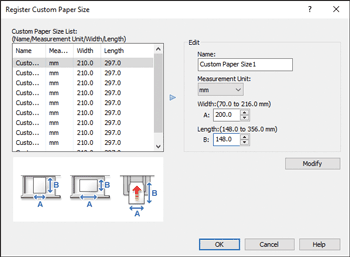
![]() Select the setting item in which to register the custom size from "Custom Paper Size List:".
Select the setting item in which to register the custom size from "Custom Paper Size List:".
![]() Enter the name of the custom size and its values, and then click [Modify].
Enter the name of the custom size and its values, and then click [Modify].
![]() Click [OK].
Click [OK].
After registering the custom size, you can select it from "Document Size:" of the printer driver.
Specifying the Custom Size to Print (Windows)
You can specify a registered custom size or enter a custom size that is not registered.
![]() Load paper into the bypass tray with the print side facing up.
Load paper into the bypass tray with the print side facing up.
![]() Open a document to print on the computer, and display the setting screen of the printer driver from the print menu in the application.
Open a document to print on the computer, and display the setting screen of the printer driver from the print menu in the application.
![]() Specify Paper Type, Orientation, and other settings.
Specify Paper Type, Orientation, and other settings.
![]() In "Input Tray:", select [Bypass Tray].
In "Input Tray:", select [Bypass Tray].
![]() In "Document Size:", specify the paper size.
In "Document Size:", specify the paper size.
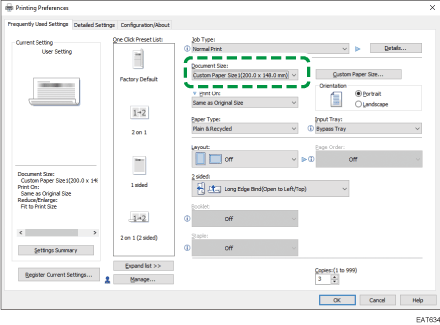
To select the custom size registered in [Printer Properties], click "Document Size:" and select the custom size.
To specify a custom size that is not registered, click [Custom Paper Size...] and then enter the paper size.
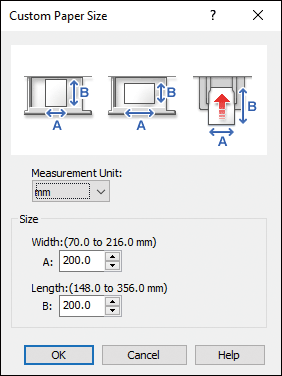
After entering the value, click [OK]. [Document Size:] is changed to the custom size.
![]() After completing the configuration, click [OK].
After completing the configuration, click [OK].
![]() On the application, click the button for printing.
On the application, click the button for printing.
The machine prints the document on the paper of the paper size and type specified in the printer driver.
After printing is completed, the paper size setting is restored to the previous values.
Specifying the Custom Size (OS X/macOS)
Specify the settings in [Paper] on "Feature Sets" of [Printer Features].
![]() Load paper into the bypass tray with the print side facing up.
Load paper into the bypass tray with the print side facing up.
![]() Open a document to print on the computer, and display the setting screen of the printer driver from the print menu in the application.
Open a document to print on the computer, and display the setting screen of the printer driver from the print menu in the application.
![]() Specify Orientation, Paper Type, and other settings.
Specify Orientation, Paper Type, and other settings.
![]() In [Paper Feed], select [Bypass Tray] from "All Pages From".
In [Paper Feed], select [Bypass Tray] from "All Pages From".
![]() In [Paper Size], select [Manage Custom Sizes...].
In [Paper Size], select [Manage Custom Sizes...].
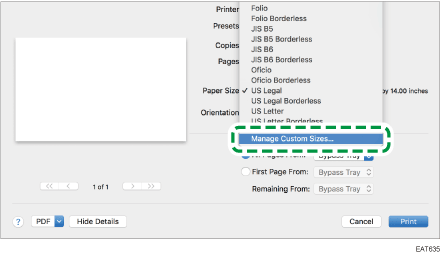
![]() On the custom size management screen, click [
On the custom size management screen, click [![]() ] and register the custom size, and then click [OK].
] and register the custom size, and then click [OK].
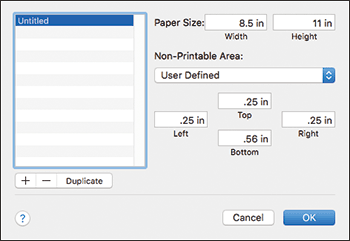
Untitled: Enter the name to register the custom size.
Paper Size: Enter [Width] and [Height] of the paper loaded in the bypass tray.

Non-Printable Area: Specify margins. Selecting the name of the machine shows the minimum margins required for the machine when printing. You can also enter values for the margins on each of the four edges.
![]() After completing the configuration, click [Print].
After completing the configuration, click [Print].
The machine prints the document with the paper size and paper type specified in the printer driver.
After completing the print, the paper size setting restores the previous contents.
