Deleting an Unused Printer Port
Display [Printer Properties] to delete a printer port that is not used. If you cannot delete the port, delete it on [Server Properties].
![]()
The port may be used from an application other than the printer. Be careful not to unintentionally delete a port used by the other applications.
![]()
The LPT, COM, FILE, and USB ports cannot be deleted.
![]() Display the "Devices and Printers" screen.
Display the "Devices and Printers" screen.
Windows 10 (version 1703 or later), Windows Server 2019
On the [Start] menu, click [Windows System]
 [Control Panel].
Click [View devices and printers].
Windows 10 (earlier than version 1703), Windows Server 2016
Right-click [Start], and then click [Control Panel].
Click [View devices and printers].
Windows 8.1, Windows Server 2012/2012 R2
On the Charm Bar, click [Set]
 [Control Panel].
Click [View devices and printers].
Windows 7, Windows Server 2008 R2
On the [Start] menu, click [Devices and Printers].
Windows Server 2008
On the [Start] menu, click [Control Panel].
Click [Printer] on [Hardware and Sound].
![]() Right-click a printer, and then click [Printer Properties].
Right-click a printer, and then click [Printer Properties].
For Windows Server 2008, right-click the machine, and then click [Properties].
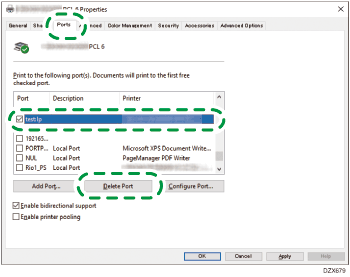
![]() Select the check box of the port to delete on the [Ports] tab, and then click [Delete Port]
Select the check box of the port to delete on the [Ports] tab, and then click [Delete Port]  [OK].
[OK].

If the port is not deleted
The port whose name is displayed in the printer column on the [Port] tab is assigned to the printer and cannot be deleted.
Confirm whether the printer is used for printing or sending (the port is used). After confirming that the port is not in use and can be safely deleted, change the port assignment, and then follow the procedure described below to delete the port.
If the port to delete is assigned to the printer whose properties screen is currently being displayed, select the check box of another port, and then click [Apply].
If the port to delete is assigned to another printer, open the properties screen of that printer, select the check box of another port on the [Port] tab, and then click [Apply].
![]() Close the Properties screen being displayed.
Close the Properties screen being displayed.
If you cannot delete the port by following the procedures described above, proceed to the next step.
![]() Select a printer on the [Devices and Printers] screen, and then click [Print server properties].
Select a printer on the [Devices and Printers] screen, and then click [Print server properties].
For Windows Server 2008, right-click the area of the printer window, and then click [Run as administrator]
 [Server Properties].
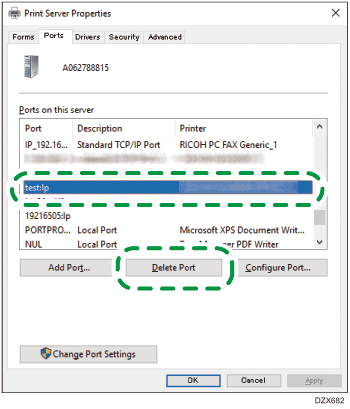
![]() Select a port to delete on the [Ports] tab, and then click [Delete Port]
Select a port to delete on the [Ports] tab, and then click [Delete Port]  [OK].
[OK].

![]() Click [Close].
Click [Close].
